The Art of Milk Frothing: Bringing Café Quality to Your Home
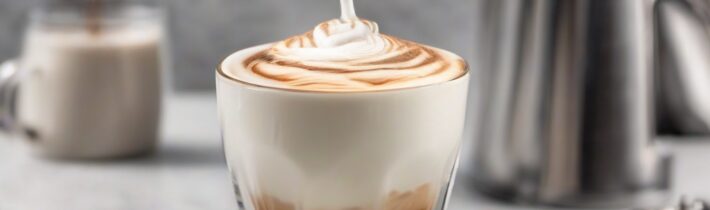
There’s something magical about starting your day with a perfectly crafted latte or cappuccino. The rich espresso, the velvety milk foam, and that artful design on top – it’s a small luxury that can brighten even the gloomiest morning. But what if you could recreate that café experience right in your own kitchen? With a little practice and the right techniques, you can become your very own at-home barista, mastering the art of milk frothing and elevating your coffee routine.
In this guide, we’ll explore the world of milk frothing, sharing tips and tricks to help you achieve that coveted microfoam and create beautiful latte art. Whether you’re a coffee enthusiast looking to up your game or simply someone who wants to add a touch of indulgence to their daily routine, these techniques will help you craft the perfect frothy milk for your favorite coffee drinks.
Understanding the Basics of Milk Frothing
Before we dive into the techniques, it’s important to understand what happens when we froth milk. Frothing is the process of introducing air into milk, creating tiny bubbles that give it a light, airy texture. The goal is to achieve a smooth, velvety microfoam – a harmonious blend of milk and fine bubbles that’s ideal for latte art and enhances the overall coffee-drinking experience.
The key to successful milk frothing lies in finding the right balance between temperature and aeration. Too much heat can scald the milk and destroy its natural sweetness, while too little air results in flat, lifeless foam. The perfect froth is all about finesse and attention to detail.
Choosing the Right Milk for Frothing
Not all milks are created equal when it comes to frothing. While personal preference and dietary needs play a role in your choice, some types of milk naturally produce better results:
- Whole Milk: With its higher fat content, whole milk creates rich, creamy foam that holds its shape well.
- 2% Milk: A good middle ground, 2% milk froths easily and produces stable foam.
- Skim Milk: While it creates lots of foam, the bubbles tend to be larger and less stable.
- Non-Dairy Alternatives: Oat milk and soy milk are among the best plant-based options for frothing, though results can vary between brands.
Experiment with different types to find what works best for you and your taste preferences. Remember, fresher milk tends to froth better, so check those expiration dates!
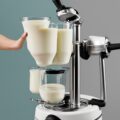
Essential Tools for Milk Frothing at Home
You don’t need a professional-grade espresso machine to create beautiful frothy milk at home. Here are some tools that can help you achieve great results:
- Steam Wand: If you have an espresso machine with a steam wand, this is the most versatile tool for frothing.
- Electric Milk Frother: These handheld devices are affordable and easy to use, great for beginners.
- French Press: Yes, your French press can double as a milk frother! It’s a budget-friendly option that works surprisingly well.
- Frothing Pitcher: A stainless steel pitcher with a spout is ideal for controlling your pour and creating latte art.
- Thermometer: While not essential, a thermometer can help you achieve the perfect milk temperature consistently.
Choose the tool that best fits your budget and kitchen space. Remember, it’s not about having the fanciest equipment – it’s about mastering the technique with whatever you have on hand.
Step-by-Step Guide to Perfect Milk Frothing
Now that we’ve covered the basics, let’s walk through the process of frothing milk to perfection:
- Start with cold milk: Cold milk froths better and gives you more time to work before it reaches the ideal temperature.
- Fill your pitcher: Only fill it about 1/3 full, as the milk will expand significantly when frothed.
- Position the steam wand or frother: Place it just below the surface of the milk, slightly off-center.
- Begin frothing: Start the steam or turn on your frother. You should hear a gentle hissing sound.
- Create a vortex: Tilt the pitcher slightly to create a spinning motion in the milk. This helps distribute the heat evenly and create uniform bubbles.
- Submerge the wand: Once you’ve incorporated enough air (usually after 5-10 seconds), lower the wand slightly to continue heating the milk without adding more air.
- Monitor the temperature: The ideal temperature is between 140-150°F (60-65°C). If you don’t have a thermometer, stop when the pitcher feels hot to touch but not burning.
- Tap and swirl: Give the pitcher a few taps on the counter to break up any large bubbles, then swirl it gently to create a glossy finish.
- Pour and enjoy: Immediately pour your beautifully frothed milk into your coffee and marvel at your barista skills!
Remember, practice makes perfect. Don’t get discouraged if your first attempts aren’t café-worthy – keep at it, and you’ll soon be creating Instagram-worthy latte art in your own kitchen.
Troubleshooting Common Milk Frothing Issues
Even experienced baristas encounter challenges when frothing milk. Here are some common issues and how to address them:
- Milk too foamy or bubbly: You’ve likely incorporated too much air. Try submerging the wand or frother deeper into the milk earlier in the process.
- Milk not foamy enough: Keep the wand closer to the surface for longer to introduce more air.
- Milk tastes burnt: You’ve probably overheated the milk. Use a thermometer or stop heating sooner.
- Inconsistent results: Pay attention to your starting milk temperature and volume, and try to keep your technique consistent each time.
Remember, every type of milk and frothing tool behaves slightly differently. Don’t be afraid to experiment and adjust your technique as needed.
FAQ: Mastering Milk Frothing at Home
Q: Can I froth non-dairy milk?
A: Yes! While some non-dairy milks froth better than others, many plant-based options can create lovely foam. Oat milk and soy milk are particularly good choices for frothing.
Q: How can I create latte art with my frothed milk?
A: Latte art requires well-frothed milk with a smooth, paint-like consistency. Start by pouring your milk slowly into the center of your coffee, then move the pitcher closer to the surface and increase your pour speed to create designs.
Q: Why does my milk sometimes curdle when I froth it?
A: Curdling usually occurs when milk is heated too quickly or to too high a temperature. Try heating your milk more slowly and stopping at a lower temperature (around 140°F or 60°C).
Q: How long does it take to froth milk properly?
A: The entire process usually takes about 20-30 seconds, depending on your starting milk temperature and the power of your frothing tool.
Q: Can I re-froth milk if it doesn’t turn out right the first time?
A: It’s best to start with fresh, cold milk each time you froth. Re-frothing can lead to overheated milk and poor texture.
Mastering the art of milk frothing is a journey, one that combines science, skill, and a touch of creativity. As you practice these techniques, you’ll not only improve your coffee-making abilities but also cultivate a deeper appreciation for the craft of coffee. Each perfectly frothed cup becomes a small act of self-care, a moment of indulgence in your day.
Remember, the goal isn’t just to recreate café-quality drinks at home – it’s to create a ritual that brings you joy and satisfaction. Whether you’re making a latte for yourself on a quiet morning or sharing cappuccinos with friends, the process of crafting these drinks can be just as rewarding as drinking them.
So go ahead, embrace your inner barista. Experiment with different milks, perfect your technique, and most importantly, have fun with it. Before long, you’ll be creating coffee shop worthy drinks that not only taste amazing but also fill your home with the warm, inviting aroma of freshly brewed coffee and perfectly frothed milk. Here’s to many delicious, frothy adventures ahead!