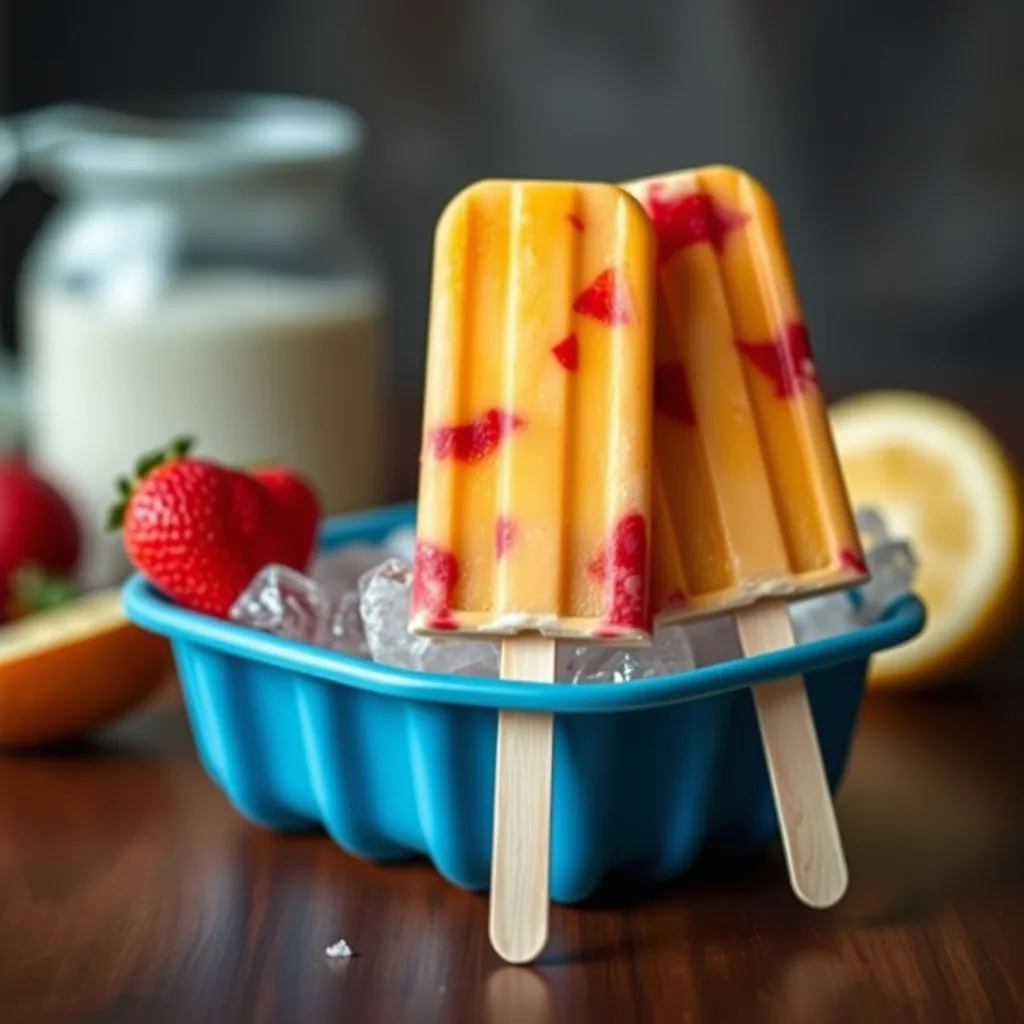
Starting the day with a handheld frozen treat may sound like a novelty, but breakfast popsicles have earned a spot on the kitchen counter for good reason. They combine the convenience of a grab‑and‑go snack with the nutritional profile of a balanced morning meal. By blending fruit, protein, healthy fats, and fiber into a single mold, you create a portable breakfast that can be eaten on the commute, at the desk, or while chasing toddlers around the house. This article walks through the science, the ingredient strategy, and the practical steps to make breakfast popsicles a reliable part of your routine.
Why Breakfast Popsicles?
Traditional breakfasts often require a plate, utensils, and a few minutes of seated time. Popsicles remove those barriers. The frozen format locks in flavor and nutrients without the need for preservatives. Because the mixture is blended before freezing, the texture stays smooth and the ingredients stay evenly distributed. For busy professionals, students, or parents, the ability to prepare a batch on Sunday and pull a pop out each morning saves precious minutes and reduces decision fatigue.
Nutritional Benefits
When built thoughtfully, a breakfast popsicle delivers macronutrients and micronutrients comparable to a bowl of oatmeal or a smoothie. A typical recipe includes a protein source such as Greek yogurt, silken tofu, or a plant‑based protein powder. Healthy fats come from nut butter, chia seeds, or avocado. Fiber is supplied by berries, oats, or ground flax. The fruit component adds vitamins C and A, potassium, and antioxidants. Because the ingredients are whole foods, the glycemic impact is lower than many commercial breakfast bars.
Choosing Base Ingredients
The base determines texture and nutritional density. Dairy or plant‑based yogurt creates creaminess and supplies probiotics. Silken tofu offers a neutral canvas and a complete protein profile. Coconut milk or almond milk adds richness without dairy. For a lighter option, blend frozen banana with a splash of liquid. Aim for roughly one cup of base per six popsicle molds; this yields a satisfying portion without excess calories.
Flavor Combos That Work
- Berry‑Banana‑Almond: mixed berries, ripe banana, almond butter, Greek yogurt, splash of almond milk.
- Green Power: spinach, mango, chia seeds, coconut milk, vanilla protein powder.
- Chocolate‑Peanut: cocoa powder, peanut butter, banana, oat milk, whey or pea protein.
- Tropical Sunrise: pineapple, mango, coconut yogurt, lime zest, hemp seeds.
Each combination balances sweet, tart, and creamy notes while keeping added sugars minimal. Taste the blend before pouring into molds; adjust with a squeeze of lemon or a pinch of salt to brighten flavors.
Meal Prep and Storage Tips
Prepare a double batch on a weekend. Pour the mixture into silicone molds, insert sticks, and freeze for at least four hours. Once solid, pop the popsicles out and transfer them to a zip‑top bag or airtight container. They keep well for up to three weeks. Label the bag with the flavor and date. For a quick grab, keep a small stash in the freezer door where temperature fluctuations are minimal.
Kid Friendly Tips
Children love the novelty of a frozen treat at breakfast. Use fun shaped molds such as stars or animals. Involve kids in choosing fruit and stirring the blend; ownership increases willingness to eat. Reduce added sweeteners by relying on ripe fruit. If a child is sensitive to texture, blend the mixture longer for a smoother result. Offer a side of whole‑grain toast or a handful of nuts for extra chewing practice.
Customizing for Dietary Needs
Gluten‑free: all listed ingredients are naturally gluten free; just verify that oats are certified. Vegan: swap dairy yogurt for coconut or soy yogurt and use plant protein. Low‑FODMAP: choose lactose‑free yogurt, limit high‑fructose fruits like mango, and use maple syrup sparingly. Keto: increase fat with avocado or MCT oil, reduce fruit to a few berries, and use a low‑carb protein powder. The modular nature of the recipe makes it easy to tailor each batch.
Mastering Layered and Swirled Popsicles for Visual Appeal and Flavor Complexity
Creating a visual gradient inside a popsicle starts with planning the order of pours. Begin with the heaviest mixture, usually a yogurt or nut‑butter base, and let it set for ten minutes before adding a lighter fruit puree. The brief pause prevents the layers from bleeding into each other while still allowing a gentle diffusion at the interface. For a true swirl, pour two contrasting batters simultaneously into the mold and drag a thin skewer in a figure‑eight motion; the key is to stop before the mixture fully homogenizes. Edge cases include high‑water‑content fruits such as watermelon, which can create icy pockets if not thickened with a pinch of chia or a splash of coconut cream. When using multiple colors, keep the total volume per mold consistent so the stick stays centered. A practical tip is to chill the molds in the freezer for five minutes before the first pour; the cold surface accelerates the initial set and sharpens the border between layers.
Flavor pairing follows the same logic as a composed plate. Pair a tart berry layer with a sweet banana‑almond layer to give the palate a push‑pull sensation. Add a thin ribbon of date‑caramel or a dusting of cacao nibs between layers for texture contrast. If you want a hidden surprise, embed a whole frozen blueberry or a dollop of nut butter in the center before the final pour; it will stay intact until the eater reaches the middle. For large batches, use a squeeze bottle for each batter to control flow and reduce mess. Clean the bottle tips between colors to avoid cross‑contamination. Finally, label each mold with a small piece of masking tape noting the layer order; this helps when you replicate a successful design weeks later.
Equipment Deep‑Dive: Molds, Blenders, and Freezer Settings That Make or Break Texture
Silicone molds with a slight taper release popsicles cleanly and reduce the risk of cracking. Rigid plastic molds work well for uniform shapes but often require a warm water dip to loosen the stick. Stainless‑steel molds conduct cold faster, yielding a finer ice crystal structure, which translates to a smoother mouthfeel. When choosing a blender, a high‑speed motor (at least 1200 watts) pulverizes fibrous greens and seeds without leaving gritty residue. A tamper tool is invaluable for thick blends that stall at the blade. Freezer temperature matters more than most realize; set the unit to minus 18 Celsius or colder. A faster freeze creates smaller crystals, while a slower freeze encourages large, crunchy shards. If your freezer has a quick‑freeze compartment, use it for the first hour then transfer to the main cavity. Avoid opening the door frequently during the first two hours; temperature spikes cause partial melt‑refreeze cycles that degrade texture. For consistent results, place molds on a flat metal tray rather than directly on the wire rack; the tray distributes cold evenly and prevents warping of silicone.
Accessories that improve workflow include a silicone funnel for mess‑free pouring, a set of reusable stainless‑steel sticks that eliminate single‑use wood, and a digital probe thermometer to verify the core temperature reaches minus 12 Celsius before unmolding. If you plan to sell or gift popsicles, invest in a blast chiller; it drops the core temperature in minutes and locks in color vibrancy. Maintenance tip: wash molds immediately after use with warm soapy water, then rinse in a vinegar solution to remove any residual fats that could cause off‑flavors in the next batch.
Budget‑Friendly Batch Scaling and Cost‑Per‑Serving Analysis
Start by listing every ingredient with its purchase price per unit weight. Use a spreadsheet to calculate the cost of a single batch based on the exact gram measurements from your recipe. Divide the total batch cost by the number of popsicles to obtain a per‑serving figure. For example, a batch using 500 g Greek yogurt at $0.004 per gram, 300 g frozen berries at $0.006 per gram, 100 g almond butter at $0.012 per gram, and 50 g chia seeds at $0.008 per gram yields a raw ingredient cost of roughly $5.80 for twelve popsicles, or $0.48 each. Bulk buying reduces the per‑gram price dramatically; a 5 kg tub of yogurt can cut the yogurt cost by 30 percent. Consider seasonal produce: buying berries in peak summer and freezing them yourself slashes the fruit cost by up to 50 percent compared with off‑season imports. When scaling up for a family of four eating one popsicle daily, a double batch every two weeks keeps the freezer stocked without waste. Track waste by noting any popsicles that develop freezer burn; adjust the batch size downward if loss exceeds five percent. A simple rule of thumb: keep the total batch weight under the freezer’s usable capacity (usually 70 percent of rated volume) to maintain airflow and consistent freezing.
Labor cost is often overlooked. If you value your prep time at $15 per hour and a batch takes 20 minutes, add $5 to the batch cost. This brings the per‑serving cost to $0.90, still well below most commercial breakfast bars. For meal‑prep services, factor in packaging (compostable sleeves at $0.07 each) and labeling. A break‑even analysis shows that selling at $2.50 per popsicle yields a comfortable margin while remaining competitive with café smoothies. Always round up to the nearest cent for pricing simplicity.
Seasonal Produce Strategies: Adapting Recipes Throughout the Year
Spring brings tender strawberries, rhubarb, and early peas. Blend strawberries with a touch of rhubarb compote for a bright pink layer; the natural pectin in rhubarb helps the mixture set faster. Summer offers stone fruit, melons, and abundant berries. Peach‑basil or watermelon‑mint combos keep the flavor light and hydrating. Autumn introduces apples, pears, and pumpkin. A spiced pumpkin‑maple base paired with a cinnamon‑apple swirl mimics a seasonal latte without the caffeine. Winter citrus such as blood orange, grapefruit, and kumquat adds acidity that cuts through richer bases like coconut cream or cashew yogurt. When a fruit is out of season, substitute frozen equivalents; they are harvested at peak ripeness and retain nutrient density. Adjust sweetener levels because off‑season fruit can be less sweet; a dash of monk fruit or a drizzle of raw honey balances the profile without spiking glycemic load. For herbs, grow a small indoor pot of mint, basil, or thyme; fresh leaves add aromatic complexity that dried herbs cannot match. Preserve surplus seasonal fruit by pureeing and freezing in ice‑cube trays; these cubes become ready‑to‑blend building blocks for future batches.
Edge case: high‑pectin fruits like quince or cranberries can cause the mixture to gel prematurely, leading to a rubbery texture. Counteract by adding a splash of lemon juice or a pinch of baking soda to lower pH and slow gel formation. Another edge case: tropical fruits such as mango or pineapple contain enzymes (bromelain, papain) that break down protein in yogurt, thinning the blend. Heat‑treat the fruit puree briefly (70 °C for 30 seconds) to deactivate enzymes before mixing. Keep a seasonal calendar on the fridge door; it reminds you which produce to buy in bulk and when to transition flavor themes.
Advanced Nutrition Tuning: Macro Targets, Micronutrient Boosts, and Functional Add‑Ins
Define your macro goal before blending. For a 30 g protein target per popsicle, combine 120 g Greek yogurt (10 g protein), 30 g whey isolate (24 g protein), and 15 g silken tofu (2 g protein) then divide by twelve molds. Adjust carbohydrate load by selecting low‑glycemic fruit such as berries (6 g net carbs per 100 g) versus banana (20 g net carbs per 100 g). Fat can be dialed with nut butter (8 g fat per 15 g) or MCT oil (14 g fat per 15 ml). Track micronutrients by adding a tablespoon of ground flax (omega‑3), a teaspoon of spirulina (iron, B12), or a pinch of kelp powder (iodine). Functional add‑ins like ashwagandha (300 mg), lion’s mane (500 mg), or collagen peptides (5 g) dissolve well in the cold blend and survive freezing. Be mindful of flavor impact; adaptogens can be earthy, so pair with strong cacao or citrus. For electrolyte support, stir in a pinch of sea salt and a splash of coconut water before freezing. If you follow a ketogenic protocol, keep net carbs under 3 g per popsicle by using avocado as the primary fruit (2 g net carbs per 100 g) and sweetening with erythritol. For a high‑fiber goal, incorporate 10 g oat bran or psyllium husk per batch; the soluble fiber thickens the mixture, so increase liquid by 10 percent to maintain pourability.
Testing is essential. Use a nutrition calculator app to input each ingredient weight and verify the per‑serving macros. Run a small pilot batch of three popsicles, then measure weight loss after freezing (typically 2‑3 percent due to sublimation). Adjust the recipe accordingly. Document each iteration in a lab notebook; this creates a reproducible library of formulas tailored to specific performance or health objectives.
FAQ
- Can I make breakfast popsicles without a mold?
- Yes. Use paper cups, ice cube trays, or even a muffin tin lined with parchment. Insert a wooden stick or spoon after the mixture begins to set, about thirty minutes into freezing.
- How much protein should each popsicle contain?
- Aim for ten to fifteen grams per serving. Adjust by adding more Greek yogurt, protein powder, or silken tofu to the blend.
- Do breakfast popsicles melt quickly in a lunch bag?
- They stay solid for up to two hours in an insulated bag with an ice pack. For longer commutes, pack them in a small cooler sleeve.
- Can I use fresh fruit instead of frozen?
- Fresh fruit works, but frozen fruit creates a thicker, creamier texture and reduces the need for extra ice. If using fresh, add a handful of ice cubes to the blender.
- Are breakfast popsicles suitable for weight loss?
- When portioned correctly and built with whole foods, they can fit into a calorie‑controlled plan. Track the total calories of your batch and divide by the number of popsicles to know the per‑serving value.
Related posts:
 Freeze Frame: The Food Storage Mistakes That Are Costing You Money
 Healthy Frozen Banana Desserts
 High Protein Breakfast Ideas for Busy Mornings
 How to Freeze Pesto: Preserving the Flavors of Summer
 Are We Really Too Busy for Breakfast?
 Poolside Popsicle Cocktails: Ideal Way to End Summer
 High-Protein Foods That Pack a Serious Nutritional Punch
 Is Freezer-Burned Food Safe?