
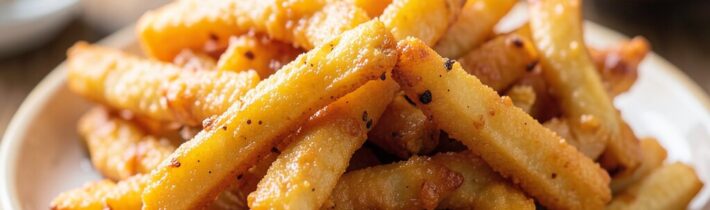
There’s something undeniably satisfying about a plate of hot, crispy fries. That perfect crunch followed by a soft, fluffy interior has made fries a beloved side dish across cultures and generations. But what if you could capture that same satisfying texture while adding nutritional value and a depth of flavor that traditional potatoes simply can’t match? Enter butternut squash fries—a revelation that might just make you forget about the potato version altogether.
Butternut squash brings natural sweetness, a gorgeous orange hue, and a nutritional profile that puts regular fries to shame. When prepared correctly, these fries develop a caramelized exterior with a tender, creamy center that delivers complex flavor in every bite. The secret lies in understanding how this winter squash behaves differently than potatoes and adjusting your technique accordingly.
Why Butternut Squash Makes Exceptional Fries
Butternut squash offers several advantages over traditional potatoes when it comes to making fries. First, its natural sugars caramelize during roasting, creating depth of flavor that doesn’t require heavy seasoning or excessive salt. This sweetness balances beautifully with savory herbs and spices, making each bite more interesting than a standard potato fry.
From a nutritional standpoint, butternut squash delivers impressive benefits. One cup of cubed butternut squash contains over 400% of your daily vitamin A needs, thanks to its high beta-carotene content. It also provides significant vitamin C, potassium, and fiber while containing fewer calories and carbohydrates than white potatoes. The orange flesh indicates the presence of antioxidants that support eye health, immune function, and skin vitality.
The texture of properly prepared butternut squash fries strikes a balance between crispy and creamy. Unlike some alternative fry options that turn mushy or require complicated preparation methods, butternut squash holds its shape well during roasting and develops a satisfying exterior crunch. The interior becomes tender without dissolving, giving you that appealing contrast that makes fries so addictive.
Selecting the Perfect Squash
Choosing the right butternut squash sets the foundation for successful fries. Look for squash that feels heavy for its size, indicating high moisture content and dense flesh. The skin should be firm and free from soft spots, bruises, or blemishes. A tan, matte exterior suggests the squash has fully matured and developed its characteristic sweetness.
The shape of the squash matters for fry-making. Butternut squash consists of two parts: a bulbous bottom that contains the seed cavity and a longer, thinner neck of solid flesh. For uniform fries, choose squash with a substantial neck section, as this area provides the most consistent shapes and sizes. The bulb portion works well too, though you’ll need to cut around the seed cavity.
Size isn’t necessarily better when selecting squash for fries. Medium-sized squash often have more concentrated flavor and better texture than their oversized counterparts. Extremely large squash can have watery flesh that doesn’t crisp as effectively. If you’re new to working with butternut squash, start with a 2-3 pound specimen, which yields plenty of fries while remaining manageable to peel and cut.
Essential Preparation Techniques
Proper preparation transforms butternut squash from a humble winter vegetable into restaurant-quality fries. Begin by peeling the squash completely, removing both the outer skin and the thin white layer underneath. This inner layer can become tough during roasting, so take the time to peel thoroughly until you reach the vibrant orange flesh.
Cutting uniform pieces is crucial for even cooking. After peeling, slice the squash in half where the neck meets the bulb. Cut the bulb portion in half and scoop out the seeds and stringy bits with a spoon—these can be saved for roasting later, similar to pumpkin seeds. Then cut both the neck and bulb portions into planks about 1/4 to 1/2 inch thick, and slice those planks into fry-shaped batons.
Consistency in size ensures all your fries finish cooking simultaneously. Aim for pieces that are roughly the same thickness throughout their length. Thinner fries will crisp more but cook faster, while thicker fries have more creamy interior but require longer roasting. A 1/3-inch thickness provides an excellent balance for most preferences.
The Drying Method That Guarantees Crispiness
The single most important step for achieving crispy butternut squash fries is removing excess moisture. Unlike potatoes, which can be soaked to remove starch, butternut squash benefits from thorough drying before cooking. After cutting your fries, spread them on clean kitchen towels or paper towels and pat them completely dry.
For even better results, let the cut fries air-dry for 15-20 minutes after patting them dry. This resting period allows surface moisture to evaporate, which directly translates to better browning and crisping in the oven. You can also toss the fries with a small amount of cornstarch or arrowroot powder after drying—this creates an ultra-crispy exterior by absorbing any remaining surface moisture.
The drying process might seem like an unnecessary extra step, but it makes a dramatic difference in the final texture. Wet squash steams in the oven instead of roasting, resulting in soggy, limp fries. Taking the time to ensure your fries are thoroughly dry before adding oil and seasonings is what separates mediocre results from truly exceptional ones.
Seasoning Combinations That Elevate the Flavor
Butternut squash’s natural sweetness provides an excellent canvas for a wide range of seasonings. A simple combination of sea salt, black pepper, and garlic powder lets the squash’s inherent flavor shine while adding savory depth. For those who enjoy heat, smoked paprika and a pinch of cayenne create a smoky-spicy profile that complements the sweetness beautifully.
Herb-focused seasonings work exceptionally well with butternut squash fries. Fresh or dried rosemary, thyme, or sage add aromatic complexity that elevates the fries beyond typical side dish status. Try tossing your fries with minced fresh rosemary, coarse sea salt, and a light grating of Parmesan cheese during the last few minutes of roasting for a sophisticated variation.
For a sweet-and-savory approach, consider cinnamon, nutmeg, and a drizzle of maple syrup applied after roasting. This combination transforms the fries into something reminiscent of sweet potato fries but with butternut squash’s unique flavor profile. A light sprinkle of brown sugar before roasting can also enhance caramelization for those who prefer a sweeter result.
Don’t overlook the power of finishing touches. A squeeze of fresh lime juice brightens the flavors, while a dusting of nutritional yeast adds umami depth. Fresh herbs like cilantro or parsley sprinkled on just before serving provide color and a fresh element that balances the roasted richness of the fries.
Perfecting the Roasting Process
Roasting butternut squash fries requires attention to temperature and timing. Preheat your oven to 425°F (220°C)—this high temperature is essential for developing a crispy exterior before the interior becomes overcooked. A hot oven from the start ensures immediate browning rather than steaming.
Use a large rimmed baking sheet and arrange the fries in a single layer with space between each piece. Crowding the pan traps moisture and prevents proper browning. If necessary, use two baking sheets rather than piling fries on top of each other. The fries should have enough room that they’re not touching, allowing hot air to circulate around each piece.
Flip the fries halfway through roasting to ensure even browning on all sides. Total cooking time typically ranges from 25-35 minutes, depending on the thickness of your fries and your desired level of crispness. Start checking at the 20-minute mark and remove them when they’re golden brown with slightly darker caramelized edges. Remember that they’ll continue crisping slightly as they cool.
For the most even cooking, consider using the convection setting if your oven has one. The circulating fan promotes more uniform browning and can reduce cooking time by several minutes. If using convection, reduce the temperature to 400°F (205°C) to prevent over-browning before the fries are fully cooked.
Air Fryer Method for Faster Results
An air fryer offers a faster, more energy-efficient way to achieve crispy butternut squash fries. The rapid air circulation mimics deep frying without the oil, producing excellent results in less time. Preheat your air fryer to 400°F (200°C) for about 3 minutes before adding the prepared fries.
Arrange the seasoned fries in the air fryer basket in a single layer, avoiding overcrowding. You’ll likely need to work in batches for the best results. Cook for 12-15 minutes, shaking the basket every 4-5 minutes to ensure even cooking. The fries are done when they’re golden brown and crispy on the outside with a tender interior.
The air fryer method requires slightly less oil than oven roasting—about one tablespoon per medium squash is usually sufficient. The reduced oil doesn’t compromise the crispy texture, making this an excellent option for those watching their fat intake. The faster cooking time also helps preserve more of the squash’s heat-sensitive nutrients, including vitamin C.
Serving Suggestions and Pairing Ideas
Butternut squash fries shine as a standalone side dish, but thoughtful pairings can transform them into a memorable meal component. They complement roasted proteins beautifully—try serving them alongside roasted chicken, baked salmon, or grilled pork chops. Their natural sweetness provides a lovely contrast to savory main dishes.
Dipping sauces open up another dimension of flavor possibilities. A garlic aioli or lemon-herb mayonnaise offers richness that balances the fries’ sweetness. For something lighter, try a Greek yogurt-based dip with lemon zest and fresh dill. Maple mustard dip—made by combining Dijon mustard with a touch of maple syrup—echoes the squash’s sweetness while adding tang.
Consider incorporating butternut squash fries into larger dishes. Top them with crumbled cheese, chopped herbs, and a drizzle of balsamic reduction for a loaded fry situation. Use them as a base for poutine-style dishes with vegetarian gravy. Or serve them alongside burgers as a nutritious alternative to traditional potato fries—their sturdiness holds up well for dipping and stacking.
For entertaining, arrange a platter of butternut squash fries with an assortment of dipping sauces and garnishes. This presentation allows guests to customize their experience and makes the fries feel special rather than routine. The vibrant orange color adds visual appeal to any spread, making them as attractive as they are delicious.
Understanding the Science Behind the Crisp
The magic of crispy butternut squash fries comes down to understanding a few key chemical processes that occur during cooking. When squash hits a hot oven, two critical reactions begin: the Maillard reaction and caramelization. The Maillard reaction occurs when proteins and sugars interact at temperatures above 300°F, creating the browned, flavorful compounds that give roasted foods their characteristic taste. Caramelization happens when natural sugars break down at around 320°F, contributing deeper sweetness and color.
Butternut squash presents a unique challenge because its moisture content hovers around 87%, compared to potatoes at roughly 79%. This extra moisture means more evaporation must occur before browning can happen. Surface moisture creates a barrier between the hot air and the squash flesh, keeping the temperature at the surface locked at 212°F—water’s boiling point—until that moisture evaporates. This explains why thorough drying is non-negotiable for achieving crispiness.
The starch content also plays a role. Potatoes contain significantly more starch than butternut squash, which contributes to their characteristic fluffy interior. Butternut squash has less starch but more pectin, a structural carbohydrate that helps the flesh maintain its shape during cooking. This pectin content is why properly prepared butternut squash fries develop a creamy rather than fluffy interior, and why they’re less likely to fall apart during the flipping process.
Oil selection matters more than many home cooks realize. Oils with higher smoke points—like avocado oil (520°F), refined coconut oil (450°F), or light olive oil (465°F)—allow the squash surface to reach higher temperatures before the oil begins breaking down. Extra virgin olive oil, while flavorful, has a lower smoke point around 375°F, which can limit browning potential and introduce off-flavors if the oven runs hot. For the best results, choose an oil that can handle the 425°F roasting temperature without degrading.
Troubleshooting Common Problems
Even experienced cooks encounter challenges when making butternut squash fries. One frequent issue is uneven browning, where some fries emerge perfectly golden while others remain pale. This typically stems from inconsistent fry thickness or uneven oven heat. To address thickness variations, use a ruler when cutting until you develop an eye for uniformity. For oven hot spots, rotate the baking sheet 180 degrees halfway through cooking, and consider moving it to a different rack position.
Burnt edges with undercooked centers indicate your oven temperature might be running higher than displayed. Oven thermostats can be off by 25°F or more, so investing in an inexpensive oven thermometer helps identify the actual temperature. If your oven runs hot, reduce the temperature by 15-25°F and extend the cooking time slightly. Thicker fries are also more prone to this problem, so try cutting them a bit thinner next time.
Fries that stick to the baking sheet present another frustration. This usually happens when the squash releases moisture during cooking, creating a glue-like bond with the pan. Lining your baking sheet with parchment paper or a silicone mat prevents sticking entirely. If you prefer direct contact with the pan for better browning, ensure the pan is adequately preheated and the fries are well-coated with oil on all surfaces.
Sometimes the seasonings fall off during or after cooking, leaving bland fries. This indicates insufficient oil coverage—seasonings need fat to adhere to the squash surface. Try tossing the dried fries with oil first until evenly coated, then adding seasonings and tossing again. Alternatively, mix your seasonings with the oil before tossing with the fries, creating a seasoned oil that distributes flavors more evenly.
Fries that taste bitter or have an off-putting aftertaste may have been over-roasted. The sugars in butternut squash can burn quickly once they reach a certain point, transitioning from caramelized to acrid. Watch the fries carefully during the final minutes of roasting, and remove them when they’re golden brown with just a hint of darker caramelization on the edges. The fries will continue cooking slightly after removal from the oven, so err on the side of slightly underdone if you’re unsure.
Alternative Cooking Methods Beyond the Oven
While oven roasting and air frying are the most common methods, several alternative techniques can produce excellent butternut squash fries with different texture profiles. Deep frying creates the crispiest exterior possible, though it requires more oil and attention to safety. Heat 2-3 inches of oil in a heavy-bottomed pot to 365°F, then fry small batches of prepared squash for 3-4 minutes until golden. The high heat rapidly evaporates surface moisture, creating an intensely crispy crust. Drain on wire racks rather than paper towels to maintain crispness.
Pan-frying offers a middle ground between oven roasting and deep frying. Heat a thin layer of oil in a large skillet over medium-high heat, then add the fries in a single layer. Cook for 3-4 minutes per side, adjusting heat as needed to prevent burning. This method allows for more precise control over individual fries, making it easier to achieve consistent browning. The direct contact with hot metal creates excellent caramelization on the flat surfaces of each fry.
For those with outdoor grill access, grilled butternut squash fries develop a unique smoky character. Slice the squash into planks rather than batons to prevent pieces from falling through the grates. Brush with oil and season as usual, then grill over medium-high heat for 3-4 minutes per side. The high, direct heat creates beautiful char marks while the interior steams gently. This method works particularly well with smoky seasonings like paprika or chipotle powder.
A hybrid approach combines initial oven roasting with a final broiler blast. Roast the fries using the standard method, then switch the oven to broil for the final 2-3 minutes. This intense top-down heat creates extra-crispy surfaces quickly. Watch carefully during broiling, as the transition from perfectly browned to burnt can happen in seconds. This technique works well for reheating previously cooked fries too, restoring much of their original crispness.
Seasonal Variations and Flavor Explorations
Butternut squash’s peak season runs from early fall through winter, making it a natural candidate for seasonal flavor profiles. Autumn-inspired variations might include warming spices like cinnamon, allspice, and a touch of ginger, finished with a drizzle of apple cider reduction. The natural sweetness of the squash pairs beautifully with these cozy spices, creating a side dish that feels appropriate for Thanksgiving or holiday gatherings.
Winter variations can incorporate more robust, hearty flavors. Try tossing the fries with fresh sage leaves during the last 10 minutes of roasting—the sage becomes crispy and fragrant, complementing the squash’s earthiness. A finishing sprinkle of pomegranate molasses adds tangy brightness that cuts through the richness. Crumbled bacon or pancetta transforms the fries into a more substantial side suitable for cold-weather comfort food menus.
Spring and summer call for lighter, brighter approaches. A citrus-herb seasoning blend featuring lemon zest, fresh thyme, and a light hand with sea salt lets the squash’s delicacy shine. After roasting, toss the fries with fresh mint, crumbled feta, and a squeeze of lime for a Mediterranean-inspired variation. The cooling herbs and tangy cheese provide refreshing contrast to the sweet, roasted squash.
Global flavor profiles expand the possibilities further. Indian-spiced fries might feature garam masala, turmeric, and a finishing sprinkle of chaat masala with fresh cilantro. Mexican-inspired variations could include cumin, chili powder, and a squeeze of lime with crumbled cotija cheese. Japanese-influenced fries might be seasoned with togarashi, sesame oil, and a drizzle of miso-mayo for dipping. The squash’s neutral sweetness adapts readily to diverse spice traditions.
Fermented and umami-rich elements add sophisticated depth. A light dusting of nutritional yeast before roasting contributes savory complexity. Finishing with a splash of balsamic vinegar or a sprinkle of sumac provides acidity that balances the sweetness. For a truly umami-forward approach, try incorporating white miso paste into your oil mixture—the fermented soybean paste creates a savory crust that transforms the fries into something entirely unexpected.
Nutritional Comparisons and Dietary Considerations
Understanding the nutritional profile of butternut squash fries helps contextualize them within various dietary frameworks. A one-cup serving of roasted butternut squash contains approximately 82 calories, 22 grams of carbohydrates, and less than 1 gram of fat when prepared with minimal oil. The same volume of traditional potato fries delivers around 150-200 calories and 15-20 grams of fat, depending on preparation method. This caloric difference makes butternut squash fries appealing for those managing energy intake.
The glycemic impact differs significantly between the two. Butternut squash has a glycemic index of approximately 51, placing it in the low-GI category. Potatoes vary more widely, with russet potatoes scoring around 78 (high GI) and sweet potatoes around 63 (medium GI). For individuals monitoring blood sugar, butternut squash fries offer a gentler impact, especially when prepared with adequate fat and fiber, which further slows glucose absorption.
Those following specific dietary protocols will find butternut squash fries adaptable. They’re naturally gluten-free, dairy-free when prepared without butter or cheese toppings, and suitable for vegetarian and vegan diets. For paleo and Whole30 practitioners, these fries fit comfortably within guidelines when prepared with compliant oils. The lower carbohydrate content may make them appropriate for some low-carb approaches, though individuals on ketogenic diets would need to account for the carbs within their daily limits.
The vitamin and mineral content offers compelling advantages. Beyond the impressive vitamin A content mentioned earlier, butternut squash provides meaningful amounts of vitamin C (about 35% of daily needs per cup), potassium (nearly 600mg), and manganese. The orange flesh indicates significant antioxidant content, primarily in the form of beta-carotene, which the body converts to vitamin A. These antioxidants help combat oxidative stress and support overall cellular health.
Fiber content contributes to satiety and digestive health. A one-cup serving provides about 7 grams of dietary fiber, roughly a quarter of daily recommended intake. This fiber slows digestion, promotes steady blood sugar levels, and supports beneficial gut bacteria. Unlike refined carbohydrate sides, butternut squash fries contribute meaningfully to daily fiber goals while still delivering satisfying texture and flavor.
Storage, Meal Prep, and Leftover Strategies
Planning ahead streamlines the process of making butternut squash fries. Raw, peeled, and cut squash can be stored in an airtight container in the refrigerator for up to three days. To prevent oxidation and maintain moisture, toss the cut pieces with a small amount of oil before storing, or place a damp paper towel over them in the container. This advance prep makes weeknight cooking significantly faster.
For longer storage, uncut butternut squash keeps for a month or more in a cool, dry location. Avoid refrigerating whole squash, as temperatures below 50°F can cause chilling injury that affects texture and flavor. Once cut, raw squash pieces should be refrigerated and used within a week. The dense flesh holds up well to storage, making butternut squash an excellent choice for gradual use over multiple meals.
Cooked fries present more storage challenges. Refrigerated in an airtight container, they’ll keep for 3-4 days but will lose their initial crispness. For best results when reheating, avoid the microwave, which creates steam and makes the fries soggy. Instead, spread cold fries on a baking sheet and reheat in a 400°F oven for 8-10 minutes, or use an air fryer for 4-5 minutes. This restores much of the original texture, though they won’t quite match freshly-made fries.
Freezing cooked fries works reasonably well for longer storage. Arrange cooled fries in a single layer on a baking sheet and freeze until solid, then transfer to a freezer bag with as much air removed as possible. Frozen fries will keep for 2-3 months. Reheat directly from frozen in a 425°F oven for 12-15 minutes, flipping halfway through. The texture will be slightly softer than fresh, but the flavor remains intact.
Leftover fries need not be simply reheated. They can be repurposed into entirely new dishes. Chop them and add to breakfast hash with eggs. Toss them into a grain bowl with quinoa, greens, and tahini dressing. Use them as a topping for shepherd’s pie or pot pie in place of traditional mashed potatoes. Their sweetness and creamy texture make them versatile ingredients beyond their original form.
Frequently Asked Questions
Can I make butternut squash fries ahead of time?
Butternut squash fries are best served immediately after cooking when they’re at their crispiest. However, you can peel and cut the squash up to two days in advance—store the cut pieces in an airtight container in the refrigerator. If you need to reheat already-cooked fries, use a 400°F oven or air fryer for 5-8 minutes to restore some of the crispness. Microwaving will make them soggy, so avoid that method for reheating.
Why do my fries always turn out soggy?
Soggy fries usually result from excess moisture. Make sure you’re thoroughly drying the cut squash before adding oil and seasonings. Don’t skip the air-drying step after patting the fries dry. Additionally, avoid overcrowding the baking sheet, which causes steaming instead of roasting. Using too much oil can also prevent crisping—stick to about 1-2 tablespoons per medium squash.
Can I freeze butternut squash fries?
Raw butternut squash doesn’t freeze well for fry-making because ice crystals damage the cell structure, resulting in mushy texture when thawed. However, you can freeze fully cooked fries. Spread cooled, cooked fries on a baking sheet and freeze until solid, then transfer to a freezer bag. Reheat directly from frozen in a 425°F oven for 10-12 minutes. The texture won’t be quite as crispy as freshly made, but they’re still enjoyable.
What’s the difference between butternut squash fries and sweet potato fries?
Both offer nutritional advantages over regular potatoes, but they have distinct characteristics. Butternut squash fries are slightly sweeter with a more delicate, creamy interior. Sweet potato fries tend to be denser and starchier with a more pronounced earthy flavor. Butternut squash contains more vitamin A and fewer calories per serving, while sweet potatoes offer more fiber. Both are excellent alternatives to traditional fries, so the choice comes down to personal preference.
Do I need to peel butternut squash before making fries?
Yes, peeling is necessary for the best texture. The skin of butternut squash becomes tough and chewy during roasting, unlike some other squash varieties where the skin softens and becomes edible. Take the time to remove both the outer tan skin and the thin white layer beneath it. A sturdy vegetable peeler works well, though some cooks prefer using a sharp knife to remove the skin in strips.
Related posts:
 Butternut Squash: A Nutritional Powerhouse in Partnership with Ocean Spray
 Healthy Butternut Squash Recipes
 Make Foodkick’s Perfect Sweet Potato Fries This Thanksgiving—Here’s an Exclusive Recipe Video
 Butternut Squash Biscuits Recipe
 Butternut Squash Biscuits Recipe
 Your Guide to Perfect Fall Baked Sweet Potatoes Every Time
 Crispy Air Fryer Carrot Fries
 This Butternut Squash Risotto Is Creamy Comfort Food at Its Best