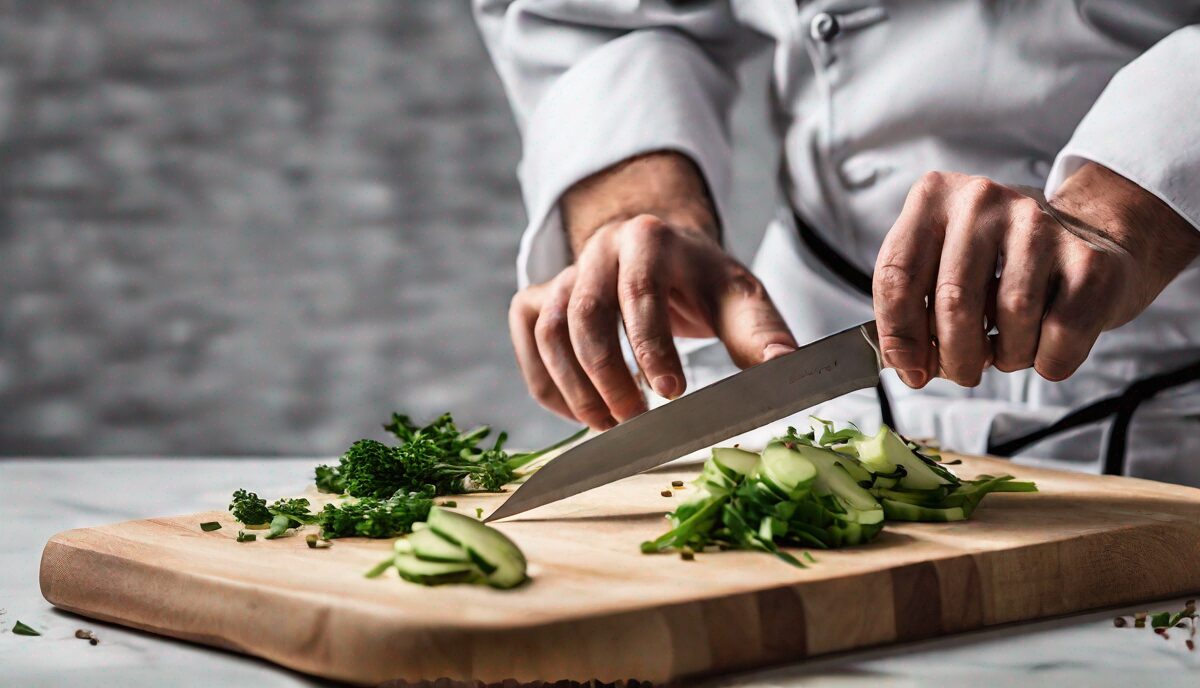
Whether you’re a budding home cook or an aspiring chef, mastering your knife skills is essential for efficiency and safety in the kitchen. In this comprehensive guide, we’ll share professional chef chopping tips that will help you slice, dice, and mince like a pro. From the basic ‘rock chop’ to the more advanced ‘julienne,’ these skills will elevate your culinary prowess and impress anyone who watches you work your magic with a blade.
Choosing the Right Knife
Before you start chopping, it’s crucial to select the right knife for the job. A chef’s knife, usually 8 to 10 inches long, is a versatile tool for most chopping tasks. Ensure your knife is sharp, as a dull blade can be dangerous and less effective.
Proper Grip and Stance
Your grip on the knife is just as important as the knife itself. Hold the handle with your dominant hand, with your thumb and forefinger gripping the blade’s base for control. Stand squarely in front of your cutting board with feet shoulder-width apart to ensure stability and precision.
Basic Chopping Techniques
The ‘rock chop’ is a fundamental technique where you keep the tip of the knife on the cutting board and rock the blade up and down. This technique is perfect for mincing herbs and chopping vegetables.
For slicing, use a smooth gliding motion, moving the blade forward and downward. Keep your fingers curled inward on the hand that’s holding the food to avoid cuts.
Advanced Cutting Methods
Once you’ve mastered the basics, try your hand at more intricate cuts like the ‘julienne’ or ‘brunoise.’ These cuts are not only visually appealing but also ensure even cooking.
Maintenance and Safety
A sharp knife is a safe knife. Regularly hone your blade with a steel rod and sharpen it when necessary. Always cut on a stable surface, and when not in use, store your knives properly to maintain their edge and prevent accidents.
The Anatomy of the Cutting Board: Surface Selection and Stability
Your cutting board is the foundation of your technique. Beyond just material, consider the surface density and size. A board that is too small forces you to move ingredients off the board constantly, breaking your rhythm and increasing the risk of accidental slips. Aim for at least 12 by 18 inches. If your board slides, it is a safety hazard; place a damp paper towel or a non-slip silicone mat underneath it to lock it in place. For professional longevity, end-grain wooden boards are superior because the wood fibers “heal” after each cut, whereas plastic boards develop deep grooves that harbor bacteria and dull blades faster. Avoid bamboo if possible, as its high silica content acts like sandpaper on your knife edge, necessitating more frequent sharpening.
Mastering the “Claw” Grip: The Secret to Speed and Safety
Many home cooks fear cutting themselves because they hold food improperly. The “claw” is your best defense. Tuck your fingertips inward, creating a C-shape with your knuckles. Your non-dominant hand rests on the ingredient, and you press the flat side of the knife blade against your knuckles. By keeping your fingertips safely tucked behind your knuckles, you can move the blade with confidence at higher speeds. As you cut, inch your fingers back toward your palm, ensuring the knife never rises above your knuckles. This technique allows you to use the blade as a guide, ensuring consistent thickness in every slice without looking at your fingers.
The Geometry of Prep: Understanding Uniformity for Even Cooking
Uniformity isn’t just for aesthetics; it is a fundamental principle of culinary physics. Pieces of vastly different sizes cook at different rates, meaning a pan of sautéed vegetables will have some pieces mushy and others raw. To achieve professional results, visualize the final dish. If you are making a soup, a rustic dice is fine. If you are stir-frying, uniform matchsticks ensure everything hits the perfect texture simultaneously. Practice squaring off your vegetables—trimming the rounded edges of a potato or carrot to create a stable rectangular block—before slicing. This removes the “wobble” that causes uneven cuts and ensures every subsequent slice is identical to the first.
Handling Challenging Ingredients: Onions, Peppers, and Tomatoes
Each ingredient presents a unique structural challenge. For onions, leave the root end intact to keep the layers together while you dice, which prevents the onion from sliding apart. For bell peppers, cut the top and bottom off, then cut down one side and open the pepper into a flat sheet; this makes julienning significantly easier than trying to slice a hollow, rolling cylinder. When cutting tomatoes, don’t press down; use a light, sawing motion to let the blade’s sharpness do the work. If your knife is dull, you will crush the tomato instead of slicing it, resulting in a mess of juice and pulp rather than clean, thin wedges.
The Art of Chiffonade and Herb Management
The chiffonade is a classic French technique for leafy greens and herbs like basil, spinach, or mint. Stack the leaves neatly on top of one another, then roll them tightly like a cigar. Using a sharp knife, make delicate, thin slices across the roll. If you use a dull blade or press too hard, you will bruise the herbs, leaving them dark and oxidized instead of bright green. For woody herbs like rosemary or thyme, strip the leaves from the stem first, gather them into a tight pile, and use the rock chop technique. Always ensure your herbs are completely dry before chopping; wet herbs will stick to your blade and create a gummy texture.
Knife Ergonomics: Preventing Fatigue During Long Prep Sessions
Professional kitchen work is physically demanding, and improper form leads to wrist strain. Avoid the “death grip” on your knife handle; your hand should be firm but relaxed, allowing your wrist to remain flexible. The power of your cut should come from your shoulder and elbow, not just your wrist. If you are prepping large quantities, take breaks to shake out your hands. Additionally, keep your work surface at the right height. If your counter is too high, you will feel strain in your shoulders; if it is too low, you will hunch your back. A board placed on a lowered surface or a thick mat can help adjust your ergonomic position to maintain precision over long periods.
Advanced Blade Work: The Push Cut vs. The Pull Cut
While the rock chop is standard, professional chefs rely on the push cut and the pull cut for different scenarios. The push cut involves driving the knife forward and down in one fluid motion, which is ideal for dense vegetables like carrots or celery. The pull cut, or draw cut, involves pulling the knife toward you while slicing, which is perfect for delicate fish or soft meat where you want to minimize structural damage to the protein fibers. Experimenting with these motions allows you to match your technique to the resistance of the ingredient, resulting in a cleaner cut and a significantly sharper edge over time, as you are not forcing the metal through the food.
FAQ
- What’s the best way to hold a chef’s knife?
- Hold the handle with your dominant hand, and grip the base of the blade between your thumb and forefinger for the most control.
- How often should I sharpen my knives?
- This depends on usage, but generally, you should sharpen your knives every few months and hone them with a steel rod every time you use them.
- What’s the difference between chopping and slicing?
- Chopping involves cutting food into smaller pieces, often without concern for shape or size, while slicing creates thin, uniform cuts.
- Are there specific cutting boards that are better for knife maintenance?
- Yes, wooden and plastic cutting boards are kinder to knives than glass or stone, which can dull the blade more quickly.
- Can I use the same chopping technique for all types of food?
- No, different foods benefit from different techniques. For example, delicate herbs require a gentle mincing action, while root vegetables may need a firmer chopping motion.
Related posts:
 The Essential Knives Every Home Cook Needs in Their Kitchen
 Should You Wash Avocados?
 The Best Carving Knives for a Picture-Perfect Thanksgiving Turkey
 The Right Way to Cut an Avocado
 Japanese Knives: State of the Art Blades for the Aspiring Home Chef
 Choosing the Perfect 8-Inch Knife
 Creative Salad Board Ideas
 The Only Way to Cut Cauliflower That Actually Makes Sense