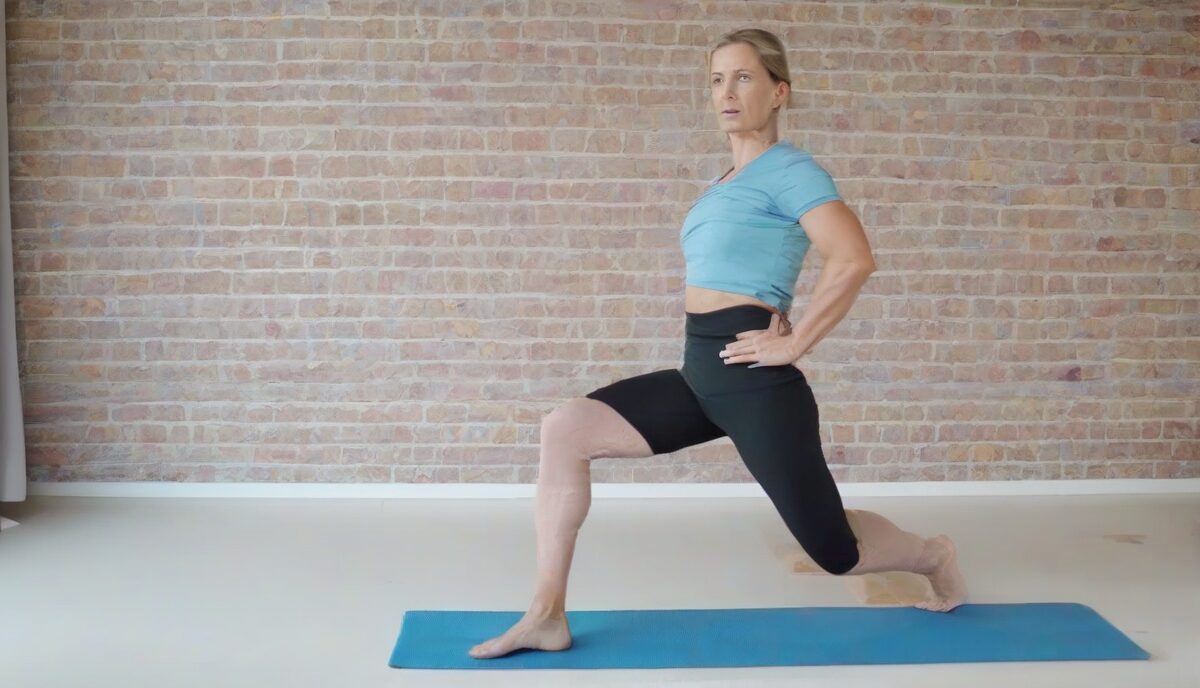
When it comes to strengthening and toning your lower body, the lunge pose is a staple exercise that can produce excellent results. However, many people unknowingly make errors that can reduce the effectiveness of the exercise and even lead to injury. In this article, we will discuss some of the most common lunge pose mistakes and how to correct them to ensure you get the most out of your workout.
1. Incorrect Knee Alignment
One of the most common mistakes when performing lunges is improper knee alignment. Your front knee should be directly above your ankle, forming a 90-degree angle. If your knee extends beyond your toes or collapses inward, this can put undue stress on your knee joint and lead to injury.
Correction: Focus on keeping your knee aligned with your ankle and avoid letting it move past your toes. Engage your core and glutes to maintain stability and proper form.
2. Leaning Forward
Another frequent error is leaning too far forward during the lunge. This can shift your center of gravity and place additional strain on your lower back.
Correction: Keep your torso upright and your chest lifted. Imagine a straight line from your head to your hips. Engaging your core muscles will help you maintain this posture.
3. Uneven Weight Distribution
Placing too much weight on your front foot or back foot can throw off your balance and make the exercise less effective.
Correction: Distribute your weight evenly between both legs. Your front foot should bear about 60% of your weight, while the back foot should carry the remaining 40%. This balance ensures both legs are working effectively.
4. Stepping Too Narrow or Too Wide
The distance between your feet when you step into a lunge matters. Stepping too narrow can make it difficult to balance, while stepping too wide can overstretch your muscles.
Correction: Aim for a step that allows your front knee to form a 90-degree angle without your back knee touching the ground. Typically, this is about hip-width distance.
5. Not Engaging Core Muscles
Failing to engage your core muscles can lead to a wobbly lunge and reduce the effectiveness of the exercise.
Correction: Tighten your core muscles throughout the movement. This will help you maintain balance and stability, making the exercise more effective.
6. Ignoring Breathing
Proper breathing is crucial during any exercise, including lunges. Holding your breath can increase blood pressure and reduce performance.
Correction: Inhale as you lower into the lunge and exhale as you push back up to the starting position. This breathing pattern helps to oxygenate your muscles and maintain rhythm.
7. Mastering Pelvic Neutrality and Lumbar Integrity
While the original article touches on the importance of an upright torso, a deeper mechanical error often occurs at the pelvis, known as an anterior pelvic tilt. This happens when the top of your pelvis rotates forward, causing an exaggerated arch in the lower back. Many practitioners attempt to keep their chest up by arching their spine rather than using their core, which compresses the lumbar vertebrae and prevents the glutes from firing effectively. This mistake is particularly common in individuals with tight hip flexors, as the descending motion of the lunge pulls on the psoas muscle, which in turn yanks the lower spine forward.
Correction: To fix this, you must find a “neutral pelvis.” Before you lower into the lunge, imagine your pelvis is a bucket of water; you want to keep the water from spilling out the front. Perform a slight posterior pelvic tilt by tucking your tailbone down and pulling your belly button toward your spine. As you descend, maintain this “ribs-to-hips” connection. If you feel a deep stretch in the front of your trailing thigh, you are likely doing it correctly. If you feel a pinch in your lower back, you are likely over-arching. Reducing the depth of your lunge temporarily can help you maintain this pelvic control until your hip flexor flexibility improves.
8. Foot Foundation and the Impact of Ankle Mobility
A frequently overlooked aspect of the lunge is the behavior of the front foot. A common mistake is allowing the front heel to lift off the ground as the body moves downward. This shifts the entire load onto the patellar tendon and the balls of the feet, significantly increasing the risk of chronic knee strain. This often stems from poor ankle dorsiflexion—the ability of the shin to move toward the foot. When the ankle is tight, the body compensates by lifting the heel to allow the knee to move forward, which creates an unstable base and reduces the power output from the posterior chain.
Correction: Focus on the “tripod foot” concept. Ensure that three points of your front foot remain in constant, firm contact with the floor: the base of the big toe, the base of the pinky toe, and the center of the heel. If you find your heel lifting, shorten your stride slightly or work on calf and ankle mobility exercises before your lunge sets. Additionally, avoid “scrunching” your toes to grip the floor, as this can create tension that travels up the leg; instead, spread your toes wide to create a broader surface area for balance.
9. The Forgotten Rear Leg: Hip Extension and Toe Pressure
Many people treat the back leg as a passive “kickstand” rather than an active participant in the movement. A common mistake is keeping the back leg too straight or, conversely, letting it collapse outward. When the back leg is ignored, the front leg has to do 100% of the stabilization work, which often leads to the wobbling mentioned earlier. Furthermore, many lifters put too much pressure on the very tips of their back toes, which can cause toe cramps or instability in the rear ankle.
Correction: The back leg should be actively engaged in a state of controlled hip extension. As you lower, the back knee should drop straight down toward the floor, staying tucked directly under your hip. You should be balanced on the ball of your back foot, not just the tips of the toes. Think of the back leg as a stabilizer that controls the verticality of the movement. By keeping the back glute squeezed, you stabilize the pelvis from the rear, which provides a more solid foundation for the front leg to drive back up to the starting position. This “double-leg engagement” transforms the lunge from a simple quad exercise into a full-body stabilization task.
10. Deceleration Mechanics and the Danger of the “Knee Drop”
The eccentric phase of the lunge—the part where you lower yourself toward the ground—is where most muscle growth and strengthening occur. However, a common error is “gravity-dropping,” where the individual relaxes their muscles and lets gravity pull them down quickly, often resulting in the back knee slamming into the floor. This not only risks bruising the patella but also misses out on the most beneficial part of the exercise. Rapid, uncontrolled descents place sudden, high-impact stress on the connective tissues rather than the muscles.
Correction: Practice a controlled three-second descent. Count “one-one-thousand, two-one-thousand, three-one-thousand” as you lower your hips. Your back knee should hover just a fraction of an inch above the floor, or lightly “kiss” the ground without transferring weight onto it. This requires intense eccentric contraction of the quadriceps and glutes. By mastering the deceleration, you build the decelerative strength necessary for sports and daily activities, such as walking downstairs or hiking, where controlled lowering is essential for joint longevity.
11. Kinetic Chain Disruptions: Neck, Shoulders, and Gaze
While the lunge is a lower-body exercise, the position of the upper kinetic chain dictates the success of the movement. A mistake often seen in beginners is “looking at the feet.” When you tuck your chin and look down, you shift your center of gravity forward and disrupt your vestibular system, which is responsible for balance. Similarly, many people carry significant tension in their upper traps, shrugging their shoulders toward their ears as they struggle with the weight or the balance of the pose.
Correction: Maintain a “proud chest” and a neutral cervical spine. Your gaze should be fixed on a stationary point approximately 10 to 15 feet in front of you on the floor or straight ahead at eye level. This helps maintain the natural curve of your neck and keeps your airway open for the breathing techniques mentioned in the original article. Keep your shoulders pulled down and back, away from your ears. If you are doing bodyweight lunges, let your arms move naturally or hold them at your chest in a “prayer” position to help counterbalance your weight without creating upper-body tension.
12. Frontal Plane Stability and Pelvic Leveling
Most people focus on the lunge from the side view (the sagittal plane), but errors often occur in the frontal plane (the view from the front). A subtle but damaging mistake is the “hip hike” or “hip drop,” where one side of the pelvis sits higher than the other during the move. This usually happens because of weakness in the gluteus medius—the muscle on the side of your hip. If this muscle isn’t firing, your hips will sway side-to-side, causing the front knee to cave inward (valgus stress) and potentially leading to IT band syndrome or ACL issues.
Correction: Imagine your hip bones are two headlights on a car; they should stay level and pointed straight ahead throughout the entire repetition. If you find your hip dropping on the side of the back leg, focus on pushing the outside of your front foot into the ground and engaging the side of your hip. Practicing lunges in front of a mirror can be incredibly helpful here. If you see your hips tilting, reduce your range of motion until you can keep your pelvis level. This lateral stability is what prevents the “wobbly lunge” and ensures that the force is being distributed through the muscles rather than the joint capsules.
13. Progression Pitfalls: Mistakes in Weighted and Dynamic Lunges
Once the basic lunge is mastered, many people move too quickly into walking lunges, jumping lunges, or weighted lunges. A common mistake with weighted lunges is holding dumbbells with a “loose” upper body, which allows the weights to swing and pull the torso out of alignment. In walking lunges, many people use momentum to “swing” into the next rep rather than coming to a full, controlled stop, which negates the stability benefits of the exercise and increases the risk of shearing forces on the knee.
Correction: When adding weight, treat the dumbbells or kettlebells as an extension of your core. Squeeze the handles tightly to engage the forearms and lats, which creates a “brace” for the spine. In walking lunges, ensure that you pass through a stable “mid-point” or step your feet together between reps if you feel off-balance. For jumping lunges (plyometrics), the mistake is landing with “loud” feet. You should land as quietly as possible, immediately absorbing the impact by sinking into the next lunge. If you cannot land softly and maintain your knee-over-ankle alignment, return to static split squats until your explosive control improves.
FAQ
1. How can I improve my balance in lunges?
Answer: To improve balance, focus on engaging your core muscles and maintaining proper knee alignment. Practicing lunges with a chair or wall for support can also help.
2. Are lunges better than squats?
Answer: Both lunges and squats are effective exercises for lower body strength. Lunges are great for targeting individual legs and improving balance, while squats engage multiple muscle groups simultaneously.
3. How many lunges should I do in a workout?
Answer: This depends on your fitness level and goals. Beginners can start with 2-3 sets of 8-12 repetitions per leg, while more advanced individuals can increase the number of sets and repetitions.
4. Can lunges cause knee pain?
Answer: Lunges can cause knee pain if performed incorrectly. Ensuring proper form, especially knee alignment, can help prevent knee pain. If you experience persistent pain, consult a healthcare professional.
5. What muscles do lunges work?
Answer: Lunges primarily work the quadriceps, hamstrings, glutes, and calves. They also engage the core muscles for stability.
Related posts:
 PHA Bodyweight Workout: Efficient Fitness Anywhere, Anytime
 The Ultimate Guide to Lunge Variations That Actually Work
 The Simple Ankle Fix That Will Transform Your Entire Workout
 The Lunge Mistakes Everyone Makes According to a Top Trainer
 Perfect Your Squat Form
 Stretches to Relieve Foot Pain
 Six Powerful Toning Moves from Jenna Dewan
 Managing Hip Pain from Sitting