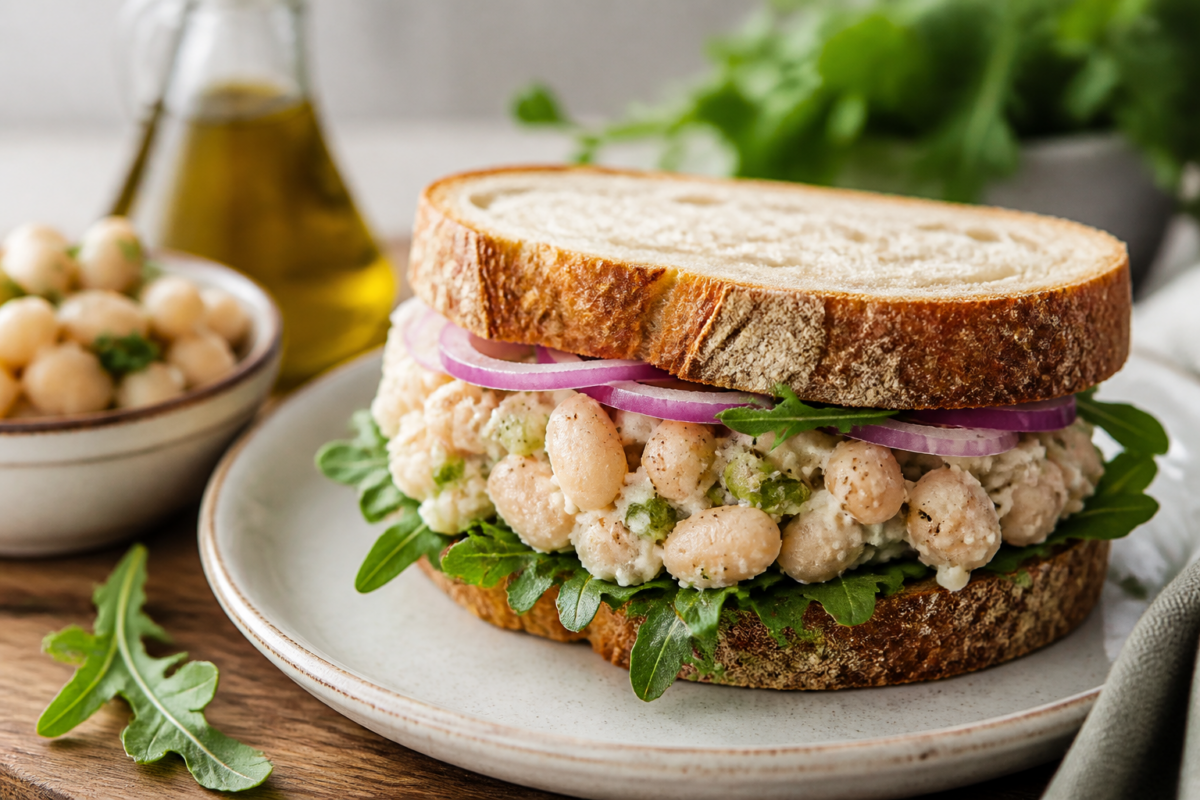
When it comes to plant-based lunches, the white bean sandwich often stands in the shadow of the more famous chickpea “tuna” or the classic avocado toast. However, those who have discovered the magic of a well-crafted white bean sandwich know that it offers a unique, silky texture and a neutral flavor profile that acts as a perfect canvas for culinary creativity. Whether you are looking for a high-protein vegan option, a budget-friendly meal prep solution, or simply a delicious way to incorporate more legumes into your diet, this recipe is a game-changer. In this comprehensive guide, we will explore everything from the science of the perfect bean mash to the art of selecting the right bread, ensuring your next lunch is nothing short of extraordinary.
Why White Beans are the Ultimate Sandwich Foundation
White beans, a category that includes Cannellini, Great Northern, Navy, and Baby Lima beans, are nutritional powerhouses that provide a satisfying heft to any meal. Unlike some plant-based proteins that can feel dry or crumbly, white beans possess a high starch content and a thin skin, which allows them to be mashed into a creamy consistency that rivals dairy-based spreads. This creaminess is essential for a sandwich, as it provides the moisture needed to bind other ingredients together while offering a luscious mouthfeel.
From a nutritional standpoint, white beans are rich in plant-based protein and dietary fiber. A single cup of cooked Cannellini beans provides approximately 15 grams of protein and 11 grams of fiber, making it an excellent choice for sustained energy throughout the afternoon. Furthermore, they are a significant source of essential minerals like iron, magnesium, and potassium. By choosing white beans as your primary sandwich filling, you are opting for a heart-healthy, low-fat alternative to processed deli meats, all while enjoying a texture that is naturally satisfying and dense.
Choosing Your Bean: Cannellini vs. Great Northern vs. Navy
While any white bean will technically work for a sandwich, understanding the subtle differences between varieties can help you tailor the recipe to your specific preferences. Cannellini beans, often called White Kidney beans, are the largest and perhaps the most popular choice. They have a nutty, earthy flavor and a very creamy interior, making them the gold standard for a thick, spreadable mash. If you want a sandwich that feels luxurious and substantial, Cannellini is your best bet.
Great Northern beans are slightly smaller and have a milder flavor. They hold their shape a bit better than Cannellini beans, which is ideal if you prefer a sandwich with some whole-bean texture rather than a smooth paste. Navy beans, the smallest of the trio, are very soft and break down easily. They are excellent if you are looking to create a very fine, almost pate-like consistency. Finally, Baby Lima beans (Butter beans) offer a buttery, rich flavor that pairs exceptionally well with bright acids like lemon juice and vinegar. Experimenting with these different varieties allows you to customize the “crunch-to-cream” ratio of your filling.
The Essential Components of a Flavorful White Bean Mash
A plain mashed bean is, admittedly, a bit boring. The secret to a delicious white bean sandwich lies in the aromatics and seasonings you fold into the base. To create a multi-dimensional flavor profile, you need to balance four key elements: fat, acid, salt, and aromatics. For fat, a high-quality extra virgin olive oil or a spoonful of tahini adds richness. For acid, fresh lemon juice is non-negotiable; it cuts through the starchiness of the beans and brightens the entire dish. Apple cider vinegar or the brine from a jar of capers can also provide that necessary tang.
Aromatics are where you can get creative. Minced garlic is a classic choice, but if you find raw garlic too pungent, consider using roasted garlic or garlic powder. Fresh herbs like parsley, dill, chives, or cilantro add a burst of freshness and color. For a savory depth, many chefs recommend adding a teaspoon of Dijon mustard or a pinch of smoked paprika. Don’t forget the crunch—finely diced celery, red onion, or shallots provide a structural contrast to the soft beans, making every bite more interesting.
Step-by-Step Recipe: The Classic Mediterranean White Bean Sandwich
This recipe serves as a foundational template. It is designed to be quick, requiring no cooking if you are using canned beans, making it perfect for busy mornings or office lunches. This version focuses on Mediterranean flavors that complement the natural creaminess of the beans.
Ingredients:
- 1 can (15 oz) Cannellini beans, rinsed and thoroughly drained
- 1 tablespoon extra virgin olive oil
- 1 tablespoon fresh lemon juice
- 1 teaspoon Dijon mustard
- 2 tablespoons finely chopped fresh parsley
- 2 tablespoons finely diced red onion
- 1 small clove of garlic, minced (optional)
- Salt and freshly cracked black pepper to taste
- 4 slices of high-quality sourdough or whole-grain bread
- Optional toppings: Arugula, sliced cucumber, roasted red peppers, or sprouts
Instructions:
- Prepare the Beans: Place the drained beans in a medium mixing bowl. Using a fork or a potato masher, crush the beans until about 70% are mashed and 30% remain whole. This creates a pleasing texture that isn’t too mushy.
- Mix in Flavorings: Add the olive oil, lemon juice, Dijon mustard, parsley, red onion, and garlic to the bowl. Stir vigorously to ensure the flavors are evenly distributed.
- Season: Taste the mixture. Add salt and pepper gradually. Remember that beans absorb salt, so you may need slightly more than you think. A pinch of red pepper flakes can be added here if you like a bit of heat.
- Assemble: If desired, toast your bread lightly. Spread a generous layer of the white bean mixture onto two slices of bread. Layer your chosen toppings—arugula provides a peppery bite, while roasted peppers add sweetness.
- Serve: Close the sandwiches, cut diagonally, and serve immediately. If packing for lunch, see the storage tips below to prevent sogginess.
Selecting the Best Bread: Texture and Integrity
The bread is the vessel for your white bean creation, and its importance cannot be overstated. Because the white bean filling is soft and moist, you need a bread that offers structural integrity. A flimsy, highly processed white sandwich bread will likely fall apart or become soggy within minutes. Instead, look for breads with a sturdy crust and a dense crumb.
Sourdough is an excellent choice because its natural acidity complements the lemon in the bean mash, and its chewy crust provides a satisfying resistance. Whole-grain or seeded breads add an extra layer of nuttiness and fiber, enhancing the health profile of the meal. For a more indulgent experience, a lightly toasted ciabatta roll or a focaccia square works beautifully, as the large air pockets in these breads can trap some of the bean mixture. If you are looking for a lighter option, a high-quality pita pocket or a large collard green wrap can also serve as a wonderful gluten-free or low-carb alternative.
Creative Variations: Elevating the Basic Recipe
Once you have mastered the classic recipe, you can begin to experiment with different flavor profiles to keep your lunches exciting. The neutral taste of white beans makes them incredibly versatile. For a Pesto White Bean Sandwich, simply swap the olive oil and parsley for two tablespoons of high-quality basil pesto. Pair this with sun-dried tomatoes and fresh mozzarella (or vegan cheese) for a gourmet Italian-inspired treat.
If you crave spice, try a Buffalo White Bean Sandwich. Mix the mashed beans with a tablespoon of hot sauce and a teaspoon of ranch seasoning (or vegan ranch). Serve it with crunchy celery sticks and shredded carrots inside the sandwich to mimic the experience of buffalo wings. For a smoky, protein-heavy option, add a teaspoon of liquid smoke and some chopped smoked almonds to the mash, creating a Smoky Almond White Bean Spread that pairs perfectly with sharp cheddar or a thick slice of heirloom tomato.
Toppings and Textures: The Art of the Garnish
A sandwich is only as good as its layers. To transform a simple bean spread into a world-class sandwich, you must consider the interplay of textures. Since the bean mash is soft, you need elements that are crunchy, juicy, or crisp. Pickled vegetables are a fantastic addition; pickled red onions, cornichons, or even pickled jalapeños add a vinegary punch and a crisp snap that balances the creaminess of the beans.
Freshness is also key. A handful of sprouts (alfalfa, broccoli, or radish) adds a delicate crunch and a boost of nutrients. Sliced cucumbers or radishes provide a refreshing water content that lightens the meal. For a boost of healthy fats, thin slices of avocado can be layered on top, though you may want to add an extra squeeze of lemon juice to prevent the avocado from browning. If you want a more savory, “umami” experience, try adding a layer of roasted seaweed or a sprinkle of nutritional yeast over the bean spread before closing the sandwich.
Meal Prep and Storage: Keeping it Fresh
One of the greatest advantages of the white bean sandwich is that the filling is highly “prep-able.” You can make a large batch of the white bean mash on Sunday, and it will stay fresh in an airtight container in the refrigerator for up to five days. In fact, many find that the flavor actually improves after 24 hours as the garlic and herbs have more time to infuse into the beans.
To prevent a soggy sandwich when packing for work or school, there are a few professional tricks you can use. First, consider “waterproofing” your bread. Spread a thin layer of vegan mayo, butter, or even a large lettuce leaf on the bread before adding the bean mash; this creates a barrier that prevents moisture from seeping into the grain. Alternatively, pack the bean mash in a small separate container and assemble the sandwich right before you eat. This ensures the bread remains perfectly crisp and the toppings stay vibrant.
Pairing Suggestions for a Complete Meal
While a white bean sandwich is quite filling on its own, pairing it with the right side dish can turn it into a restaurant-quality meal. During the colder months, a cup of tomato basil soup or a smoky lentil soup provides a warm contrast to the cool sandwich. The acidity of a tomato-based soup is particularly effective at cutting through the richness of the beans.
In the summer, a light side salad with a lemon-tahini dressing or a simple fruit salad of melon and mint keeps the meal refreshing. If you are looking for something more substantial, a side of roasted sweet potato wedges or a handful of kale chips adds a satisfying crunch. For a beverage, a crisp sparkling water with a lime wedge or an iced herbal tea complements the clean, plant-based flavors of the sandwich perfectly.
Advanced Mashing Techniques and Texture Engineering
While the basic fork-mash is the standard for a rustic white bean sandwich, achieving a truly professional-grade texture requires a deeper understanding of bean starch and moisture ratios. For those who find the standard mash a bit too grainy, the “whipped” method is a transformative alternative. By using a food processor or high-speed blender, you can emulsify the white beans with a fat source—such as extra virgin olive oil or tahini—and a splash of the reserved bean liquid (aquafaba). This process breaks down the cellular walls of the beans more thoroughly than a fork ever could, resulting in a mousse-like consistency that is light, airy, and incredibly spreadable. However, a common pitfall here is over-processing; if you blend for too long, the starches can become gummy. The goal is a silky-smooth finish that still holds its shape when peaked with a spoon.
For those who prefer a more complex mouthfeel, the “layered texture” approach is superior. This involves dividing your beans into three portions. One third is processed into a completely smooth puree to act as the binder. The second third is roughly smashed with a fork to provide soft chunks. The final third is left completely whole, perhaps even lightly toasted in a pan with a bit of oil until the skins are slightly crisp. When folded together, these three textures create a sophisticated eating experience that prevents the sandwich from feeling like a monolithic block of paste. This method is particularly effective when using larger beans like Cannellini or Butter beans, where the contrast between the creamy interior and the slightly resistant skin is most pronounced. To further engineer the texture, consider the temperature of the beans during mashing. Warm beans will release more starch and create a creamier, more cohesive bond, whereas cold beans from the fridge will remain more distinct and crumbly.
Global Fusion: Transcending the Mediterranean Palette
The white bean is a culinary chameleon, and while Mediterranean flavors are its most common companion, the bean’s neutral profile allows it to travel across the globe. To create a Japanese-Inspired White Bean Sandwich, replace the traditional lemon and parsley with a white miso paste, a teaspoon of grated fresh ginger, and a dash of rice vinegar. The miso provides a deep, fermented saltiness that complements the beans’ earthiness. Pair this mash with pickled daikon radish, shredded nori, and a swipe of wasabi mayo for a sandwich that is sharp, salty, and refreshing. The key here is to balance the “funk” of the miso with the brightness of the ginger, ensuring the beans don’t feel too heavy.
Moving toward the Americas, a Chipotle-Lime White Bean Mash offers a smoky, spicy alternative. Incorporate finely chopped chipotle peppers in adobo sauce, fresh lime juice, and toasted cumin into your bean base. This version demands robust accompaniments like pickled red onions, fresh cilantro, and perhaps some charred corn kernels for sweetness. For an Indian-Spiced White Bean Wrap, use a base of warmed spices—turmeric, garam masala, and toasted mustard seeds. Instead of olive oil, use a touch of coconut milk to bind the beans, creating a rich, aromatic filling that pairs beautifully with a mango chutney spread on the bread. These global variations prove that the white bean sandwich can be adapted to any craving, moving far beyond the confines of a simple health-food staple into the realm of gourmet fusion.
The Science of the “Bean Melt”: Hot Sandwich Strategies
While often served cold, the white bean sandwich undergoes a fascinating chemical transformation when subjected to heat. When you grill or press a white bean sandwich, the starches in the bean mash begin to gelatinize, creating a texture that is remarkably similar to melted cheese or a rich pâté. To master the “White Bean Melt,” you must manage moisture carefully. Because beans contain a high amount of water, a hot sandwich can quickly become soggy if the filling is too loose. To combat this, add a dry binder to your mash, such as nutritional yeast, breadcrumbs, or even a small amount of chickpea flour. This absorbs excess moisture and helps the filling set as it heats.
Consider the “White Bean Reuben” as a prime example of a hot application. Layer your seasoned white bean mash with sauerkraut, vegan Swiss cheese, and Russian dressing on rye bread. When pan-fried in a bit of vegan butter, the outside of the bread becomes shatteringly crisp, while the bean filling becomes hot and unctuous. Another excellent hot option is the “White Bean and Sage Panini.” By sautéing the beans briefly with fresh sage and garlic before mashing, you develop a deep, savory flavor profile that is enhanced by the pressing process. The heat also helps to release the volatile oils in the herbs, perfuming the entire sandwich. For the best results, use a heavy press or a cast-iron skillet to weigh down the sandwich, ensuring maximum contact between the bread and the heat source, which facilitates the Maillard reaction—the browning process that gives toasted bread its irresistible aroma and flavor.
Boosting the Umami Factor: Depth Beyond Salt
One of the most frequent criticisms of bean-based sandwiches is that they can taste “flat” or overly vegetal. This is usually due to a lack of umami, the savory fifth taste. Because white beans are naturally low in the glutamates that provide this sensation, you must intentionally introduce them through your choice of seasonings. Sun-dried tomatoes are an umami powerhouse; finely dicing them and folding them into the mash provides concentrated bursts of savory flavor. Similarly, a teaspoon of tomato paste, lightly sautéed to remove its raw edge, can add a foundational richness to the beans without making them taste like pasta sauce.
Other umami-rich additions include liquid aminos, tamari, or even a small amount of vegan Worcestershire sauce. For a more Mediterranean umami profile, look to fermented ingredients like capers or kalamata olives. The brine from these ingredients is liquid gold for a bean mash, providing both acidity and deep savory notes. If you are not strictly vegan, a few finely minced anchovies or a grating of aged Parmesan cheese can elevate the white bean mash to restaurant-level heights. For a plant-based umami boost, nutritional yeast is the go-to choice, offering a nutty, cheesy flavor that also helps to thicken the mash. By layering these savory elements, you create a sandwich that feels “meaty” and satisfying, triggering the same neurological reward centers as a traditional deli sandwich.
Seasonal White Bean Sandwiches: A Year-Round Guide
To keep the white bean sandwich relevant throughout the year, look to the produce aisle for seasonal inspiration. In the Spring, the goal is lightness and vibrancy. Fold blanched peas, shaved asparagus, and a handful of mint into your white bean mash. Use a light, airy focaccia and top with a lemon-zest vinaigrette. This version celebrates the return of green vegetables and pairs perfectly with the delicate creaminess of Great Northern beans. In the Summer, take advantage of the abundance of stone fruits and heirloom tomatoes. A white bean sandwich with sliced peaches, basil, and a balsamic glaze might sound unconventional, but the sweetness of the fruit cuts through the starchiness of the beans in a way that is incredibly sophisticated.
As the weather cools in the Autumn, shift toward earthy, roasted flavors. Mix your white bean mash with roasted butternut squash or sweet potato and season with rosemary and thyme. A hearty, seeded whole-grain bread provides the necessary structural support for these denser ingredients. In the Winter, focus on preserved flavors and hardy greens. A white bean mash paired with sautéed garlicky kale or radicchio offers a pleasant bitterness that balances the beans’ richness. Consider adding toasted walnuts or pecans for a seasonal crunch and a boost of healthy fats. By rotating your ingredients with the seasons, you ensure that the white bean sandwich never becomes a repetitive or boring lunch option.
Structural Integrity and the “Slide” Factor: Engineering the Perfect Bite
A common frustration with bean sandwiches is the “slide” factor—where the filling squishes out the sides of the bread upon the first bite. This is a structural engineering problem that can be solved with proper layering and ingredient choice. First, the “glue” method: use your white bean mash as the primary adhesive. Apply it to both slices of bread, not just one. This creates a double-sided bond that holds the interior ingredients in place. When adding slippery items like sliced cucumbers or tomatoes, never place them directly against each other. Instead, “shingle” them with a layer of greens or a sprinkle of dry herbs in between to create friction.
The order of operations matters immensely. Place your heaviest and most stable ingredients (like roasted peppers or thick slices of cheese) at the bottom, and your lightest, most volatile ingredients (like sprouts or microgreens) at the top. If you are using avocado, mash a portion of it directly into the white beans rather than slicing it; this incorporates the healthy fats into the binder itself, reducing the number of loose layers. Finally, the choice of bread can mitigate the slide. A bread with “nooks and crannies,” like a sourdough with a high hydration rate or a ciabatta, provides physical anchor points for the bean mash to grip. If all else fails, the “wrap and rest” technique is a professional secret: wrap the completed sandwich tightly in parchment paper or beeswax wrap and let it sit for five minutes. This allows the moisture to distribute evenly and the layers to “set,” making for a much cleaner eating experience.
From Pantry to Plate: Eliminating the “Canned” Aftertaste
While canned beans are a miracle of convenience, they often carry a distinct metallic or “tinny” aftertaste and a viscous liquid that can dull the flavors of your sandwich. To elevate your sandwich from “pantry-raid” to gourmet, you must properly treat the beans before they ever touch the mashing bowl. The first step is the “Double Rinse and Refresh.” After draining the beans, rinse them under cold running water until the foam completely disappears. Then, let them soak in a bowl of fresh water with a squeeze of lemon juice or a splash of vinegar for five minutes. This helps to neutralize the alkaline flavor of the canning liquid and firms up the skins of the beans.
For an even more significant flavor upgrade, consider the “Quick Sauté” method. Toss your rinsed beans into a pan with a tablespoon of olive oil, a smashed garlic clove, and a sprig of rosemary or thyme. Heat them over medium-low for about five minutes. You aren’t trying to cook them—they are already cooked—but rather to infuse them with aromatics and evaporate any lingering “canned” moisture. This step also allows you to season the beans from the inside out with a pinch of salt and pepper while they are warm and porous. Once they are fragrant, remove the garlic and herbs and proceed with your mash. This extra five minutes of effort completely removes the industrial flavor profile of canned legumes, resulting in a sandwich that tastes like the beans were soaked and simmered for hours by a professional chef.
Frequently Asked Questions
Can I use dried beans instead of canned for this recipe?
Absolutely! Using dried beans is more cost-effective and often results in a better texture. To use dried beans, soak them overnight, then simmer in water with a bay leaf and a clove of garlic until tender (usually 45-60 minutes). One 15-ounce can is equivalent to approximately 1.5 cups of cooked beans. Ensure the beans are completely cooled before mashing to maintain the best consistency for a sandwich spread.
Is this white bean sandwich recipe gluten-free?
The white bean filling itself is naturally gluten-free. To make the entire sandwich gluten-free, simply serve the filling on your favorite gluten-free bread, in a gluten-free wrap, or even scooped into large Belgian endive leaves or romaine lettuce boats. The flavors also work wonderfully as a dip for gluten-free crackers or raw vegetable crudités.
How can I make this recipe more kid-friendly?
For children who might be wary of “green bits” or strong flavors, you can simplify the recipe. Omit the raw onions and garlic, and use a milder herb like dried parsley or just a touch of honey-mustard. Mashing the beans until they are completely smooth can also help with texture issues, making it more similar to a hummus-style spread that children often find more approachable.
Can I freeze the white bean mash?
While you can freeze cooked white beans, the texture of the seasoned mash may change slightly upon thawing. The vegetables (like onions and celery) will lose their crunch and may release water, making the spread a bit runny. For the best quality, it is recommended to store the mash in the refrigerator for up to five days. If you must freeze it, freeze the plain mashed beans and add the fresh aromatics and lemon juice after thawing.
What are the best greens to use in a white bean sandwich?
The choice of greens can significantly alter the flavor profile. Arugula is a favorite because its peppery notes contrast beautifully with the mild beans. Baby spinach offers a more neutral, earthy flavor and a soft texture. For a significant crunch, shredded romaine or iceberg lettuce works well. If you want something more sophisticated, try microgreens or watercress, which add a concentrated burst of nutrients and a delicate aesthetic to the sandwich.
Related posts:
 Garlic’s Secret Weapon: Alliinase for Boosting Health Benefits
 Beyond Breakfast: The Plant-Based Sausage That’s Changing the Morning Game
 Matcha Banana Bread Recipe That’s Actually Healthy
 Guilt-Free Cinnamon Roll Recipe
 Kayla Itsines’ Game-Changing Sweet Potato Enchilada Recipe That’ll Transform Your Kitchen
 From Italy with Love: The Ultimate Tuscan Bean Toast That’ll Transform Your Breakfast Game
 Delicious Ground Chicken Recipes
 Keto Mexican Night: Cauliflower Enchiladas That Actually Taste Amazing