Walking into a home that smells like a crisp spring morning or a warm vanilla bakery can instantly shift your mood. However, many of us have experienced the headache-inducing, cloying artificiality of commercial air fresheners. While store-bought sprays and plug-ins offer convenience, they often come with a cocktail of synthetic chemicals, including phthalates and volatile organic compounds (VOCs), which can irritate the respiratory system and affect indoor air quality. Making your own DIY air fresheners is not just a sustainable choice; it allows you to create sophisticated, nuanced scents that actually smell better than their mass-produced counterparts. By using natural botanicals, high-quality essential oils, and pantry staples, you can curate an olfactory experience that is uniquely yours, safe for your family, and gentle on the environment.
Key takeaways
- Use high-quality, therapeutic-grade essential oils and avoid synthetic fragrance oils for a safer, more authentic scent profile.
- Create effective room sprays by using distilled water, an emulsifier like vodka or witch hazel, and a balanced blend of essential oils.
- Neutralize odors naturally by using baking soda or activated charcoal, which trap and absorb smells rather than masking them.
- Simmer pots and wax melts offer excellent ways to scent your home while improving indoor humidity or providing consistent fragrance.
- Always verify essential oil safety for pets, as some common oils can be toxic to cats and dogs if inhaled or ingested.
The Science of Scent and the Benefits of Natural Ingredients
To understand why DIY air fresheners often outperform store-bought options, we have to look at the chemistry of fragrance. Commercial products are designed for shelf-life and maximum throw, which often means using heavy synthetic fixatives. These chemicals are designed to linger, but they can often feel “heavy” or “sticky” in the air. Natural scents, derived from essential oils and plant matter, tend to have a more complex molecular structure that interacts more gracefully with our olfactory receptors. They provide a “top-note” freshness that feels airy and authentic because they are, quite literally, the essence of the plant.
Beyond the scent profile, the health benefits of switching to natural alternatives are significant. Many commercial fresheners contain endocrine disruptors that can interfere with hormonal health over long-term exposure. When you craft your own sprays and diffusers, you have total control over the ingredients. You can choose therapeutic-grade essential oils that offer secondary benefits, such as lavender for relaxation, peppermint for focus, or lemon for its natural antibacterial properties. This transforms air freshening from a chore meant to mask odors into a form of functional aromatherapy that enhances your living space.
Essential Oil Basics for Custom Home Fragrance
The foundation of most effective DIY air fresheners is essential oil. However, not all oils are created equal, and understanding how to blend them is key to creating a scent that smells professional rather than amateur. When selecting oils, look for 100% pure, therapeutic-grade options. Avoid “fragrance oils,” which are often just synthetic scents diluted in a carrier oil, as these bring back the very chemicals we are trying to avoid.
A successful home fragrance follows the classic perfume pyramid: top notes, middle notes, and base notes. Top notes, like citrus and eucalyptus, are the first thing you smell; they are bright and refreshing but evaporate quickly. Middle notes, such as lavender, geranium, or rosemary, form the heart of the scent and provide balance. Base notes, like cedarwood, sandalwood, or patchouli, are heavy and grounding; they act as fixatives that help the lighter scents last longer. A well-rounded DIY spray might include 10 drops of Sweet Orange (top), 5 drops of Lavender (middle), and 2 drops of Cedarwood (base). Experimenting with these ratios allows you to tailor the scent to the specific room—bright and citrusy for the kitchen, or woody and floral for the bedroom.
Room Sprays: The Versatile All-Rounder
Room sprays are perhaps the easiest DIY air freshener to create and offer immediate results. The secret to a spray that doesn’t just fall to the floor in wet droplets is the use of an emulsifier. Since oil and water don’t mix, you need a substance to help the essential oils disperse evenly throughout the liquid. High-proof vodka or witch hazel are the most common choices. Not only do they help the oil mix, but they also help the scent evaporate more quickly into the air, preventing surfaces from becoming damp.
To make a standard 4-ounce room spray, fill a glass spray bottle with 1 tablespoon of vodka or witch hazel. Add 20 to 30 drops of your chosen essential oil blend and swirl the bottle to combine. Fill the rest of the bottle with distilled water, leaving a bit of room at the top. Distilled water is preferable to tap water because it lacks minerals and bacteria that could cause the mixture to spoil or clog the nozzle over time. For a “Clean Linen” scent, try a combination of lemon, tea tree, and a hint of eucalyptus. For a “Tropical Escape,” blend lime, grapefruit, and a touch of ylang-ylang. Always shake the bottle gently before each use to ensure the oils are well-distributed.
Simmer Pots: The Cozy Kitchen Secret
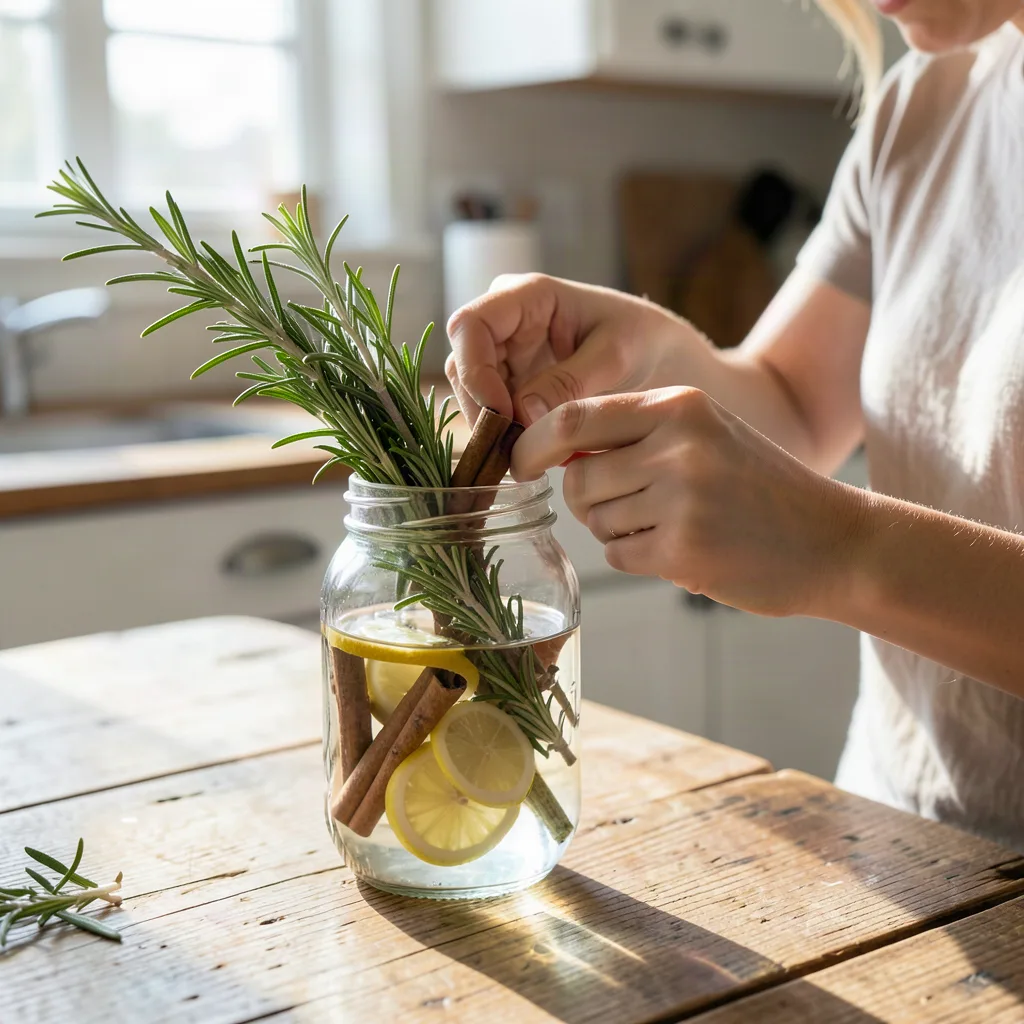
If you want your entire home to smell like a high-end boutique or a cozy cabin without spraying a single thing, simmer pots (also known as stovetop potpourri) are the answer. This method uses low heat to release the natural oils from whole ingredients like citrus peels, spices, and herbs. It is particularly effective in the colder months when the added humidity from the steam can also help combat dry indoor air.
The beauty of a simmer pot lies in its visual and aromatic appeal. For a classic “Autumn Harvest” pot, add sliced apples, cinnamon sticks, whole cloves, and a few star anise to a small pot of water. Bring it to a gentle boil, then turn the heat down to the lowest setting. As the water evaporates, the scent will waft through the house. For a “Spring Garden” version, use sliced lemons, fresh rosemary sprigs, and a teaspoon of vanilla extract. You can keep a simmer pot going for several hours; just be sure to add more water as it gets low to prevent the ingredients from scorching. When you’re finished, you can often strain the liquid and store the ingredients in a jar in the fridge to reuse for one or two more days.
Reed Diffusers and Long-Lasting Gel Fresheners
For consistent, passive scenting in areas like bathrooms or entryways, DIY reed diffusers and gel fresheners are excellent choices. Commercial reed diffusers are often expensive and use alcohol bases that evaporate too quickly. You can make your own using a narrow-necked glass bottle, rattan reeds (which have clear channels to wick the oil), and a light carrier oil like sweet almond oil or fractionated coconut oil. Mix about 20-30 drops of essential oil into 1/4 cup of carrier oil, add a splash of alcohol to thin the consistency, and insert the reeds. Flip the reeds once a week to refresh the scent.
Gel fresheners are a fun, “set it and forget it” option that mimics store-bought solids but with better ingredients. You can make these using unflavored gelatin. Dissolve two packets of gelatin in one cup of boiling water, then add a tablespoon of salt (which acts as a preservative to prevent mold). Once dissolved, add a cup of cold water and 30 drops of essential oil. Pour the mixture into small mason jars and let them set in the fridge. These look beautiful on a shelf and slowly release scent as the gel evaporates over several weeks. You can even add food coloring or dried flower petals to the jars for a decorative touch.
Baking Soda and Charcoal: Neutralizing Odors at the Source
Sometimes, “freshening” the air isn’t about adding a new scent, but about removing an old one. Odor neutralizers are essential for areas like mudrooms, near pet beds, or inside gym bags. Baking soda is a powerhouse for this because its alkaline nature neutralizes acidic odor molecules. To make an odor-absorbing jar, fill a small glass jar halfway with baking soda and add 10-15 drops of a purifying essential oil like lemon or purification blend. Replace the solid lid with a piece of breathable fabric or a decorative paper with small holes punched in it. Shake the jar occasionally to bring fresh baking soda to the surface.
Activated charcoal is another incredible tool for odor removal. It works through adsorption, where odors are physically trapped in the millions of tiny pores on the charcoal’s surface. You can buy activated charcoal pellets and sew them into small linen or cotton sachets. These are perfect for tucking into shoes or hanging in closets. Unlike scented fresheners, charcoal doesn’t add any smell; it simply leaves the air feeling “clean” and neutral. These sachets can be “recharged” by placing them in direct sunlight for a few hours once a month, which releases the trapped odors and moisture.
Dried Botanicals and Modern Potpourri
Potpourri often gets a bad reputation for being dusty and smelling like a grandmother’s attic, but modern DIY potpourri is a sophisticated way to add both scent and texture to your decor. Instead of buying pre-made bags of wood chips soaked in synthetic perfume, you can dry your own botanicals. Use a dehydrator or a low-temperature oven to dry slices of oranges, grapefruits, and apples. Combine these with dried eucalyptus leaves, bay leaves, pinecones, and cedar shavings.
To give your potpourri a lasting scent, place the dried ingredients in a sealed container and add several drops of essential oils. Let the mixture “cure” for a week, shaking it occasionally, so the botanicals can fully absorb the oils. When you display it in a bowl, the scent will be subtle and natural. If the fragrance begins to fade, you don’t need to throw the potpourri away; simply add a few more drops of oil. For a more hidden approach, you can fill small muslin bags with dried lavender buds and cedar chips to create sachets for your dresser drawers, ensuring your clothes always smell like they’ve been dried in a summer breeze.
Safety, Maintenance, and Best Practices
While DIY air fresheners are generally much safer than commercial ones, there are still important safety considerations to keep in mind. First and foremost is pet safety. Certain essential oils, such as tea tree, peppermint, cinnamon, and ylang-ylang, can be toxic to cats and dogs, especially when diffused in high concentrations or applied to surfaces they might lick. Always research the safety of an oil for your specific pets and ensure the room is well-ventilated so animals can leave if the scent is too strong for them.
Storage also matters. Essential oils are light-sensitive and can degrade over time, losing their aromatic and therapeutic properties. Store your DIY sprays in amber or cobalt blue glass bottles to protect them from UV rays. Because these recipes don’t contain heavy preservatives, it’s best to make them in small batches that you can use within a month or two. If a water-based spray starts to look cloudy or smells “off,” it’s time to discard it and make a fresh batch. Finally, always do a small patch test before spraying a DIY concoction onto delicate fabrics or upholstery to ensure the oils won’t cause staining.
Hand-Poured Soy Wax Melts and the Art of Cold Throw
While the existing guide covers liquid and air-based fresheners, wax melts offer a unique advantage: they provide a consistent scent release without the open flame of a candle or the evaporation rate of a spray. The secret to a high-end DIY wax melt lies in the choice of wax and the timing of oil integration. Paraffin wax, commonly found in store-bought melts, is a petroleum byproduct that can release soot and toluene. Instead, opting for 100% soy wax or a beeswax-coconut blend ensures a cleaner burn and a superior “scent throw.”
Scent throw is divided into two categories: “cold throw” (how the melt smells at room temperature) and “hot throw” (the fragrance intensity when melted). To achieve a professional-grade hot throw, you must add your essential oils when the wax is at its optimal binding temperature, typically around 185°F (85°C). If the wax is too hot, the delicate volatile compounds in the essential oils will flash off, leaving you with a weakened scent. If it is too cool, the oil won’t bond properly with the wax molecules, leading to “bleeding,” where the oil pools on the surface of the hardened melt.
For a sophisticated “Midnight Forest” blend, melt 1 pound of soy wax flakes in a double boiler. Once it reaches 185°F, remove from heat and stir in a mixture of 1 ounce of essential oils—specifically, 15ml of Siberian Fir, 10ml of Black Spruce, and 5ml of Vetiver. Stir slowly but thoroughly for at least two minutes to ensure total emulsification. Pour the mixture into silicone molds and, crucially, let them cure. Unlike sprays which are instant, wax melts require a curing period of 1 to 2 weeks. This allows the oil and wax to form a stable crystalline structure, resulting in a much more powerful fragrance when you finally place a cube in your warmer.
Botanical Carpet Refreshers and Deep-Fiber Deodorization
While baking soda jars are excellent for passive odor absorption, carpets and rugs act as giant filters that trap dust, pet dander, and microscopic odor molecules deep within their fibers. A surface-level spray often cannot penetrate these layers. A DIY botanical carpet powder works through a combination of mechanical abrasion and chemical neutralization. By adding dried, pulverized herbs to your base, you create a time-release scent that lingers long after the powder has been vacuumed away.
To create a heavy-duty refresher, combine 2 cups of baking soda with 1/2 cup of cornstarch. The cornstarch acts as a flow agent, helping the powder spread evenly and preventing the baking soda from clumping in humid environments. For the botanical element, use a spice grinder to turn dried lavender buds or dried mint leaves into a fine dust. Mix this into the powder along with 30 drops of Lemon and 10 drops of Eucalyptus essential oils. The lemon provides grease-cutting properties that help break down the oils from pet fur or foot traffic.
The application technique is just as important as the ingredients. Sieve the powder over your carpet and use a stiff brush to work it into the fibers. This is an edge case: do not use this on damp carpets, as the baking soda will turn into a paste that is nearly impossible to remove. Let the powder sit for at least 45 minutes—or overnight for high-traffic areas. As you vacuum, the agitation of the brush roll releases the essential oils, scenting the air while the baking soda lifts the trapped odors. For those with high-efficiency (HE) vacuums, ensure the botanical elements are ground into a very fine powder to avoid clogging the filtration system.
Portable Scent Solutions: Felt, Clay, and Wood
Air freshening shouldn’t be limited to the home; however, the enclosed, high-heat environment of a car or a locker requires a different approach than a glass bottle of liquid. Liquid sprays can expand and leak in a hot car, and alcohol-based diffusers evaporate too quickly. The solution is “solid-state” diffusion using porous natural materials like wool felt, terracotta clay, or unfinished wood. These materials act as reservoirs, holding the oil in their microscopic pores and releasing it slowly through passive evaporation.
For a DIY car vent clip, cut a small circle of 100% wool felt (synthetic felt will not absorb the oil as effectively) and glue it to a wooden clothespin. Apply 5-7 drops of a refreshing blend like Peppermint and Grapefruit directly to the felt. The heat from the car’s vents will accelerate the diffusion, but because the oil is trapped in the fibers, it won’t be overwhelming. Similarly, unglazed terracotta disks can be infused with essential oils and tucked into gym bags or suitcases. Because terracotta is highly absorbent, it can hold a scent for up to two weeks.
An often-overlooked edge case is the use of “scented wood” for closets. Instead of buying expensive cedar blocks, you can take scrap pieces of unfinished pine or balsa wood and soak them in a mixture of Cedarwood and Bergamot oils. Once the wood has absorbed the oil and dried to the touch, place them in your dresser drawers. Unlike paper liners, the wood provides a three-dimensional surface area for the scent to radiate from, and it can be “recharged” indefinitely by lightly sanding the surface and reapplying the oil.
Seasonal Scent-Scaping and Psychological Anchoring
Advanced home fragrancing involves more than just making a room smell “good”; it involves scent-scaping, which is the practice of using different scents to define the function of a space or the time of day. This relies on the olfactory bulb’s direct connection to the limbic system, the part of the brain responsible for emotion and memory. By strategically changing your DIY blends, you can anchor your brain into specific states—productivity in the morning, relaxation in the evening, or seasonal transition.
For a “Focus & Clarity” morning mist, create a spray using Rosemary and Lemon. Studies have shown that the aroma of rosemary can improve speed and accuracy on cognitive tasks. Use this in your home office or workspace. Conversely, for a “Sunset Transition” blend, move toward heavier, grounding esters found in Roman Chamomile and Clary Sage. These oils help signal to the nervous system that the workday is over.
Seasonal transitions also benefit from specific molecular profiles. In the height of summer, use “cooling” oils like Spearmint and Lime, which contain menthol and limonene to provide a psychological sense of temperature reduction. In the dead of winter, switch to “warming” spices like Cardamom and Cassia. Note that Cassia and Cinnamon are “hot” oils; if used in a room spray, they should be diluted more than floral oils to avoid skin irritation if the mist lands on your arms or face. By curating these transitions, you prevent “olfactory fatigue,” where your nose becomes blind to a scent because it never changes.
Advanced Emulsification: Beyond Vodka and Water
The original article mentions vodka and witch hazel as emulsifiers, which are excellent for beginners. However, for those looking to create a professional-grade room spray that remains crystal clear and never separates, you must look at natural solubilizers like Polysorbate 20 or Caprylyl/Capryl Glucoside. These are plant-derived surfactants that bridge the gap between oil and water more effectively than alcohol alone. When you use only vodka, you often end up with a milky, cloudy mixture because the oil droplets are still relatively large. A true solubilizer breaks the oil into such tiny droplets that they become invisible to the naked eye.
To upgrade your room spray, mix your essential oils with the solubilizer in a 1:1 ratio before adding any water. For 20 drops of oil, use 20 drops of the solubilizer. Stir them together until they form a thick, clear gel. Only then should you slowly pour in your distilled water. This creates a micro-emulsion that is shelf-stable for months.
Another advanced tip is the addition of a natural preservative. While the original article notes that distilled water helps, it doesn’t stop the growth of mold or bacteria indefinitely once the bottle is opened and exposed to air. If you plan on making large batches or gifting your air fresheners, adding a broad-spectrum natural preservative like Leucidal Liquid (derived from fermented radishes) at a 2% concentration will ensure the product remains safe. This is especially important for sprays that might be used around children or individuals with compromised immune systems, where bacterial growth in a water-based spray could pose a hidden risk.
Scented Furniture Polish and Dusting Sprays
One of the most efficient ways to keep a home smelling better than store-bought is to integrate fragrance into your cleaning routine. Most commercial furniture polishes have a heavy, artificial lemon-scented silicone base that builds up on wood over time. A DIY scented polish not only nourishes the wood but leaves behind a sophisticated, lingering aroma that feels like part of the house’s DNA rather than a temporary cover-up.
To create a “Heirloom Wood” polish, combine 1/2 cup of fractionated coconut oil (which stays liquid and doesn’t go rancid like olive oil) with 1/4 cup of white vinegar and 15 drops of Sandalwood, 10 drops of Orange, and 5 drops of Clove. The vinegar cleanses the surface, while the oil penetrates the wood grain, carrying the heavy base notes of sandalwood deep into the material. Because wood is porous, it will hold onto these base notes for days, releasing a faint, warm scent every time the sun hits the furniture.
For a lighter dusting spray for non-wood surfaces, mix 1 cup of distilled water with 2 tablespoons of castile soap and 20 drops of Pine and Juniper Berry. The castile soap acts as a mild surfactant to lift dust, while the coniferous oils provide a “mountain air” scent that is vastly superior to the “pine” chemicals used in industrial cleaners. This method turns a mundane chore into a moment of aromatherapy, and because you are applying the scent directly to surfaces, the fragrance has a much longer residency time than a mist sprayed into the air.
Troubleshooting and Optimizing Scent Longevity
Even with high-quality ingredients, DIY air fresheners can sometimes fall short of expectations. A common complaint is that the scent “disappears” too quickly. This is often due to a lack of “fixatives.” In perfumery, a fixative is a substance used to reduce the evaporation rate of the more volatile ingredients. While the original article mentions base notes like cedarwood, you can also use natural non-aromatic fixatives. Adding a half-teaspoon of vegetable glycerin to a 4-ounce room spray acts as a humectant, literally grabbing onto the scent molecules and slowing their release into the air.
Another issue is the “off-smell” that can develop in DIY products after a few weeks. This is usually the result of oxidation. Citrus oils, in particular, are highly prone to oxidation, which can make them smell like cleaner fluid or even cause skin sensitization. To prevent this, always store your essential oils and finished products in a cool, dark place. If you are making a large batch of a citrus-heavy spray, consider adding a few drops of Vitamin E oil (Tocopherol), which acts as a natural antioxidant to stabilize the citrus molecules.
Frequently Asked Questions
How long do DIY room sprays typically last?
A DIY room spray usually lingers in the air for about 30 minutes to an hour, depending on the base notes used and the ventilation in the room. Because they lack the heavy synthetic fixatives of commercial sprays, they are meant for a quick refresh rather than a permanent scent. However, the scent can last longer if sprayed onto textiles like curtains or pillows (just be sure to patch test first!).
Can I use fragrance oils instead of essential oils?
While you can use fragrance oils, they are generally not recommended if your goal is a natural, non-toxic home. Fragrance oils are synthetic and do not offer the therapeutic benefits of essential oils. They also tend to have that “artificial” smell that many people find irritating. If you decide to use them, ensure they are phthalate-free and high-quality.
Why did my DIY reed diffuser stop smelling?
There are two common reasons for this. First, the reeds may have become clogged with dust or saturated with oil, preventing them from wicking. Try flipping the reeds or replacing them with fresh ones. Second, the alcohol in your mixture may have evaporated, leaving the oil too thick to travel up the reed. You can try adding a teaspoon of high-proof vodka to the mixture to thin it out again.
Are simmer pots safe to leave unattended?
No, you should never leave a simmer pot unattended on a hot stove. The water will eventually evaporate, and if the pot runs dry, the ingredients will burn, which can create smoke and potentially start a fire. If you need to leave the house, turn off the stove. Alternatively, you can use a small slow cooker on the “low” or “warm” setting for a safer, long-term simmer.
What is the best way to get rid of a strong cooking smell like fish or onions?
For strong cooking odors, a two-step approach works best. First, use an odor neutralizer like a bowl of baking soda or white vinegar left on the counter to absorb the molecules. Second, use a simmer pot with citrus and cloves or a spray with lemon and eucalyptus. The citrus oils are particularly effective at breaking down the organic compounds that cause food odors.
Related posts:
 The Slow Beauty Movement’s Secret Hydration Recipes
 The Salt Spray Secret to Perfect Beach Hair Every Time
 Ditch Commercial Mouthwash for This DIY Essential Oil Version
 Zoe Kravitz’s Coconut Oil Hair Care Secret
 Creative Ways to Use Baking Soda
 Phlur Fragrance Is Redefining What Clean Perfume Can Be
 Baccarat Rouge 540 Body Oil Review
 DIY Home Deodorizer: The Rice and Essential Oil Hack That Actually Works