
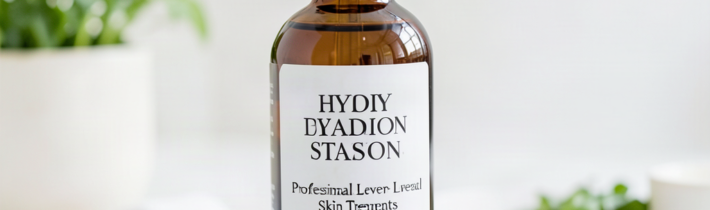
Achieving a professional-level glow does not always require an expensive appointment at a dermatology clinic. With the right techniques and a thoughtful approach to product application, you can create a high-performance hydration station in your own bathroom. The secret to professional results lies in the concept of “skin flooding”—a multi-layered approach that maximizes moisture retention and restores the skin barrier. By understanding how to prep, layer, and seal, you can transform dehydrated, lackluster skin into a plump, radiant canvas.
Understanding the Science of Skin Hydration
Hydration is fundamentally different from moisturization. While moisturizers focus on sealing the skin, hydration is about introducing water-attracting ingredients into the epidermis. Professional treatments often utilize humectants like hyaluronic acid, glycerin, and polyglutamic acid. These molecules act like sponges, drawing moisture from the environment into the skin cells. When your skin barrier is compromised, water evaporates quickly—a process known as Transepidermal Water Loss (TEWL). A professional-level DIY routine minimizes TEWL by layering products from thinnest to thickest, ensuring that every drop of moisture is locked in place.
The Essential Toolkit for Your Hydration Station
Before you begin, curate your station with high-quality, non-irritating essentials. You will need a gentle, pH-balanced cleanser that does not strip the skin, a hydrating toner or essence, a concentrated hyaluronic acid serum, a facial oil, and a dense occlusive moisturizer. Additionally, consider incorporating a facial steamer or a warm, damp microfiber towel. Tools like a jade roller or a stainless steel gua sha tool can also improve circulation, helping the skin better absorb the active ingredients you apply. Keep these items organized in a clean tray to mimic the calm, methodical environment of a spa.
Step 1: The Foundation of Cleanliness
A professional treatment begins with a clean slate. Use a double-cleansing method if you have been wearing makeup or SPF. Start with an oil-based cleanser to dissolve sebum and sunscreen, followed by a gentle water-based cleanser to remove impurities. It is vital to leave your skin slightly damp after cleansing. Water acts as a vehicle for your serums, and applying products to dry skin can actually hinder absorption. Pat your face with a soft towel, but leave it feeling tacky to the touch before moving to the next step.
Step 2: Essence and Toner Layering
In professional skincare, toners and essences are not just for balancing pH; they are the first layer of hydration. Apply a hydrating essence by patting it into the skin with your palms. This technique, often called the “7-skin method” in K-beauty, involves layering thin, watery products multiple times to saturate the skin deeply. If your skin feels particularly tight, do not be afraid to apply two layers of essence. This process plumps the surface cells and creates a receptive base for your more potent serums.
The Power of Humectant Serums
The core of your hydration station is the serum. Look for formulas containing low-molecular-weight hyaluronic acid, which penetrates deeper than larger molecules. Apply 3-4 drops to your damp face and neck. To mimic a professional aesthetician’s touch, use upward, sweeping motions. This massage technique stimulates lymphatic drainage and ensures even distribution. If you are using a polyglutamic acid serum, apply it after your hyaluronic acid; its larger molecular structure creates a film that prevents the previously applied moisture from evaporating.
Locking in Moisture with Occlusives
The final, most critical step is the application of an occlusive. Without this, your expensive serums will simply evaporate. A cream containing ceramides, fatty acids, or cholesterol is ideal, as these mimic the skin’s natural lipid barrier. Apply a nickel-sized amount of moisturizer, warming it between your fingertips first. Press it firmly into the skin rather than rubbing it in. For an extra professional touch, add two drops of a high-quality facial oil—like squalane or rosehip—on top to seal everything in. This creates a protective seal that keeps your skin hydrated for hours.
Maintenance and Environmental Factors
Your DIY hydration station is most effective when paired with lifestyle adjustments. Invest in a small cool-mist humidifier for your bedroom, especially during winter months when indoor heating dries out the air. Drinking adequate water is important for overall health, but the topical application of humectants is what gives you that immediate, dewy “glass skin” look. Consistency is key; perform this routine every evening to allow your skin to repair itself overnight, as the skin’s permeability is higher while you sleep.
Optimizing Ingredient Synergy and Molecular Weight
To truly elevate your home ritual, you must understand the interplay between different molecular weights. Hyaluronic acid is not a monolith; professional-grade serums often blend high, medium, and low molecular weights to address different layers of the epidermis. High-molecular-weight HA sits on the surface, providing an immediate smoothing effect and a protective barrier against environmental pollutants. Conversely, low-molecular-weight HA penetrates deeper into the dermis, providing long-term hydration that supports structural integrity. When building your station, avoid layering products with conflicting pH levels. For example, applying a potent L-ascorbic acid serum directly before a heavy alkaline cream can destabilize the actives. Instead, wait two minutes between layers or ensure your products are formulated within a similar pH range (typically 4.5 to 5.5) to maintain the acid mantle’s health.
The Role of Temperature and Micro-Circulation
Professional treatments frequently use thermal therapy to manipulate skin permeability. You can replicate this by incorporating a “warm-to-cool” cycle into your routine. Before applying your serums, use a warm (not hot) damp towel for 60 seconds. This gentle heat induces vasodilation, temporarily increasing blood flow and softening the stratum corneum, which significantly enhances the uptake of humectants. Conversely, finishing your routine with a chilled jade roller or a stainless steel cryo-tool creates vasoconstriction. This helps to “set” the product, reduces immediate post-application redness, and assists in lymphatic drainage—a key technique used by facialists to contour the face and reduce fluid retention around the orbital bone.
Strategic Ingredient Pairing for Barrier Resilience
Hydration is only half the battle; barrier repair requires specific lipids that mimic the skin’s natural matrix. When selecting your final occlusive, look beyond basic moisturizers and seek out “barrier creams” that contain a 3:1:1 ratio of ceramides, cholesterol, and free fatty acids. This ratio is scientifically recognized for accelerating the recovery of a damaged skin barrier. If your skin feels particularly reactive or tight, consider “slugging”—a technique where you apply a thin layer of petrolatum or a specialized balm over your final moisturizer on targeted areas like the corners of the nose or the lips. This creates an impermeable seal that prevents TEWL entirely, allowing the skin to undergo a deep, overnight restoration process without the interference of dry, indoor air.
Advanced Application Techniques: The Press-and-Tap Method
The way you apply your product is just as critical as the formulation itself. Avoid the common mistake of dragging or pulling the skin, which can lead to premature laxity over time. Instead, adopt the “press-and-tap” method. After dispensing your serum, warm it between your palms to activate the ingredients, then press your hands firmly against the face, starting from the center and moving outward. Once the product is distributed, use your fingertips to perform a light, rhythmic tapping motion across the skin. This “staccato” technique, often called “petrissage” in professional massage, increases micro-circulation and encourages the product to absorb into the follicles rather than simply sitting on the surface, which is a primary cause of product pilling.
Mitigating Environmental Stressors at the Source
Even the most diligent hydration routine can be undermined by your immediate micro-environment. If you live in an arid climate or rely heavily on HVAC systems, your skin is in a constant tug-of-war for moisture. Place your hydration station near a source of humidity if possible, or use a facial mister throughout the day. However, be cautious: misting with plain water can actually dehydrate the skin through evaporation. Always use a mist that contains humectants like aloe vera, panthenol, or glycerin. Furthermore, consider the materials in your bedroom; silk or satin pillowcases are less absorbent than cotton, meaning they won’t “steal” the expensive skincare products you’ve meticulously applied before bed, allowing them to remain on your face where they belong.
Customizing for Seasonal and Hormonal Shifts
A professional approach recognizes that skin needs change based on the calendar and your biological cycle. During the winter months, increase the lipid content of your occlusive by mixing in a drop of plant-derived squalane or jojoba oil. These oils are biomimetic, meaning they closely resemble human sebum and are less likely to cause congestion. During the summer or high-humidity periods, pivot to “water-locking” gels that provide a cooling sensation and use lighter humectants like urea, which provides both hydration and mild keratolytic benefits. If you notice hormonal acne or increased sensitivity during specific times of the month, simplify your station to the essentials—cleanser, essence, and a ceramide-rich moisturizer—to avoid overwhelming an already inflamed barrier.
The Chemistry of pH Balancing and Product Ordering
In a professional setting, the sequence of application is dictated by the chemical polarity and viscosity of the products. A common oversight in home routines is applying water-based serums over silicone-heavy primers or heavy emollients, which creates an impenetrable barrier that renders active ingredients useless. To maximize efficacy, always apply products from the lowest molecular weight to the highest. If you are using a vitamin C serum for brightening, apply it immediately after cleansing on dry skin to allow for optimal pH penetration, then wait three minutes before beginning your hydration layering. This ‘waiting period’ is crucial; it allows the skin’s acid mantle to stabilize, preventing the neutralization of actives that could cause irritation or diminished results. When transitioning into your hydration station, ensure your essence is applied while the skin is still slightly damp from the preceding step, as this ‘wet-layering’ acts as a conduit, pulling the humectants deeper into the stratum corneum.
Advanced Delivery Systems: The Role of Occlusion and Patches
Beyond traditional creams, professional-level results often rely on localized delivery systems. Hydrogel masks or silicone-backed patches are excellent additions to your hydration station. Unlike sheet masks, which can dry out and pull moisture from the skin if left on too long, silicone patches create a completely airtight seal. By applying a concentrated hyaluronic acid serum to the under-eye area or nasolabial folds and covering it with a silicone patch for 20 minutes, you force the moisture into the skin via ‘transdermal pressure.’ This technique is particularly effective for treating fine lines caused by dehydration. After removing the patch, you will notice a significant reduction in surface texture, as the skin has been effectively ‘plumped’ from the inside out, a result that topical application alone often fails to achieve.
Strategic Integration of Niacinamide and Panthenol
For those struggling with a compromised barrier, humectants alone are insufficient. Professional protocols often include the use of Vitamin B5 (panthenol) and Niacinamide (Vitamin B3) to support the skin’s natural repair mechanisms. Panthenol is a humectant that also possesses emollient properties, meaning it draws moisture in while simultaneously smoothing the skin’s surface. Niacinamide is essential for stimulating ceramide synthesis, which reinforces the lipid barrier over time. When building your hydration station, look for a ‘barrier serum’ containing these ingredients to use as your mid-layer. Applying this before your heavier occlusive provides a dual-action benefit: the panthenol provides immediate soothing and plumping, while the niacinamide works to prevent future TEWL by strengthening the skin’s structural integrity, making your skin more resilient to environmental stressors throughout the day.
The ‘Towel-Compress’ Technique for Penetration
Professional aesthetic treatments often utilize a warm compress to prepare the skin for absorption, a step easily replicated at home with a dedicated microfiber towel. Soak a clean, lint-free towel in warm, distilled water—avoid tap water if you live in a hard-water area, as mineral deposits can interfere with product absorption. Wring it out until it is damp but not dripping and press it against the face for 45 seconds. This micro-steaming effect softens the keratinized cells of the epidermis and increases the permeability of the skin barrier. Immediately follow this with your essence or serum application. By bypassing the initial resistance of the surface layer, you ensure that high-value ingredients are delivered into the living layers of the skin, rather than merely sitting on the surface where they are prone to evaporation.
Managing ‘Product Pilling’ and Texture Compatibility
A frequent frustration in multi-layering is product pilling—the formation of small, unsightly rolls of residue. This usually occurs when layering products with incompatible bases, such as an oil-based serum followed by a water-based moisturizer, or when applying too much product too quickly. To avoid this, use the ‘fingertip test’: if your skin still feels wet or tacky after 90 seconds, you have applied too much. When layering, use a ‘pressing’ motion rather than a ‘rubbing’ motion to encourage absorption. If you find that your routine frequently pills, switch to a lighter, water-based essence and allow it to fully absorb (until the skin feels ‘tacky’ but not ‘wet’) before applying your next layer. Additionally, avoid mixing products containing high concentrations of silicones with those containing high concentrations of botanical oils, as these substances often struggle to emulsify on the skin’s surface, leading to the dreaded pilling effect.
Targeting Dehydration-Induced Fine Lines
It is important to distinguish between aging-related wrinkles and dehydration-induced fine lines. The latter often appear as a ‘crisscross’ pattern on the cheeks or around the eyes and are highly responsive to intensive hydration. If you notice these lines, your hydration station should focus on ‘filler-like’ ingredients such as sodium hyaluronate crosspolymer or polyglutamic acid. These ingredients have a higher water-binding capacity than standard hyaluronic acid and are better at filling the spaces between cells. Apply these specifically to the affected areas as a spot treatment before applying your full-face serum. By saturating these dehydrated zones with high-performance humectants, you can often erase the appearance of these temporary lines within minutes, providing an immediate, professional-looking ‘lift’ to the complexion.
FAQ: Mastering Your Home Hydration
Q: Can I use too many hydrating layers? A: While hydration is beneficial, “over-layering” can lead to product pilling or a sticky residue. Stick to 3-4 steps at most. If your skin feels tacky after 15 minutes, you have likely used too much product.
Q: Should I exfoliate before my hydration routine? A: Yes, but only once or twice a week. Exfoliation removes dead skin cells, allowing your hydration products to penetrate much deeper. Use a gentle lactic acid or enzyme exfoliator rather than harsh physical scrubs.
Q: What if I have oily skin? A: Hydration is essential even for oily skin. If you are prone to breakouts, choose oil-free, water-based essences and lightweight gel-creams instead of heavy, wax-based occlusives.
Q: Can I use facial tools with these products? A: Absolutely. Using a gua sha or facial roller over your serum layer helps with absorption and reduces facial puffiness. Always ensure the skin is well-lubricated with serum or oil to avoid tugging.
Q: How long does it take to see results? A: You should notice an immediate difference in skin plumpness and texture after the first session. For long-term barrier repair and sustained hydration, consistent application over 4-6 weeks is recommended.
Related posts:
 The Slow Beauty Movement’s Secret Hydration Recipes
 Living Proof Scalp Treatment Review
 Foundation’s Impact on Skin
 Spring Awakening: The Hydrating Serums Your Winter Skin Is Craving
 Proper Order of Skincare Application
 Rael and Good Chemistry Advanced Antioxidant Serum Review
 The Best Toners for Acne-Prone Skin That Won’t Strip Your Face
 The Best Natural Tools for Silky Smooth Skin