
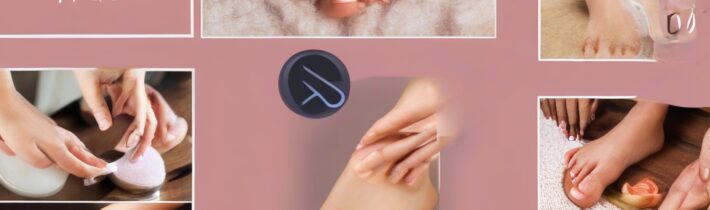
DIY Pedicure at Home: Your Ultimate Guide to Spa-Quality Foot Care
In the hustle and bustle of daily life, finding moments to pause, breathe, and nurture ourselves is not just a luxury – it’s a necessity. Our feet, often overlooked, carry us through every step, every challenge, and every triumph. They deserve appreciation, care, and a little bit of pampering. And what better way to treat your weary feet, and your soul, than with a luxurious DIY pedicure at home?
Imagine transforming your living room into a serene spa, dedicating a precious hour to pamper your feet, all while saving money and ensuring the highest standards of hygiene. This isn’t just about aesthetics; it’s about embracing a mindful self-care ritual that rejuvenates both your body and spirit. This comprehensive guide will walk you through every step, helping you achieve salon-quality results right from the comfort of your own sanctuary. Get ready to put your best foot forward, feeling refreshed, confident, and utterly cherished.
Why Embrace the DIY Pedicure?
Beyond the obvious aesthetic appeal, choosing a DIY pedicure at home offers a multitude of benefits that nourish your well-being:
- Cost-Effectiveness: Regular salon pedicures can add up quickly. A DIY approach allows you to maintain beautiful, healthy feet without breaking the bank, freeing up resources for other self-care treats.
- Hygiene & Safety: You have complete control over the cleanliness of your tools and products, significantly reducing the risk of infections or cross-contamination often associated with shared salon equipment. It’s peace of mind, right at your fingertips (and toes!).
- Personalized Experience: This is *your* spa time. Choose your favorite scents, polishes, and take as much time as you need. There’s no rush, no pressure, just pure indulgence tailored exactly to your preferences.
- Mindfulness & Relaxation: Beyond the aesthetic benefits, the act of giving yourself a pedicure is a wonderful opportunity for mindfulness. It’s a chance to slow down, disconnect from screens, and simply *be*. Let the warm water soothe you, feel the scrub invigorate your skin, and allow your mind to drift into a state of calm.
- Convenience: No appointments, no travel, no waiting. Your personal spa is open whenever you need it most, fitting seamlessly into your schedule, whether it’s a quiet evening or a lazy Sunday afternoon.
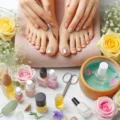
Gathering Your At-Home Pedicure Essentials
Before you dive into your blissful foot care ritual, ensure you have all your tools and products ready. Think of this as assembling your personal spa kit:
- Large Basin or Foot Spa: For a comforting warm water soak.
- Epsom Salts or Essential Oils: Lavender for relaxation, tea tree for its purifying properties, or a slice of lemon for freshness.
- Nail Clippers & File: Keep them sharp and clean for precise nail shaping.
- Cuticle Pusher: A wooden or metal tool to gently push back cuticles.
- Pumice Stone or Foot File: Essential for smoothing rough patches and calluses.
- Foot Scrub: To exfoliate and revitalize your skin. You can even make your own with sugar and olive oil!
- Rich Foot Cream or Lotion: For deep hydration and a luxurious massage.
- Cotton Pads & Nail Polish Remover: For nail prep and any touch-ups.
- Toe Separators: To prevent smudging during polishing.
- Base Coat, Desired Nail Polish Color, Top Coat: The foundation for beautiful, lasting color.
- Soft Towel: For drying your feet.
- Optional: Candles, calming music, a good book, or a warm cup of herbal tea to enhance the ambiance.
Step-by-Step Guide to Your Perfect Pedicure
Now, let’s embark on this journey of self-care, step by delightful step:
1. Set the Mood:
First things first, create your personal oasis. Dim the lights, light a candle with a soothing scent, and put on some calming music. This isn’t just a chore; it’s a ritual dedicated to your well-being. Make it feel special, because you are.
2. The Soothing Soak:
Fill your basin or foot spa with comfortably warm water. Add a generous handful of Epsom salts (renowned for muscle relaxation), a few drops of your favorite essential oil, or even a slice of lemon for a refreshing scent. Submerge your feet and allow yourself to relax for 10-15 minutes. Let the warmth seep into your muscles, softening your skin and melting away tension.
3. Nail & Cuticle Care:
Gently pat your feet dry with a soft towel. Using sharp nail clippers, trim your toenails straight across to prevent ingrown nails. Then, use a nail file to gently smooth any rough edges, shaping them to your preference. Next, gently push back your cuticles with a wooden or metal cuticle pusher. *Only trim cuticles if absolutely necessary and with extreme caution, as they protect your nails from infection. Less is often more.*
4. Exfoliation for Silky Smoothness:
This is where you banish rough patches and reveal beautifully soft skin! Apply a generous amount of foot scrub to your feet, focusing on heels, balls of your feet, and any calloused areas. Gently massage in circular motions, allowing the scrub to work its magic. For stubborn spots, use a pumice stone or foot file on damp skin, always with gentle, consistent pressure. Rinse thoroughly.
5. Deep Hydration & Massage:
Rinse off the scrub completely and thoroughly dry your feet once more. Now, indulge them with a rich foot cream or lotion. Massage it in, working your way up from your toes to your ankles, using firm but gentle strokes. This not only deeply moisturizes but also stimulates circulation and provides a wonderfully relaxing sensation. Don’t forget to massage your calves too – they work hard!
6. Polish Perfection:
- Prep: Wipe your nails with a cotton pad soaked in nail polish remover. This ensures they are free of oils and residue, helping your polish adhere better and last longer.
- Base Coat: Apply a thin, even layer of base coat. This protective layer prevents your nails from staining and provides a smooth surface for your color.
- Color: Once the base coat is dry, apply your first thin coat of nail polish. Let it dry for a few minutes, then apply a second thin coat for opaque, vibrant color. Use toe separators to keep your toes apart and prevent smudging.
- Top Coat: Finish with a high-quality top coat. This adds brilliant shine, protects your polish from chipping, and extends its life.
7. The Grand Finale: Drying Time:
This is crucial! Resist the urge to rush. Allow your nails to air dry completely for at least 30-60 minutes. For faster drying, you can use quick-dry drops or a fan, but patience is your best friend here to avoid smudges.
Tips for a Long-Lasting & Healthy Pedicure
To truly cherish your feet and extend the life of your beautiful DIY pedicure at home, incorporate these simple habits into your routine:
- Regular Maintenance: Don’t wait until your feet are screaming for attention. Schedule a DIY pedicure every 2-4 weeks to maintain foot health and appearance.
- Moisturize Daily: Keep your feet hydrated by applying a good quality lotion or foot cream daily, especially after showering. This prevents dryness and cracking.
- Wear Proper Footwear: Protect your feet from harsh elements and friction by choosing comfortable, well-fitting shoes that offer good support.
- Hydrate from Within: Drinking plenty of water benefits your entire body, including the skin on your feet, helping it stay supple and healthy.
- Be Gentle with Cuticles: Less is more when it comes to cuticles. Pushing them back gently is usually sufficient; aggressive cutting can lead to irritation or infection.
- Invest in Good Tools: Sharp clippers, quality files, and effective scrubs make a huge difference in the ease and effectiveness of your pedicure. Keep them clean and replace them when they get dull.
FAQ: Your DIY Pedicure Questions Answered
Here are some common questions you might have about your at-home foot care routine:
Q: How often should I do a DIY pedicure?
A: For most people, a DIY pedicure at home every 2-4 weeks is ideal to maintain optimal foot health and appearance. However, daily moisturizing and occasional scrubbing can be done in between full pedicures.
Q: Can I use regular body lotion instead of foot cream?
A: While body lotion is better than nothing, foot creams are specifically formulated to be thicker and more intensive, addressing the unique dryness, calluses, and thicker skin of the feet more effectively. They often contain ingredients like urea or salicylic acid for deeper penetration.
Q: How do I prevent nail polish from chipping quickly?
A: Proper nail prep (clean, oil-free nails), applying thin coats of polish, and using a good quality base and top coat are key. Allow adequate drying time between *each* coat to ensure maximum adhesion and durability.
Q: Is it safe to remove my own calluses?
A: Yes, using a pumice stone or foot file gently on damp skin is safe and effective. Avoid harsh metal razors or excessive scraping, which can cause injury, infection, or even stimulate calluses to grow back thicker.
Q: What if I have really dry, cracked heels?
A: For severe dryness, consider an overnight treatment: apply a thick layer of a rich foot cream (or even petroleum jelly), cover your feet with cotton socks, and leave on while you sleep. Repeat regularly, and ensure you’re exfoliating consistently.
Embrace Your Inner Spa Guru
Embracing the DIY pedicure at home is more than just a beauty routine; it’s an act of self-love, a commitment to your well-being, and a delightful way to unwind. You have the power to create a spa-like experience, tailored perfectly to your needs, right in your own space, whenever you desire.
So, go ahead, treat your feet with the kindness and attention they deserve. Nourish your soul with this simple yet profound ritual of self-care. Step out with confidence, knowing you’ve given yourself the gift of comfort, beauty, and appreciation. Your feet work hard for you every day – it’s time to show them some well-deserved love and let them shine!
Related posts:
 How to Apply Color Street Nails Like a Pro
 Fall’s Hottest Nail Polish Trends
 Nail Exfoliation Tips
 DIY the Perfect At-Home Pedicure in 7 Easy Steps
 What Your Nails Say About Vitamin Deficiency
 Benefits of Waterless Manicures
 Understanding Leukonychia: Those White Spots on Your Nails
 Holiday Glitter Nail Trends