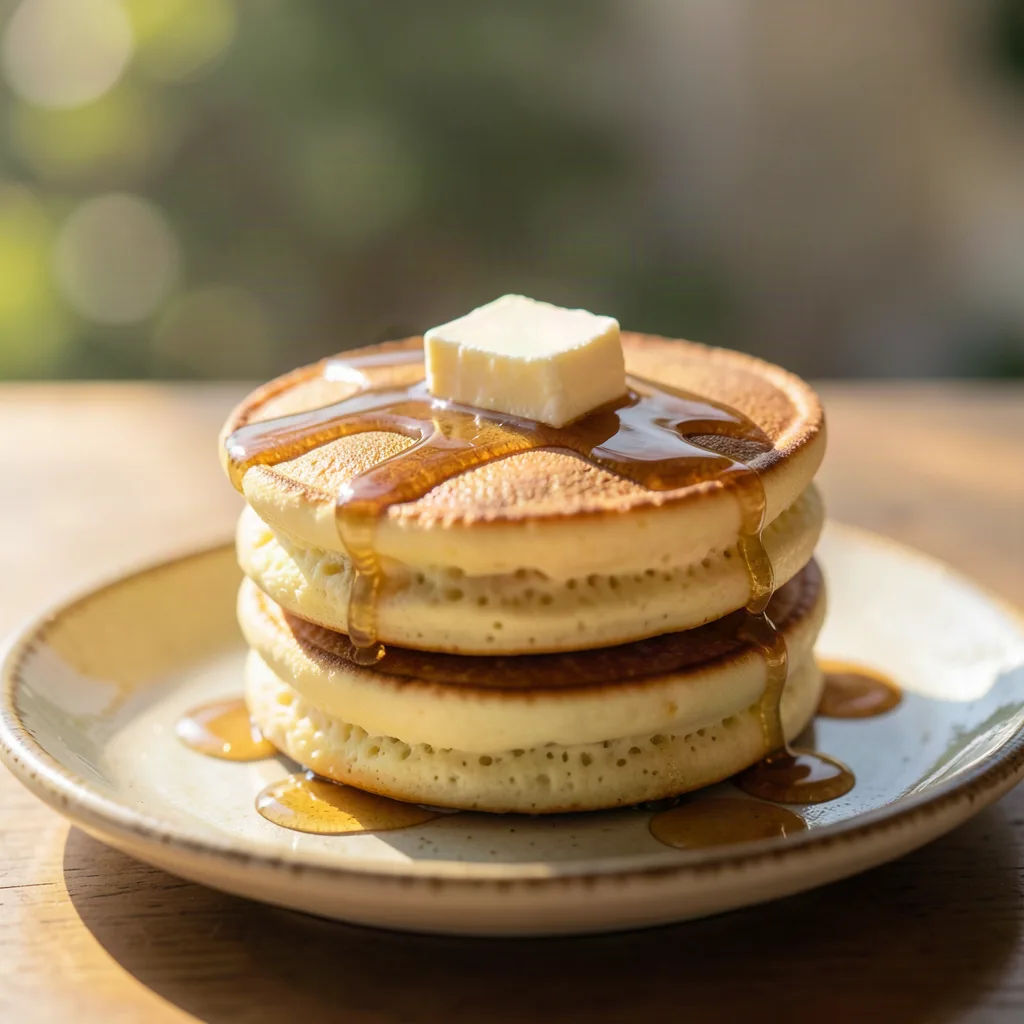
Weekend mornings deserve a little extra magic, and nothing says celebration quite like a stack of fluffy Japanese pancakes rising like clouds on a warm plate. These pancakes, known for their airy texture and gentle sweetness, have captured the imagination of home cooks around the world. In this guide you will discover the science behind the lift, the essential ingredients, step‑by‑step techniques, and creative ways to serve them so every weekend feels like a special occasion.
Key takeaways
- Achieve signature height by folding stiff-peaked egg whites into a flour-based batter to create millions of tiny, expanding air bubbles.
- Use a ring mold and a covered skillet to trap steam, ensuring the pancakes cook evenly and rise vertically without losing their airy structure.
- Preheat your pan to 160°C (320°F) to avoid hot spots and prevent the pancakes from collapsing or burning during the cooking process.
- Keep the meringue stable by using room-temperature eggs and folding gently until just combined to preserve the delicate, cloud-like crumb.
- Scale recipes by weight rather than volume and use a staggered batch-cooking approach to maintain volume for large brunch crowds.
Understanding the Unique Texture
Japanese pancakes differ from classic American flapjacks because they rely on a meringue‑style batter rather than a simple flour‑egg‑milk mixture. Whipping egg whites to stiff peaks introduces millions of tiny air bubbles that expand when heated, giving the pancake its signature height. The batter is then folded gently to preserve those bubbles, resulting in a tender crumb that melts in the mouth. This method also means the pancakes cook more slowly, allowing the interior to set without burning the exterior.
Key to the texture is the ratio of liquid to dry ingredients. Too much milk makes the batter runny and the pancakes spread; too little makes them dense. A typical recipe uses about one part flour to one part liquid by weight, plus a modest amount of sugar and a pinch of salt. The sugar not only sweetens but also stabilizes the foam, while salt enhances flavor without toughening the structure.
Understanding the role of each component helps you troubleshoot. If the pancakes collapse, the meringue may have been under‑whipped. If they are overly chewy, the flour protein may be too high. Adjusting flour type or adding a touch of cornstarch can fine‑tune the crumb.
Essential Ingredients and Why They Matter
Gather the following before you start: cake flour or low‑protein all‑purpose flour, fresh eggs separated into yolks and whites, whole milk, granulated sugar, baking powder, vanilla extract, and a neutral oil for the pan. Cake flour contains less gluten, which keeps the crumb delicate. If you only have all‑purpose flour, sift it twice and replace a tablespoon per cup with cornstarch to mimic the lower protein content.
Egg yolks provide richness and color, while the whites create the lift. Use eggs at room temperature; cold whites do not whip as well. Milk adds moisture and helps dissolve the sugar. A teaspoon of baking powder gives a safety net of extra rise, especially if the meringue loses volume during folding. Vanilla extract adds a subtle aromatic note that complements the pancake’s mild flavor.
For a dairy‑free version, substitute the milk with oat or almond milk and use a plant‑based oil. The flavor remains neutral, and the texture stays light because the meringue does the heavy lifting.
Equipment That Makes a Difference
A non‑stick skillet or a well‑seasoned cast‑iron pan with a tight‑fitting lid is ideal. The lid traps steam, which finishes cooking the top without flipping too early. A wide, shallow ring mold (about 8‑centimeter diameter) helps the batter hold its shape and rise vertically. If you do not have a ring, you can fashion one from a cleaned tin can with both ends removed.
Other useful tools: a handheld electric mixer or a sturdy whisk for the meringue, a silicone spatula for folding, a fine‑mesh sieve for flour, and a ladle or measuring cup for consistent portioning. A kitchen thermometer can confirm the pan surface is around 160°C (320°F) before the first pour.
Investing in a good quality ring mold pays off; the uniform shape makes stacking for presentation effortless and ensures even cooking across each pancake.
Step‑by‑Step Batter Preparation
1. Sift the flour and baking powder together into a large bowl. 2. In a separate bowl whisk the egg yolks, milk, sugar, and vanilla until the sugar dissolves. 3. Pour the wet mixture into the dry ingredients and stir just until combined; the batter will be thick and slightly lumpy. 4. In a clean, dry bowl beat the egg whites with a pinch of salt until soft peaks form, then gradually add a tablespoon of sugar while continuing to beat until stiff, glossy peaks appear. 5. Fold one‑third of the meringue into the base batter to lighten it, then gently fold the remaining meringue in two additions. Stop folding as soon as no streaks of white remain.
Rest the batter for five minutes. This brief pause allows the flour to hydrate fully and the bubbles to stabilize, which translates into a more even rise.
If you prefer a slightly sweeter pancake, increase the sugar in the yolk mixture by half a tablespoon; the extra sugar also helps the meringue hold its shape longer.
Cooking Technique for Perfect Height
Heat the pan over low‑medium heat and brush lightly with oil. Place the ring mold in the center and let it warm for a minute. Ladle about 60 ml of batter into the ring, smoothing the top with the back of the spoon. Cover immediately with the lid and set a timer for three minutes. Resist the urge to peek; the steam does the work.
After three minutes, the edges will look set and the surface will have small bubbles. Slide a thin offset spatula under the pancake, lift the ring, and flip confidently. Replace the lid and cook another two to three minutes until the bottom is golden and the center springs back when lightly pressed. Transfer to a wire rack to keep the bottom crisp while the interior stays moist.
For an extra‑tall stack, repeat the process, stacking each pancake on a warm plate covered loosely with foil. The residual heat keeps them fluffy while you finish the batch.
Troubleshooting Common Pitfalls
Even a well‑tested recipe can misbehave when a single variable shifts. The most frequent complaint is a pancake that collapses after the flip. This usually signals that the meringue never reached true stiff peaks or that the folding motion was too aggressive. To diagnose, lift a small spoonful of batter after folding; it should hold a soft mound without spreading. If it runs, re‑whip the whites with a pinch of cream of tartar for extra stability.
Uneven rise across the surface often stems from an uneven pan temperature. A thin‑bottomed skillet creates hot spots that set the edges before the center has time to expand. Pre‑heat the pan for at least three minutes on low‑medium and verify with an infrared thermometer; aim for 160°C (320°F). If you lack a thermometer, sprinkle a few drops of water — they should dance and evaporate slowly, not sizzle violently.
Sticking is another headache, especially when the ring mold is not properly seasoned or the oil layer is too thin. Brush the interior of the ring with a neutral oil using a silicone brush, then wipe away excess with a paper towel. A well‑seasoned cast‑iron ring will develop a natural non‑stick patina after a few uses.
Over‑cooking yields a dry, rubbery crumb while under‑cooking leaves a gummy center. The three‑minute covered cook followed by a two‑minute uncovered finish works for a standard 8 cm ring, but altitude and humidity shift the timing. At higher elevations, add 30 seconds to each stage; in humid kitchens, reduce by 15 seconds. The pancake is done when the top springs back gently to a fingertip press and a toothpick inserted near the center emerges clean.
Flavor flatness can be corrected without altering structure. A pinch of fine sea salt in the yolk mixture amplifies sweetness, while a splash of vanilla bean paste adds depth without extra liquid. If the pancakes taste overly eggy, increase the sugar in the meringue by half a tablespoon; the sugar also reinforces the foam.
- Collapsed stack → under‑whipped whites or over‑folding
- Uneven height → pan hot spots, insufficient pre‑heat
- Sticking → dry ring, insufficient oil
- Dry crumb → over‑cooked, high heat
- Gummy center → under‑cooked, low heat
- Bland taste → low salt, missing vanilla
Scaling and Batch Cooking for Crowds
Feeding a brunch crowd means multiplying the base recipe while preserving the delicate balance of foam and batter. The simplest method is to scale every ingredient by weight rather than volume; a kitchen scale eliminates the cumulative error that cups introduce. For a dozen pancakes, multiply the single‑batch weights by three and mix in a single large bowl, but keep the meringue separate until the final fold.
Because the meringue loses volume over time, whip the whites in two batches if you need more than eight pancakes. Fold the first meringue batch into the base, cook four pancakes, then whip the second batch and fold into the remaining batter. This staggered approach keeps each pancake airy.
Equipment logistics matter. Two identical non‑stick skillets with matching lids let you run parallel streams, halving total cook time. If only one pan is available, keep finished pancakes warm on a wire rack set over a baking sheet in a 90°C (195°F) oven. Cover loosely with foil to prevent surface drying. Rotate the rack every five minutes for even heat distribution.
Timing the pour is critical. Ladle 60 ml per ring, then start a timer. While the first batch steams, prepare the next ladleful so the transition is seamless. A second pair of hands can manage the lid and ring removal, turning the process into an assembly line.
For very large gatherings, consider a commercial griddle with a fitted stainless‑steel ring set. The larger surface area accommodates six rings at once, and the griddle’s even heat eliminates hot‑spot worries. Adjust the heat to low‑medium and extend the covered cook to four minutes to accommodate the thicker batter column.
Dietary Adaptations: Gluten‑Free, Vegan, Low‑Sugar, Keto
The meringue‑driven lift makes these pancakes surprisingly forgiving to ingredient swaps. For a gluten‑free version, replace cake flour with a 1:1 blend of rice flour, tapioca starch, and potato starch (70 g rice, 20 g tapioca, 10 g potato per 100 g total). Add ½ tsp xanthan gum per cup of blend to mimic gluten’s elasticity. The batter will be slightly thicker; thin with an extra tablespoon of milk if needed.
Vegan cooks can harness aquafaba — the viscous liquid from canned chickpeas — as an egg‑white substitute. Use 90 ml aquafaba per two egg whites, whip with ¼ tsp cream of tartar until stiff peaks form, then fold exactly as you would a traditional meringue. Replace egg yolks with 30 g silken tofu blended smooth with the milk and sugar. The tofu adds richness without detectable bean flavor.
Low‑sugar or diabetic‑friendly pancakes work well with erythritol or monk‑fruit sweetener. Use the same weight as granulated sugar; both dissolve in the yolk mixture and stabilize the foam. Note that erythritol can crystallize on the surface during cooling, giving a faint crunch — a quick dusting of powdered erythritol after plating masks it.
Keto enthusiasts often swap flour for almond flour and add a tablespoon of psyllium husk powder to bind moisture. The batter becomes denser, so increase the meringue volume by 20 % (add an extra egg white) and extend the covered cook by one minute. The result is a nutty, high‑fat pancake that still rises impressively.
All adaptations share a common rule: keep the meringue pristine. Any fat residue on the bowl or whisk will prevent peak formation, so wash tools with hot, soapy water and dry thoroughly before each batch.
Make‑Ahead, Storage, and Reheating Strategies
Busy weekends benefit from a batter that can rest overnight. After folding the meringue, cover the bowl with plastic wrap pressed directly onto the surface and refrigerate up to 12 hours. The flour fully hydrates, and the foam stabilizes, yielding an even more uniform rise. Bring the batter to room temperature for 15 minutes before cooking; cold batter spreads less and may produce a tighter crumb.
Cooked pancakes freeze beautifully. Place cooled pancakes in a single layer on a parchment‑lined tray, freeze solid, then transfer to a zip‑top bag. They keep for three months without noticeable texture loss. To reheat, arrange frozen pancakes on a wire rack over a baking sheet and warm in a 150°C (300°F) oven for eight minutes. The gentle heat restores fluffiness without drying the interior.
For a quicker reheating, a steam basket works wonders. Set a steamer over simmering water, place pancakes in a single layer, cover, and steam for three minutes. The steam re‑hydrates the crumb and revives the cloud‑like texture. Avoid microwaving; the uneven heating collapses the air pockets and creates rubbery edges.
If you plan to serve a stack the next morning, keep the cooked pancakes on a rack in a 90°C (195°F) oven, loosely tented with foil. They stay warm for up to 30 minutes without over‑cooking. For longer holds, switch to the freezer method and reheat just before plating.
Batter that has been refrigerated longer than 12 hours may develop a slight sour note from fermentation. A pinch of baking soda (¼ tsp per batch) neutralizes acidity and restores lift. Test a single pancake first; if it rises well, proceed with the rest.
Advanced Techniques: Soufflé‑Style Double‑Cook, Bain‑Marie, Blow‑Torch Caramelization, Ring‑Free Free‑Form
For an extra‑tall, soufflé‑like pancake, employ a double‑cook method. After the initial three‑minute covered cook, remove the lid, flip, and immediately cover again for another three minutes. Then uncover, increase heat to medium‑high for 30 seconds to set a thin crust, and finish with a quick blast from a culinary blow‑torch. The torch caramelizes the top sugars, creating a delicate brûlée layer that cracks satisfyingly under a fork.
A bain‑marie (water bath) offers the most even heat for ultra‑delicate batters. Place the ring mold in a shallow pan, pour hot water to reach halfway up the ring, and cover the whole assembly with a tight lid. Cook at 150°C (300°F) for six minutes, then flip and continue for four minutes. The water buffer prevents hot spots and yields a pancake with a uniformly moist crumb from edge to center.
Ring‑free free‑form pancakes rely on a thicker batter that can hold shape without a mold. Increase flour by 10 % and reduce milk by 5 %. Spoon batter onto a well‑greased skillet, gently nudge the edges with a spatula to form a round, then cover. The pancake will rise vertically but may spread slightly; the result is a rustic, cloud‑like disc with a charmingly irregular silhouette.
Combining techniques can produce show‑stopping results. Start with a bain‑marie for the first half of cooking, then transfer the ring to a dry skillet for the final uncovered minute and a torch finish. This hybrid delivers the even rise of a water bath and the caramelized crown of a brûlée.
Safety note: when using a blow‑torch, keep the flame moving, maintain a distance of at least 5 cm, and work on a heat‑proof surface. Never torch directly over a non‑stick coating; the intense heat can degrade the coating and release fumes.
Pairing and Presentation: Beverage Pairings, Plating Styles, Seasonal Garnishes, Edible Flowers
The subtle sweetness and airy texture of Japanese pancakes invite thoughtful pairings. A light, floral tea — such as a first‑flush Darjeeling or a jasmine green — cleanses the palate between bites without overwhelming the delicate flavor. For a coffee lover, a pour‑over from a bright Ethiopian Yirgacheffe, served black, mirrors the pancake’s gentle acidity.
If you prefer a cold beverage, a sparkling yuzu soda or a chilled matcha latte adds a refreshing contrast. Alcoholic brunch options include a dry sake (junmai ginjo) served slightly chilled, or a mimosa made with a dry prosecco and a splash of white peach puree.
Plating transforms the stack into a centerpiece. For a minimalist look, place three pancakes on a matte white plate, drizzle a thin line of maple syrup in a zigzag, and dust with powdered sugar through a fine sieve. Add a single mint leaf at the 10‑o’clock position for a pop of green.
Seasonal garnishes keep the dish fresh year‑round. Spring calls for sliced strawberries, rhubarb compote, and a drizzle of vanilla‑bean whipped cream. Summer invites mango ribbons, passion‑fruit curd, and toasted coconut flakes. Autumn pairs well with spiced apple compote, candied pecans, and a dusting of cinnamon. Winter shines with persimmon slices, yuzu marmalade, and a sprinkle of kinako (roasted soybean flour).
Edible flowers — such as violets, nasturtiums, or micro‑orchids — add visual elegance and a faint vegetal note. Place two or three blossoms atop the highest pancake just before serving; they wilt quickly under heat, so add them at the last moment.
Cultural Context and Modern Twists
Japanese soufflé pancakes trace their lineage to the post‑war café boom in Tokyo’s Ginza district, where Western‑style tearooms adapted the French soufflé technique to a handheld format. The iconic tall stack became a symbol of “kawaii” culture, fueling Instagram trends and inspiring specialty shops across Osaka, Fukuoka, and beyond.
Regional variations showcase local ingredients. In Hokkaido, dairy‑rich milk and fresh cream produce an extra‑silky crumb, while Okinawa’s purple sweet potato powder lends a violet hue and subtle earthiness. Kansai cafés often fold in a whisper of yuzu zest, giving a citrus lift that balances the sweetness.
Modern fusion chefs have pushed the concept further. A matcha‑white chocolate ganache filling turns each pancake into a layered dessert, while a savory version incorporates dashi‑infused batter, topped with a soft‑boiled egg, nori strips, and a drizzle of ponzu‑mayonnaise. Vegan pop‑ups experiment with black sesame paste swirled into the meringue, creating a striking marble effect.
Home cooks can borrow these ideas without professional equipment. A teaspoon of culinary‑grade matcha folded into the dry mix yields a vivid green stack; a spoonful of black cocoa powder creates a dramatic dark version that pairs beautifully with orange‑segment garnish. For a playful twist, pipe a thin line of fruit‑puree gel between layers using a squeeze bottle — the gel sets quickly and adds a burst of flavor with each bite.
Understanding the cultural roots enriches the cooking experience. When you whisk the meringue, you’re participating in a dialogue between French patisserie precision and Japanese attention to detail. Each flip honors that exchange, and every stack served becomes a small celebration of culinary cross‑pollination.
Flavor Variations and Toppings
Classic Japanese pancakes shine with a drizzle of maple syrup and a pat of butter, but the neutral canvas invites creativity. For a citrus twist, fold zest of one lemon into the batter and serve with a dollop of whipped cream and fresh berries. Matcha lovers can whisk a teaspoon of culinary‑grade matcha powder into the dry ingredients for a vibrant green hue and earthy flavor. Chocolate chips folded in at the end create pockets of melty richness.
Savory options work equally well. Omit the sugar, add a pinch of black pepper, and fold in finely chopped scallions and shredded cheese. Top with a poached egg and a splash of soy‑based hollandaise for a brunch that feels both Japanese and Western. Seasonal fruit compotes, sweet red bean paste,
Related posts:
 15-Minute Dairy-Free Dinner Ideas
 Beyond Breakfast: The Plant-Based Sausage That’s Changing the Morning Game
 $5 iPhone Ring Holder Health Hack
 Perfect Scrambled Eggs Tutorial
 HexClad: Gordon Ramsay’s Choice
 Perfect Hard-Boiled Eggs: A Simple Guide
 Healthy Banana Pancakes Recipe
 Guilt-Free Cinnamon Roll Recipe