Introduction
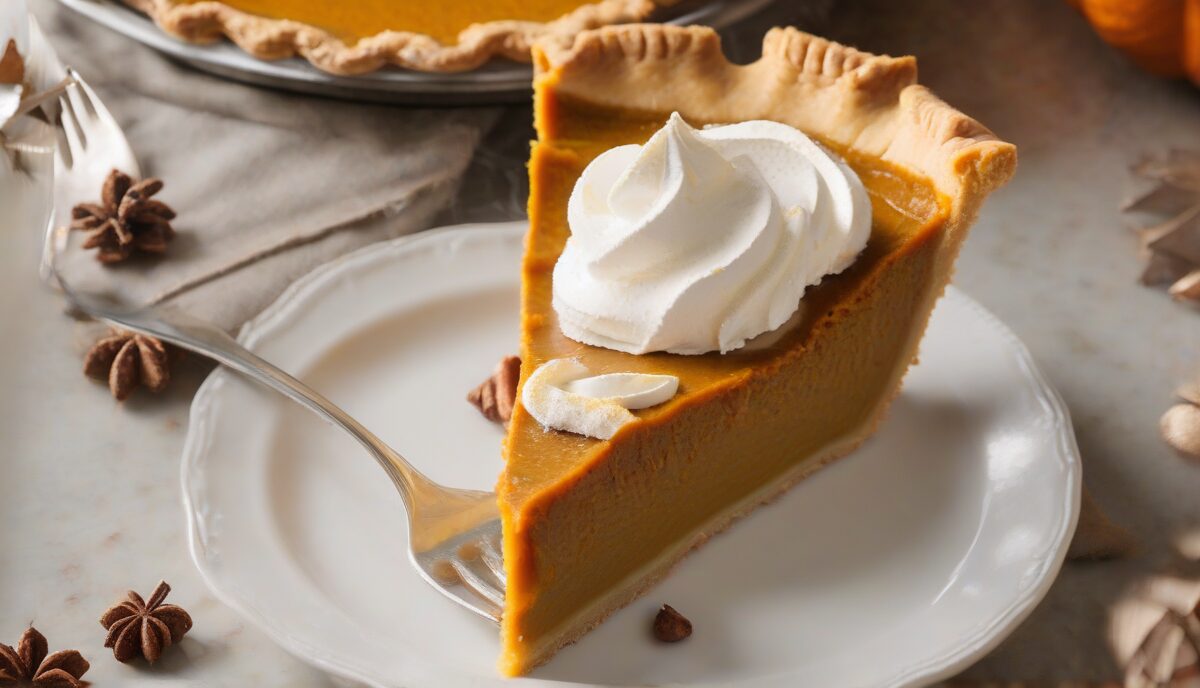
The holiday season is upon us, and with it comes the joy of festive meals. However, for those with gluten sensitivities or celiac disease, traditional holiday dishes can be a source of stress rather than delight. Enter the gluten-free pumpkin pie—a tasty, inclusive dessert that everyone can enjoy.
Why Choose Gluten-Free?
Gluten sensitivity and celiac disease are more common than you might think. For those affected, consuming gluten can lead to a range of uncomfortable and even dangerous symptoms. Opting for a gluten-free dessert ensures that all your guests can indulge without concern. Plus, gluten-free options have come a long way in terms of taste and texture, making them a win-win for both inclusivity and flavor.
Ingredients for Gluten-Free Pumpkin Pie
Before we dive into the recipe, let’s gather our ingredients. Here’s what you’ll need:
- 1 gluten-free pie crust (store-bought or homemade)
- 1 can (15 oz) of pumpkin puree
- 1 cup of coconut milk or any dairy-free milk
- 2/3 cup of brown sugar
- 2 large eggs
- 1 teaspoon of ground cinnamon
- 1/2 teaspoon of ground ginger
- 1/4 teaspoon of ground cloves
- 1/4 teaspoon of ground nutmeg
- 1/2 teaspoon of salt
- 1 teaspoon of vanilla extract
Step-by-Step Recipe
Follow these steps to create a delicious gluten-free pumpkin pie:
- Prepare the crust: If you’re using a store-bought crust, follow the package instructions. If you’re making your own, roll out the dough and fit it into a 9-inch pie dish. Trim the edges and set aside.
- Preheat your oven: Set your oven to 375°F (190°C).
- Mix the filling: In a large bowl, combine the pumpkin puree, coconut milk, brown sugar, eggs, cinnamon, ginger, cloves, nutmeg, salt, and vanilla extract. Mix until smooth.
- Fill the crust: Pour the pumpkin mixture into the prepared crust, spreading it evenly.
- Bake the pie: Place the pie in the preheated oven and bake for 50-60 minutes, or until the filling is set and a knife inserted into the center comes out clean.
- Cool and serve: Allow the pie to cool completely before serving. Top with whipped cream if desired.
Tips for a Perfect Gluten-Free Pumpkin Pie
Here are some tips to ensure your gluten-free pumpkin pie turns out perfect every time:
- Use high-quality ingredients: Opt for pure pumpkin puree and high-quality spices for the best flavor.
- Don’t overbake: Keep an eye on your pie as it bakes. Overbaking can lead to a cracked or dry filling.
- Let it cool: Allowing the pie to cool completely helps the filling set properly.
- Experiment with crusts: There are many gluten-free crust options available, from almond flour to oat-based crusts. Find the one that suits your taste preference.
Navigating the Complexities of Gluten-Free Flour Blends
When transitioning from a standard wheat-based crust to a gluten-free version, the most significant hurdle is the absence of gluten’s structural network. Gluten acts as the “glue” that provides elasticity and strength; without it, doughs tend to be brittle, crumbly, or overly sandy. To achieve a flaky, buttery crust that rivals traditional recipes, understanding the composition of your flour blend is essential. Most commercial all-purpose gluten-free flours are a mix of rice flour (white or brown), potato starch, and tapioca starch. However, the ratio of these ingredients determines the final texture of your pumpkin pie base.
For a pie crust that holds its shape, look for blends that include a high percentage of superfine white rice flour. Coarser grinds can result in a “gritty” mouthfeel that detracts from the creamy pumpkin custard. Furthermore, the presence of a binder—most commonly xanthan gum or guar gum—is non-negotiable. These hydrocolloids mimic the properties of gluten by trapping moisture and providing the necessary tension to roll out the dough. If your chosen blend does not contain a binder, you will need to add approximately 1/2 teaspoon of xanthan gum per cup of flour to prevent the crust from shattering once it hits the oven’s heat.
An emerging trend in gluten-free baking involves the use of ancient grain flours like sorghum or millet. Sorghum flour, in particular, offers a mild, slightly sweet flavor profile that complements the earthy notes of pumpkin and nutmeg. When building a custom blend, consider a ratio of 40% whole grain flour (sorghum or brown rice), 40% starches (tapioca and potato), and 20% protein-rich flour (almond or chickpea) to create a balanced nutritional profile and a robust structure. This complexity in the flour blend ensures that the crust doesn’t just serve as a vessel for the filling but contributes its own nuanced flavor to the dessert.
Technical Strategies for Handling Fragile Gluten-Free Dough
Rolling out gluten-free dough requires a shift in technique compared to traditional pastry. Because the dough lacks elasticity, it is prone to tearing and sticking to surfaces. To mitigate this, always roll your dough between two sheets of heavy-duty parchment paper. This eliminates the need for excess dusting flour, which can dry out the dough and make it even more brittle. If the dough becomes too warm, the fats (butter or vegan shortening) will melt, leading to a greasy, tough crust. Aim to keep the dough at a cool room temperature—if it feels tacky or limp, slide the parchment-covered sheet onto a baking tray and chill it in the refrigerator for 10 minutes before continuing.
When transferring the rolled dough to your pie plate, do not attempt to lift it by hand. Instead, remove the top layer of parchment, flip the dough over the pie dish, and gently peel back the remaining parchment. If the dough cracks during this process, do not panic. Unlike wheat dough, which becomes tough when overworked, gluten-free dough is incredibly forgiving when it comes to “patchwork.” You can simply press stray pieces back into the gaps using your fingers moistened with a drop of cold water. This malleability allows you to create a seamless finish even if the initial transfer is less than perfect.
Edge design is another area where gluten-free dough behaves differently. Intricate braided edges or high-standing crimps may slump during baking because the dough lacks the structural integrity to hold sharp peaks. For the best visual results, opt for a simple fork-pressed edge or a wide, low-profile flute. If you are determined to have decorative elements, such as leaf cutouts, bake them separately on a cookie sheet and place them atop the finished pie after it has cooled. This prevents the decorations from sinking into the custard or losing their definition during the long bake time required for the filling.
Preventing the “Soggy Bottom” and Ensuring Structural Integrity
One of the most common complaints with gluten-free pumpkin pie is the “soggy bottom”—a phenomenon where the moisture from the pumpkin custard seeps into the crust, leaving it pale and gummy. To combat this, blind baking (pre-baking) the crust is a mandatory step. Even if your recipe suggests otherwise, giving the crust a head start in the oven allows the starches to set and creates a moisture-resistant barrier. Line your raw crust with parchment and fill it with pie weights or dried beans, baking at 375°F for about 12-15 minutes until the edges are just beginning to turn golden.
To further reinforce the barrier between the crust and the filling, consider applying a “sealant.” After the blind baking is complete and the crust is still warm, brush a thin layer of beaten egg white over the bottom and sides. The residual heat will cook the egg white instantly, creating a waterproof film. For a dairy-free or vegan alternative, a very thin layer of melted cocoa butter or even a light dusting of gluten-free breadcrumbs can serve a similar purpose. These micro-adjustments ensure that every slice of pie maintains a crisp, distinct snap when bitten into, providing a necessary textural contrast to the soft filling.
The choice of pie dish also plays a role in heat distribution. While ceramic dishes are aesthetically pleasing for holiday tables, they are slow to heat up. For the crispest gluten-free crust, a dull-finish metal pan or a tempered glass dish is often superior. If you must use ceramic, place a heavy-duty baking sheet in the oven while it preheats and set your pie dish directly onto the hot sheet. This conductive heat jumpstarts the bottom-crust cooking process, ensuring the base is fully rendered by the time the custard is set.
Elevating the Filling: Fresh Puree and Flavor Enhancement
While canned pumpkin puree is a reliable and convenient staple, roasting your own squash can elevate a gluten-free pumpkin pie from standard to spectacular. Not all pumpkins are created equal; the large varieties used for Jack-o’-lanterns are too watery and fibrous for baking. Instead, seek out “Sugar Pies,” “New England Pie Pumpkins,” or even better, heirloom varieties like Kabocha or Long Island Cheese pumpkins. These varieties have a denser flesh and a higher sugar content, which translates to a richer, more velvety custard.
To prepare fresh puree, halve the squash, remove the seeds, and roast it cut-side down at 400°F until the skin is blistered and the flesh is fork-tender. Once cooled, scoop the flesh into a food processor and blend until completely smooth. A critical edge case to consider is the moisture content of fresh puree, which is often higher than canned versions. To prevent a runny pie, strain your homemade puree through a fine-mesh sieve or cheesecloth for at least two hours (or overnight in the fridge). This concentrated “pumpkin butter” will provide an intense flavor and a more stable structure for your gluten-free dessert.
Flavor complexity can be further enhanced by blooming your spices. Instead of simply whisking the cinnamon, ginger, and cloves into the cold pumpkin mixture, try heating them gently in a small pan with a tablespoon of melted butter or coconut oil for 30 seconds. This releases the fat-soluble compounds in the spices, making their aroma more pronounced throughout the pie. For a sophisticated twist, consider adding a teaspoon of freshly grated orange zest or a tablespoon of dark rum. The acidity of the zest cuts through the richness of the coconut milk, while the rum adds a deep, caramelized undertone that pairs beautifully with brown sugar.
Managing Temperature and Preventing the Dreaded Center Crack
The hallmark of a poorly baked pumpkin pie is a large, unsightly crack running through the center. This occurs when the eggs in the custard overcook and tighten, pulling the filling apart. Because gluten-free crusts can sometimes take longer to brown, there is a high risk of overbaking the filling while waiting for the crust to finish. To avoid this, focus on the internal temperature of the pie. A pumpkin pie is technically a baked custard; it is finished when the internal temperature reaches 175°F (79°C). At this point, the edges should be slightly puffed and set, but the center 2 inches should still jiggle like firm gelatin when the pan is gently shaken.
Residual heat is your best friend in custard baking. Once the pie reaches the 175°F mark, remove it from the oven immediately. The center will continue to firm up as it cools on the counter. If you wait until the center is completely still before removing it, the pie will almost certainly crack as it reaches room temperature. If you do find yourself with a crack, don’t worry—this is the perfect opportunity to use decorative gluten-free crust cutouts or a generous dollop of whipped topping to mask the imperfection.
Cooling is a multi-stage process that cannot be rushed. A gluten-free pumpkin pie needs at least 3 to 4 hours at room temperature to allow the starches and proteins to fully stabilize. Placing a hot pie directly into the refrigerator can cause “weeping” (syneresis), where beads of moisture form on the surface, making the top of the pie slippery and diluting the spices. Once the pie has reached room temperature, cover it loosely with foil or a pie dome and refrigerate. This slow cooling curve ensures a dense, creamy texture that slices cleanly without sticking to the knife.
Tailoring the Recipe for Multiple Dietary Restrictions
In many households, gluten-free needs often overlap with other dietary restrictions, such as veganism, keto lifestyles, or low-FODMAP requirements. To adapt the existing recipe for a vegan guest, the eggs can be replaced with a “flax egg” (1 tablespoon ground flaxseed meal mixed with 3 tablespoons water per egg) or a commercial egg replacer. Note that flax seeds will add a slightly nutty flavor and a speckled appearance to the filling. Alternatively, 1/4 cup of silken tofu blended into the pumpkin puree provides an exceptionally smooth texture without the need for eggs, though you may need to add an extra tablespoon of cornstarch or arrowroot powder to ensure the pie sets firmly.
For those following a ketogenic or low-carb diet, the brown sugar can be substituted with an erythritol-based brown sugar replacement or monk fruit sweetener. However, sugar provides more than just sweetness; it also contributes to the moisture and “bulk” of the filling. When using sugar alcohols, the filling may set slightly firmer, so consider adding an extra tablespoon of heavy cream or full-fat coconut milk to maintain the desired creaminess. For the crust, a mixture of almond flour and melted butter (or coconut oil) pressed directly into the pan—rather than rolled—works best for keto versions, as it bypasses the need for starch-heavy gluten-free flour blends.
Low-FODMAP guests can also enjoy this treat with a few mindful adjustments. Pumpkin is low-FODMAP in servings of 1/3 cup, which is roughly one slice of pie. Ensure the milk used is lactose-free or a suitable nut milk like almond or macadamia. Be cautious with the sweeteners; while maple syrup is low-FODMAP, large amounts of honey or agave should be avoided. By making these small substitutions, the gluten-free pumpkin pie becomes a truly universal centerpiece that respects the health needs of every person at the table.
Aesthetic Finishes and Stabilized Toppings
The visual presentation of a gluten-free pumpkin pie is the final step in making it feel like a professional holiday dessert. Since gluten-free crusts can sometimes look a bit more rustic or pale than wheat-based ones, a high-gloss finish can make a significant difference. Before the final bake, brush the exposed edges of the crust with a mixture of egg yolk and a teaspoon of heavy cream. This creates a deep golden-brown sheen that looks appetizing and hides any minor imperfections in the dough’s texture.
When it comes to toppings, a standard whipped cream often deflates within an hour, especially if the pie is sitting out on a buffet. To create a “stabilized” whipped cream that holds its peaks for hours, add a small amount of gelatin or mascarpone cheese to the cream while whipping. For a completely dairy-free and gluten-free topping, use chilled full-fat coconut milk. Scoop only the solid white cream from the top of the can, leaving the watery liquid behind, and whip it with powdered sugar and vanilla. The high fat content in the coconut cream provides a natural stability that rivals traditional whipped cream.
Finally, consider the art of the slice. To achieve clean, restaurant-quality slices, use a thin-bladed knife dipped in hot water and wiped dry between every single cut. This prevents the filling from dragging and ensures that the beautiful orange custard and the crisp crust are clearly defined. For an extra touch of elegance, dust the top of the pie with a light sprinkle of freshly grated nutmeg or a few flakes of sea salt just before serving. The salt enhances the sweetness of the pumpkin and the warmth of the spices, providing a sophisticated finish to your inclusive holiday masterpiece.
Frequently Asked Questions
1. Can I make this pie dairy-free?
Yes, you can make this pie dairy-free by using coconut milk or any dairy-free milk of your choice.
2. How should I store the pumpkin pie?
Store the pumpkin pie in the refrigerator, covered, for up to four days.
3. Can I freeze gluten-free pumpkin pie?
Yes, you can freeze the pie. Wrap it tightly in plastic wrap and aluminum foil before freezing. Thaw in the refrigerator before serving.
4. What can I use as a substitute for brown sugar?
You can use coconut sugar or maple syrup as a substitute for brown sugar.
5. Can I use a homemade gluten-free crust?
Absolutely! Homemade gluten-free crusts can add a personal touch to your pie. There are many recipes available online to guide you.
Conclusion
A gluten-free pumpkin pie is a delicious and inclusive dessert option for the holiday season. With the right ingredients and a little bit of care, you can create a pie that everyone, regardless of dietary restrictions, will enjoy. Happy baking!
Related posts:
 Gluten-Free Spinach Muffins Recipe
 The Coconut Pudding That Tastes Like Dessert But Isn’t
 Healthy Pumpkin Spice Latte Recipe
 Guilt-Free Cinnamon Roll Recipe
 Gluten-Free Pumpkin Pie by Jennifer Esposito
 Partake’s Pizza Crust Mix: A Gluten-Free, Allergen-Friendly Option
 A Gluten-Free Banana Pudding Recipe
 Is Starbucks Almond Milk Healthy?