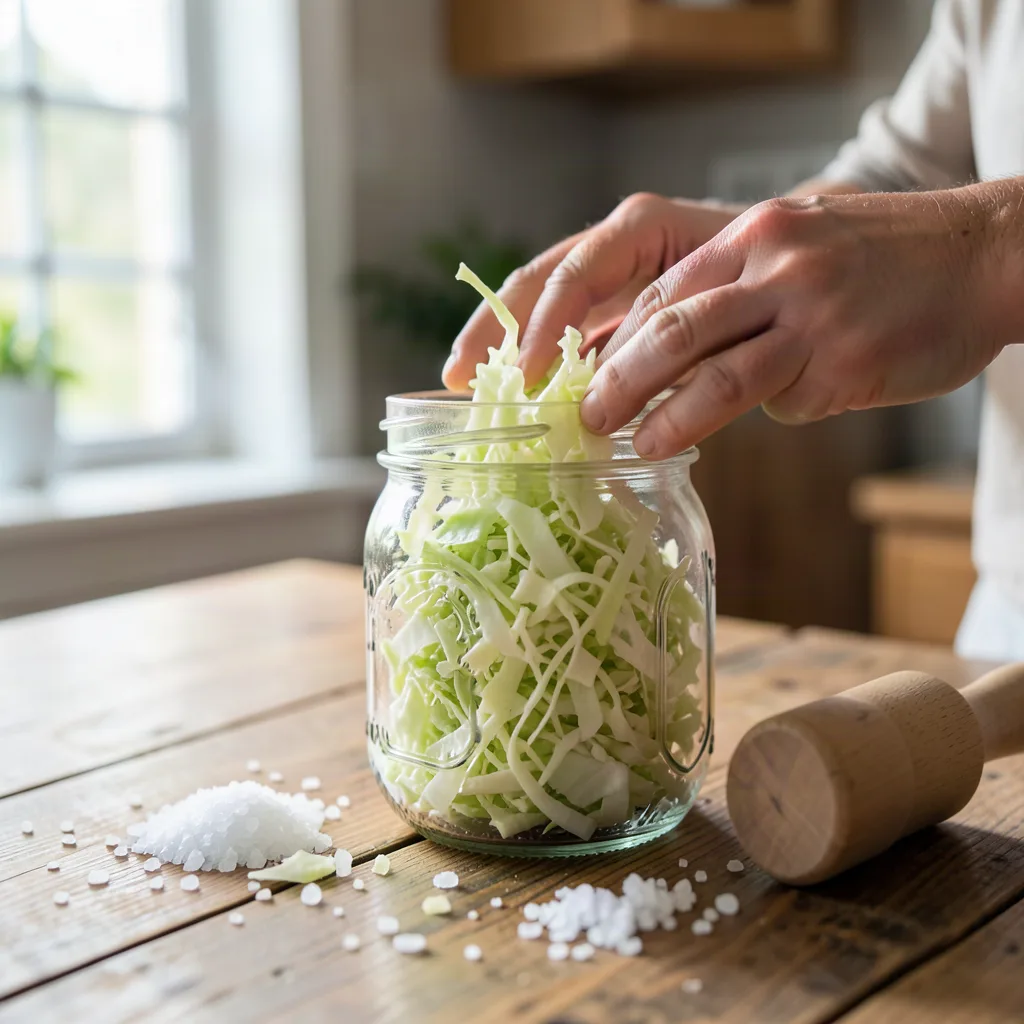
There is something deeply satisfying about the process of fermentation. It is a slow, rhythmic dance between nature and patience, transforming a simple head of cabbage into a tangy, probiotic-rich condiment that has been a staple of human diets for centuries. Making your own sauerkraut at home is not only a cost-effective way to preserve vegetables, but it is also an empowering entry point into the world of artisanal food preservation. Unlike store-bought versions that are often pasteurized—a process that kills the beneficial bacteria—homemade sauerkraut is alive, bubbling with the natural enzymes and microorganisms that support a healthy lifestyle.
Key takeaways
- Use a 2% salt-to-cabbage ratio by weight for safe fermentation and optimal texture.
- Ensure cabbage remains fully submerged in its own brine to create the necessary anaerobic environment.
- Avoid iodized table salt, as it can hinder the growth of beneficial lactic acid bacteria.
- Store finished sauerkraut in the refrigerator to slow down fermentation and preserve its quality for months.
Understanding the Science of Lacto-Fermentation
At its core, sauerkraut is the product of lacto-fermentation. This is a biological process where naturally occurring lactic acid bacteria (primarily from the Lactobacillus family) convert the sugars found in cabbage into lactic acid. This acid acts as a natural preservative, lowering the pH of the environment to a level where spoilage-causing bacteria cannot survive.
For this process to work, two conditions must be met: an anaerobic (oxygen-free) environment and the presence of salt. Salt serves a dual purpose. First, it draws the water and nutrients out of the cabbage cells through osmosis, creating a brine that submerges the vegetables. Second, it inhibits the growth of harmful bacteria while allowing the salt-tolerant Lactobacillus to thrive. When the cabbage is kept beneath the brine, the oxygen is excluded, ensuring that the fermentation proceeds safely and produces that characteristic sharp, acidic flavor we love.
Essential Equipment and Ingredients
One of the most appealing aspects of making sauerkraut is that you do not need expensive, specialized laboratory equipment. Most of what you need is likely already in your kitchen. However, using the right materials ensures a consistent result and prevents contamination.
- Cabbage: A medium-to-large head of fresh, dense green cabbage is the gold standard. You can also use red cabbage for a vibrant color and slightly different nutrient profile.
- Salt: This is the most critical ingredient. Use non-iodized salt, such as sea salt or kosher salt. Iodine and anti-caking agents found in table salt can inhibit fermentation or turn the brine a cloudy, unappealing color.
- Glass Jars: Wide-mouth Mason jars are ideal. Glass is non-reactive, meaning it won’t leach chemicals or metallic flavors into your ferment.
- Fermentation Weights: To keep the cabbage submerged, you need a weight. This can be a professional glass fermentation weight, a smaller glass jar that fits inside the larger one, or even a clean, scrubbed cabbage leaf folded and pressed down.
- Mixing Bowl and Shredder: A large stainless steel or ceramic bowl and a sharp knife or a mandoline slicer for consistent shredding.
Step-by-Step Guide to Making Classic Sauerkraut
Follow these steps carefully to ensure a successful ferment. The key is cleanliness; ensure your hands and all equipment are thoroughly washed with soap and water.
1. Preparation and Shredding
Start by removing the outer, wilted leaves of the cabbage. Save one large, clean outer leaf for later. Cut the cabbage into quarters and remove the hard core. Shred the cabbage thinly—either with a knife or a mandoline. The thinner the shreds, the more surface area is exposed, which allows the salt to draw out the moisture more efficiently.
2. Salting and Massaging
Place the shredded cabbage in your large mixing bowl. The general rule of thumb for sauerkraut is 2% salt by weight. For a standard medium head of cabbage (approx. 2kg), this is about 40 grams of salt. Sprinkle the salt over the cabbage and begin massaging it with your hands. Use a squeezing and kneading motion. You will notice the cabbage softening and a pool of liquid (the brine) forming at the bottom of the bowl. Continue for 5-10 minutes until the cabbage is limp and well-coated in brine.
3. Packing the Jar
Transfer the cabbage into your clean glass jar in small handfuls. After each addition, press down firmly with your fist or a tamper to remove air pockets. The goal is to pack the cabbage as tightly as possible. Once all the cabbage is in, pour any remaining brine from the bowl over the top. The cabbage should be completely submerged beneath the liquid.
4. Weighting and Sealing
Take the reserved outer cabbage leaf, fold it to fit the diameter of the jar, and place it on top of the shredded cabbage. Place your fermentation weight on top of this leaf. This prevents the cabbage from floating to the surface and touching the air. Seal the jar with a lid. If using a standard lid, do not tighten it completely, or use a fermentation lid that allows gases to escape while keeping dust out.
Choosing the Right Cabbage and Salt
While any cabbage can technically be fermented, the variety you choose affects the texture and flavor. Green cabbage is the traditional choice, offering a crisp texture and a balanced tang. Red cabbage contains more anthocyanins (antioxidants) and results in a slightly sweeter, more earthy kraut. You can even mix the two for a visually stunning blend.
Regarding salt, the type is non-negotiable. Avoid iodized table salt. Iodine is an antimicrobial agent; while it is healthy in your diet, it can hinder the growth of the very bacteria you are trying to cultivate. Pure sea salt or Himalayan pink salt are excellent choices because they provide trace minerals that can actually support the fermentation process. Always weigh your salt if possible, as tablespoons can vary wildly in volume depending on the grain size of the salt.
Fermentation Timelines and Environment
Once your jar is packed and weighted, it is time for the waiting game. The environment plays a massive role in how quickly your sauerkraut develops.
Temperature: The ideal temperature for fermentation is between 65°F and 75°F (18°C to 24°C). If the room is too cold, the bacteria will work very slowly, and it may take several weeks to develop flavor. If it is too hot (above 80°F), the cabbage may soften too quickly, and you increase the risk of unwanted yeast growth.
Duration: Most homemade sauerkraut is ready in 1 to 4 weeks. During the first few days, you will see bubbles forming—this is a sign that the bacteria are active and producing carbon dioxide. If you are using a tight lid, you must “burp” the jar once a day by opening it slightly to release the pressure, otherwise, the glass could crack.
Tasting: Start tasting your kraut after 7 days. If it is too salty, let it ferment longer. If it has reached a tartness that you enjoy, it is ready to be moved to the refrigerator.
Troubleshooting Common Issues
Fermentation is a natural process, and sometimes things don’t go perfectly. Most issues are easily identified and solved.
- White Film on Top (Kahm Yeast): You may notice a thin, white, matte film on the surface of the brine. This is usually Kahm yeast. It is harmless and does not spoil the batch, though it can affect the flavor if left too long. Simply skim it off with a clean spoon.
- Fuzzy Mold: Unlike Kahm yeast, mold is fuzzy and often appears in colors like green, black, or pink. If you see fuzzy mold, it means oxygen reached the cabbage. If it is only a small spot on the surface, you can remove a thick layer of cabbage around it, but if the mold has penetrated deep or the smell is putrid, it is safer to discard the batch.
- Soft Cabbage: If your kraut is mushy rather than crunchy, it could be due to too high a temperature during fermentation or using cabbage that was already starting to break down.
- Off-Smells: Sauerkraut should smell sour and acidic, similar to vinegar. A strong “sulfur” smell is normal in the first few days, but a smell of rot or putrefaction is a sign of failure.
Flavor Variations and Creative Add-ins
Once you have mastered the basic recipe, you can begin experimenting with flavors. The 2% salt ratio remains the same, but you can add other vegetables and spices to the mix during the massaging stage.
- The Root Blend: Add shredded carrots and parsnips. This adds a natural sweetness that balances the acidity of the cabbage.
- The Spicy Kick: Incorporate thinly sliced jalapeños, red pepper flakes, or a grated piece of fresh ginger. Ginger adds a warming note that is excellent for digestion.
- The Aromatic Approach: Add caraway seeds, mustard seeds, or juniper berries. Caraway is the traditional German addition and helps reduce the bloating sometimes associated with cabbage.
- The Fruity Twist: Grated apple or pear can be added to create a sweeter, more complex ferment that pairs beautifully with pork or strong cheeses.
How to Store and Preserve Your Kraut
Once you are happy with the flavor of your sauerkraut, the fermentation process needs to be slowed down. This is achieved by moving the jar into the refrigerator. The cold temperature puts the Lactobacillus into a dormant state, preserving the flavor and texture for months.
Storage Tips:
- Keep the cabbage submerged in brine even in the fridge. If the brine level drops, the exposed cabbage may develop mold.
- Always use a clean fork or spoon to remove portions. Introducing bacteria from your mouth or a dirty utensil can contaminate the entire jar.
- Check the jar occasionally. If you notice the brine becoming overly cloudy or the smell changing, evaluate it carefully.
Properly fermented and refrigerated sauerkraut can last for 6 to 12 months, though most people find they eat it much faster given its versatility.
Incorporating Sauerkraut into Your Daily Diet
Sauerkraut is more than just a topping for a hot dog. Because of its bright acidity and crunch, it works as a flavor enhancer in a wide variety of dishes.
As a Condiment: Use it as a probiotic-rich alternative to mayonnaise or ketchup on sandwiches, burgers, and wraps. It provides a sharp contrast to rich, fatty meats.
In Salads: Mix sauerkraut with fresh apple slices, walnuts, and a drizzle of olive oil for a refreshing side salad. The fermented cabbage acts as its own dressing.
Warm Applications: While heating sauerkraut kills the live probiotics, the flavor remains delicious. Stir it into sautéed potatoes, fold it into a grilled cheese sandwich, or serve it alongside braised pork shoulder.
Morning Boost: Some people enjoy a small spoonful of raw sauerkraut alongside their morning eggs to stimulate digestive enzymes for the rest of the day.
Frequently Asked Questions
Q: Do I need to buy a special fermentation crock?
A: No, you do not. While crocks are traditional and excellent for large batches, a standard glass Mason jar with a weight works perfectly for home cooks. The most important factor is that the cabbage remains submerged in its own brine.
Q: Why is my sauerkraut not bubbling?
A: If you don’t see bubbles, it could be that your environment is too cold, which slows down the bacteria, or you may have used too much salt, which can inhibit the start of fermentation. Ensure your jar is in a spot that stays around 65-75°F.
Q: Can I use a food processor to shred the cabbage?
A: Yes, you can. However, be careful not to over-process the cabbage into a mush. You want clean, thin shreds. If the cabbage is pulverized, it may release too much water too quickly and result in a softer texture.
Q: Is it safe to eat sauerkraut if it tastes very sour?
A: Yes, a very sour taste is a sign of a successful fermentation. The longer it ferments, the more lactic acid is produced, and the more sour it becomes. As long as there is no fuzzy mold and it smells clean, it is safe to eat.
Q: Can I make sauerkraut with other vegetables like carrots or radishes?
A: Absolutely. While “sauerkraut” specifically refers to cabbage, the same lacto-fermentation process works for almost any vegetable. You can make fermented carrots, radishes, or cauliflower using the same 2% salt ratio and anaerobic technique.
Related posts:
 Essential Korean Condiments
 Second Life Magic: Turn Finished Candles Into Morning Coffee Companions
 How to Make Homemade Sauerkraut
 PHA Bodyweight Workout: Efficient Fitness Anywhere, Anytime
 Fermented Foods for Gut Health
 The Bowl Method for Curly Hair
 The Salt Spray Secret to Perfect Beach Hair Every Time
 Why SCOBY Might Be the Secret Ingredient Your Skincare Routine Needs