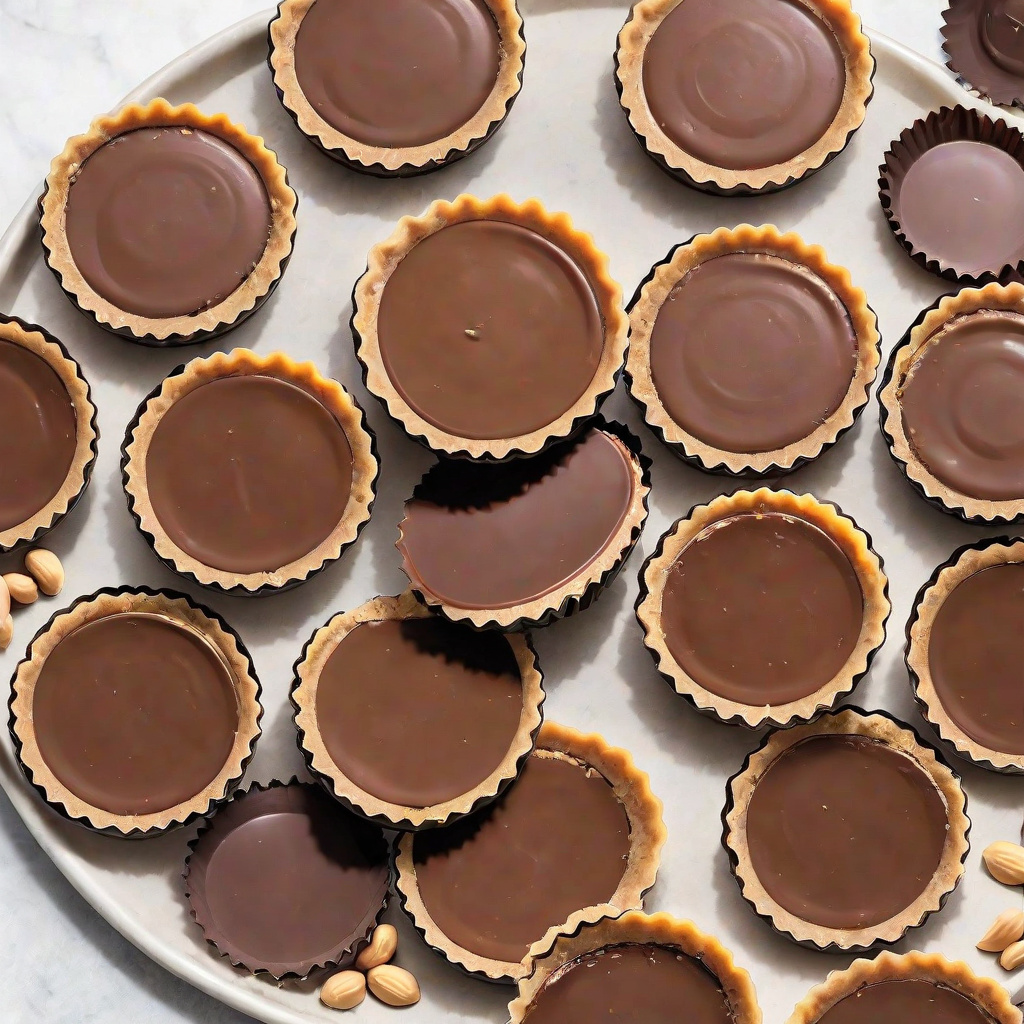
There’s something undeniably satisfying about the combination of chocolate and peanut butter. That sweet-salty contrast, the creamy texture meeting the slight snap of a chocolate shell, has made peanut butter cups a beloved treat for generations. But most store-bought versions come with a downside: excessive sugar, preservatives, and ingredient lists that require a chemistry degree to decipher.
Key takeaways
- Use natural peanut butter and dark chocolate for a cleaner, more robust flavor profile than store-bought versions.
- Master the simple three-layer assembly process using a muffin tin and silicone liners for easy removal.
- Incorporate coconut oil into melted chocolate to ensure a smooth texture and a professional-looking snap.
- Store finished cups in an airtight container in the refrigerator for up to two weeks to maintain optimal freshness.
Making your own peanut butter cups at home transforms this classic candy into something you can feel good about eating and sharing. You control the sweetness, choose quality ingredients, and skip the artificial additives entirely. The process is simpler than you might expect, and the results taste noticeably fresher than anything wrapped in plastic on a grocery store shelf.
Why Make Your Own Peanut Butter Cups
The appeal of homemade peanut butter cups goes beyond simple curiosity. When you make them yourself, you gain complete control over every ingredient that goes into the final product. This matters more than you might think.
Commercial peanut butter cups typically contain high amounts of refined sugar, often listing it as the first ingredient. They frequently include preservatives to extend shelf life, artificial flavors to enhance taste, and stabilizers to maintain texture during shipping and storage. While these additions serve practical purposes for manufacturers, they’re not ingredients most people would choose to eat by the spoonful.
Homemade versions allow you to select better ingredients without compromising on taste. You can use natural peanut butter made solely from peanuts and salt, high-quality chocolate with a higher cocoa content, and natural sweeteners like honey or maple syrup if you prefer. The difference in flavor is immediately apparent: the peanut butter tastes more nutty and robust, the chocolate more complex and rich.
There’s also the matter of freshness. Store-bought peanut butter cups may sit in warehouses and on shelves for months before you open the package. Homemade cups are ready within hours and taste their absolute best in the first few days. This freshness contributes to a more vibrant flavor profile that processed versions simply cannot match.
Essential Ingredients for Success
The beauty of this recipe lies in its simplicity. You need only a handful of ingredients, but choosing the right ones makes all the difference between an okay result and an exceptional one.
For the chocolate layer, you have several options. Dark chocolate with 60-70% cocoa content provides a rich, slightly bitter contrast to the sweet peanut butter filling. Semi-sweet chocolate offers a more traditional candy bar flavor. For those avoiding dairy, high-quality vegan chocolate chips work beautifully. Whatever you choose, look for chocolate that lists cocoa butter rather than vegetable oil as its fat source. Cocoa butter melts smoothly and sets with an appealing snap.
The peanut butter selection matters equally. Natural peanut butter, made from only peanuts and perhaps a small amount of salt, delivers the most authentic flavor. Avoid brands with added sugars, hydrogenated oils, or emulsifiers. The natural oil separation in pure peanut butter is normal and actually helps create the right consistency for the filling. If your peanut butter has been sitting in the pantry, give it a good stir to reincorporate the oils before measuring.
You’ll also need a sweetener for the peanut butter filling. Powdered sugar creates a classic candy-like texture, but honey, maple syrup, or coconut sugar work well for those seeking less refined alternatives. Each brings its own subtle flavor notes: honey adds floral sweetness, maple contributes caramel undertones, and coconut sugar offers a mild toffee-like taste.
A small amount of salt is crucial. It enhances the peanut flavor and creates that addictive sweet-salty balance. Use fine sea salt or kosher salt rather than iodized table salt, which can have a slightly metallic aftertaste.
Finally, consider adding a teaspoon of coconut oil or butter to the melted chocolate. This small addition helps the chocolate set smoothly and makes it easier to work with, particularly if you’re new to working with melted chocolate.
Equipment You’ll Need
You don’t need specialized candy-making equipment to create beautiful peanut butter cups. Most home kitchens already have everything required.
A standard 12-cup muffin tin is the most accessible option for shaping your cups. The standard size creates generous treats similar in scale to commercial peanut butter cups. Mini muffin tins work well if you prefer bite-sized portions, which are particularly nice for parties or for those who like built-in portion control.
Paper or silicone cupcake liners are essential. They prevent sticking and make removal effortless. Silicone liners have the advantage of being reusable and tend to release chocolate more cleanly than paper, but either type works fine. If using paper liners, look for high-quality ones labeled as “unwaxed” or specifically designed for chocolates and candies.
A double boiler or a heatproof bowl set over a pot of simmering water provides gentle, even heat for melting chocolate. Direct heat can scorch chocolate quickly, so the indirect approach is worth the extra moment it takes to set up. A microwave works too, but requires careful attention. Heat in 30-second intervals at 50% power, stirring between each interval until smooth.
Small spoons or piping bags help with filling the cups neatly. A piping bag gives you more control, especially for the peanut butter layer, but a small spoon works perfectly well. A small offset spatula or the back of a spoon helps smooth the tops.
A refrigerator or freezer space is necessary for setting the chocolate. The cold temperature helps the chocolate harden quickly and cleanly.
Step-by-Step Recipe Instructions
Before you begin, gather all your ingredients and equipment. This recipe yields approximately 12 standard-sized peanut butter cups and takes about 30 minutes of active time, plus setting time.
Start by lining a standard muffin tin with paper or silicone liners. This preparation ensures everything is ready when you need it, as melted chocolate waits for no one.
For the chocolate base and top layers, you’ll need about 12 ounces of chocolate. Break or chop it into small, uniform pieces if using a bar. Place about 8 ounces in your double boiler or heatproof bowl. Reserve the remaining 4 ounces for later. Melt the chocolate gently over simmering water, stirring occasionally until completely smooth. Remove from heat and stir in half a teaspoon of coconut oil if using.
Spoon about a tablespoon of melted chocolate into each liner. Use the back of the spoon or a small brush to push some chocolate up the sides of each liner, creating a cup shape. This step takes a bit of patience but ensures the peanut butter filling is fully enclosed. Place the muffin tin in the refrigerator for 15-20 minutes, until the chocolate is firm to the touch.
While the chocolate sets, prepare the peanut butter filling. In a medium bowl, combine 1 cup of natural peanut butter, 3-4 tablespoons of powdered sugar (or 2-3 tablespoons of honey or maple syrup), and a quarter teaspoon of salt. Mix until well combined and smooth. The filling should be thick but spreadable. If it seems too runny, add more sweetener. If too thick, a small splash of warm water will loosen it.
Once the chocolate bases are set, remove the tin from the refrigerator. Scoop about a tablespoon of peanut butter filling into each chocolate cup. Use a spoon or your fingers to flatten it slightly, leaving space at the top for the final chocolate layer. The filling should not come all the way to the top of the liner.
Return the tin to the refrigerator for another 10 minutes while you melt the remaining chocolate. This brief chilling helps the filling set slightly, making it easier to top with chocolate without the layers mixing.
Melt the remaining 4 ounces of chocolate using the same gentle method. Spoon this chocolate over each cup, covering the peanut butter completely. Gently tap the muffin tin on the counter a few times to release any air bubbles and create a smooth surface. If desired, sprinkle a small pinch of flaky sea salt on top of each cup for an elevated finish and extra flavor contrast.
Refrigerate for at least 30 minutes, or until the chocolate is completely firm. The cups are now ready to eat. Store them in an airtight container in the refrigerator, where they’ll keep for about two weeks.
Variations and Flavor Combinations
Once you’ve mastered the basic recipe, the possibilities for customization are nearly endless. Small tweaks can create entirely different flavor profiles while maintaining the core appeal of the chocolate-peanut butter combination.
For a darker, more sophisticated treat, increase the cocoa percentage of your chocolate. An 85% dark chocolate creates an intensely rich cup that pairs beautifully with a slightly sweeter peanut butter filling. This version appeals particularly to adults and those who find traditional candy too sweet.
Adding spices to the peanut butter filling creates warming, complex flavors. A quarter teaspoon of cinnamon brings warmth and pairs naturally with both peanut butter and chocolate. A pinch of cayenne pepper adds subtle heat that builds pleasantly. Cardamom offers an aromatic, slightly floral note that feels unexpected and elegant.
Texture variations add another dimension. Fold a quarter cup of crushed pretzels into the peanut butter filling for extra crunch and saltiness. Chopped roasted peanuts add nutty intensity. A sprinkle of toffee bits creates buttery sweetness. Even a small amount of crispy rice cereal folded into the filling mimics the texture of certain commercial candy bars while keeping the ingredient list wholesome.
For those who enjoy the combination of sweet and salty, experiment with different finishing salts. Flaky sea salt like Maldon creates beautiful visual appeal and delivers clean saltiness that enhances rather than overwhelms. Smoked salt adds an intriguing campfire note. Himalayan pink salt brings subtle mineral complexity.
Seasonal variations can make these treats feel special for holidays and occasions. A drop of peppermint extract in the chocolate creates a winter holiday vibe. Orange zest mixed into the peanut butter filling offers bright, fresh flavor perfect for spring. A sprinkle of cinnamon and nutmeg on top evokes autumn comfort.
Storage and Shelf Life
Proper storage ensures your homemade peanut butter cups maintain their texture and flavor for as long as possible. Because they contain no artificial preservatives, they require a bit more attention than their store-bought counterparts.
The refrigerator is your best option for storage. Place the cups in an airtight container, separating layers with parchment paper or wax paper to prevent sticking. Properly stored, they’ll maintain optimal quality for 10-14 days, though they rarely last that long before being eaten.
You can also freeze peanut butter cups for longer storage. Place them in a freezer-safe container with parchment between layers. They’ll keep for up to three months. Thaw them in the refrigerator for several hours or at room temperature for about 30 minutes before eating. Frozen cups thawed at room temperature may develop condensation that affects the chocolate’s appearance, so refrigerator thawing is preferable if aesthetics matter.
Room temperature storage is possible if your home stays relatively cool, but the cups will soften considerably. Chocolate begins to soften around 70 degrees Fahrenheit and melts at 86 degrees. If you’ve used coconut oil in your chocolate, it melts at an even lower temperature. For food safety, room temperature storage beyond a few hours is not recommended because the peanut butter filling can become a breeding ground for bacteria if it warms too much.
Signs that your peanut butter cups have passed their prime include a chalky or grainy texture in the chocolate, off smells from the peanut butter, or visible mold. Trust your senses: if something seems off, it’s better to discard than risk it.
Troubleshooting Common Issues
Even simple recipes can present challenges, especially when working with chocolate. Here are solutions to the most common problems you might encounter.
If your chocolate seizes and becomes grainy or thick during melting, moisture is likely the culprit. Even a small drop of water can cause chocolate to seize. Unfortunately, once chocolate has seized, it cannot be restored to its original state for candy-making. However, you can still use it for baking or hot chocolate. To prevent seizing, ensure all utensils and bowls are completely dry, and avoid letting steam from your double boiler contact the chocolate.
If the chocolate layers crack when you peel away the liners, the chocolate may have been too cold or set too quickly. Allow the cups to sit at room temperature for a few minutes before unwrapping. Alternatively, the chocolate might have been overheated during melting, which can affect how it sets. Gentle, patient melting prevents this issue.
If the layers separate when you bite into the cups, the chocolate base may have been too cold when you added the peanut butter filling. The contrasting temperatures can prevent proper adhesion between layers. Let the chocolate cups sit at room temperature for a minute or two before adding the filling, or press the filling gently but firmly into the chocolate base.
If your peanut butter filling is too runny and won’t hold its shape, it may need more sweetener or a brief stint in the refrigerator to firm up. Natural peanut butter varies in oil content depending on the brand and how well it was stirred, so some adjustment may be necessary. Adding more powdered sugar will absorb excess moisture and create a firmer texture.
If the finished cups stick to the liners, they may not be fully set, or the liners might be low quality. Give them more time in the refrigerator. Silicone liners release chocolate more easily than paper, so consider investing in a set if you plan to make these regularly.
Making This Recipe Your Own
The true joy of homemade candy lies in making it suit your tastes and preferences. This recipe provides a foundation, but it’s meant to be adapted.
Consider your dietary needs. For a vegan version, simply ensure your chocolate contains no dairy products. Most dark chocolates are naturally vegan, but check the label for milk fat or milk powder. Use maple syrup instead of honey for the sweetener. For a refined sugar-free version, use dark chocolate sweetened with coconut sugar or stevia, and sweeten the filling with maple syrup or dates processed into a paste.
Think about portion sizes that work for your lifestyle. Mini muffin tins create bite-sized cups perfect for sharing or for those who prefer smaller indulgences. Standard muffin tins yield treats similar in size to commercial versions. For a truly impressive presentation, use large silicone cupcake molds to create generous, restaurant-style desserts.
Consider who you’re making these for. Children often prefer sweeter chocolate and smoother peanut butter without add-ins. Adults might appreciate darker chocolate, flaky salt finishing, or unexpected flavors like espresso powder or cinnamon. Party guests will notice and appreciate the extra touch of sea salt on top or the use of high-quality chocolate.
Most importantly, don’t be afraid to experiment. The worst-case scenario is that a batch doesn’t turn out perfectly, but you’ll have learned something in the process. And even imperfect homemade peanut butter cups usually taste delicious. Keep notes on what works and what doesn’t, and soon you’ll have your own signature version that friends and family request by name.
Understanding Chocolate Tempering for Professional Results
The difference between homemade candies that look amateur and those that rival artisan confectioners often comes down to one technique: tempering. Properly tempered chocolate sets with a glossy shine, a crisp snap when broken, and remains stable at room temperature. Untempered chocolate develops a dull, streaky appearance and feels soft or chalky in the mouth. While the recipe works perfectly fine without this step, understanding tempering elevates your results to a new level.
Tempering involves carefully controlling the temperature of melted chocolate to encourage the formation of stable cocoa butter crystals. Chocolate contains several types of fat crystals, each with different melting points and structural properties. The goal is to promote Form V crystals, which provide that professional finish. This happens through a specific cycle of heating, cooling, and reheating.
For dark chocolate, the process begins by heating to around 115-120 degrees Fahrenheit, then cooling to approximately 81-82 degrees, and finally reheating to 88-90 degrees. The chocolate must stay within this working range while you coat your cups. Semi-sweet and milk chocolate require slightly lower temperatures throughout. A reliable digital thermometer is essential for this process, as guessing by appearance leads to inconsistent results.
The seeding method offers the most approachable way to temper at home. Reserve about one-third of your total chocolate in small pieces. Melt the remaining two-thirds gently until it reaches the target temperature. Remove from heat and add the reserved unmelted chocolate, stirring constantly. The solid chocolate cools the melted portion while introducing the right crystal structure. Once the mixture reaches the cooling target, remove any remaining solid pieces and gently rewarm if necessary to reach working temperature.
Several signs indicate properly tempered chocolate. It coats a spoon in an even, thin layer rather than pooling thickly. It begins setting within a few minutes at room temperature. The surface appears glossy rather than matte. And when you touch it with a clean finger after five minutes, it should feel dry and firm rather than tacky. If the chocolate isn’t setting properly or appears streaky, it may have fallen out of temper and need to be rewarmed and cooled again.
Environmental factors significantly impact tempering success. Work in a cool, dry space ideally between 65 and 70 degrees Fahrenheit. Humidity is chocolate’s enemy, as even small amounts of moisture can cause seizing or prevent proper setting. Avoid tempering on humid days without air conditioning, and never let water or steam contact your chocolate. Even a damp spoon can ruin an entire batch.
Selecting the Best Peanut Butter for Candy Making
Not all peanut butters perform equally in this recipe. Understanding the differences between types helps you choose wisely and adjust your technique accordingly.
Commercial peanut butters with added stabilizers and hydrogenated oils present both advantages and challenges. Their uniform consistency means no stirring is required, and the texture remains consistent batch after batch. However, these stabilizers can create a waxy mouthfeel and muted peanut flavor. The emulsifiers also affect how the filling sets, sometimes creating a firmer texture that lacks the creaminess of natural versions. If using commercial peanut butter, reduce the added sweetener slightly, as these products already contain sugar.
Natural peanut butter, made solely from peanuts and salt, delivers superior flavor but requires attention to detail. Oil separation is both normal and problematic if not addressed. Before measuring, stir thoroughly to reincorporate all the oil that has risen to the top. This ensures consistent results. Natural peanut butters vary widely in oil content between brands, so you might need to adjust sweetener amounts based on how runny or stiff your particular brand is. A brand that separates heavily tends to produce a softer filling.
Fresh-ground peanut butter from health food stores or specialty markets offers exceptional flavor but presents unique challenges. These butters are often ground fresh and may have a looser consistency than jarred varieties. The intense roasted peanut flavor is fantastic, but the higher oil content might require additional powdered sugar to achieve the right filling texture. Let fresh-ground butter drain excess oil for 30 minutes before using, or simply plan to add more thickener.
Consider the salt content of your peanut butter as well. Many natural brands include added salt, while others are unsalted. Taste your peanut butter before adding the called-for salt in the recipe, and adjust accordingly. An over-salted filling overwhelms the chocolate, while an under-salted one lacks dimension.
Grind consistency matters more than you might expect. Smooth peanut butter creates the most classic candy-like texture. Chunky varieties can work, but the peanut pieces create weak points in the filling that may cause it to crumble when bitten. If you want peanut crunch, better to fold in chopped peanuts separately rather than rely on chunky butter. The size of any added pieces should be small enough to not puncture through your chocolate layers.
Accommodating Dietary Restrictions and Allergies
One of the strongest arguments for homemade candy is the ability to accommodate dietary needs without sacrificing quality. Several thoughtful substitutions make this recipe accessible to nearly everyone.
For those with peanut allergies, alternative nut and seed butters work beautifully. Almond butter creates an elegant, slightly sweeter filling with a more delicate flavor profile. Cashew butter offers exceptional creaminess and a mild taste that lets the chocolate shine. Sunflower seed butter provides a nut-free option, though its earthier flavor works best with darker chocolate to balance the intensity. Tahini, made from sesame seeds, creates an unexpectedly sophisticated result with subtle nuttiness. When using alternatives, keep in mind that oil content varies, so filling consistency might need adjustment.
Vegan versions require attention to chocolate selection. Many dark chocolates are naturally dairy-free, but some contain milk fat or milk powder as ingredients. Look for chocolates explicitly labeled vegan, or check ingredient lists carefully. High-quality semi-sweet chocolate chips from brands like Enjoy Life or Guittard offer reliable vegan options. Replace honey with maple syrup or agave nectar in the filling. The result tastes virtually identical to the standard version.
Those following paleo or primal diets can participate too. Use dark chocolate sweetened only with coconut sugar or unsweetened baker’s chocolate sweetened with stevia or monk fruit. For the filling, natural peanut butter technically doesn’t qualify as paleo due to legumes, but almond or cashew butter does. Sweeten with honey or maple syrup, both paleo-approved in moderation. Coconut sugar works well for those avoiding maple and honey.
Keto-friendly peanut butter cups require more significant modifications. Seek out sugar-free chocolate or make your own using cocoa butter, cocoa powder, and a keto sweetener like erythritol or allulose. The filling can remain largely unchanged, as natural peanut butter contains minimal net carbs. Powdered erythritol can replace powdered sugar in the filling for an entirely sugar-free result. These cups allow those restricting carbohydrates to enjoy a treat that fits their macros without triggering cravings.
When making treats for those with severe allergies, cross-contamination becomes a serious concern. Even trace amounts of peanut protein can trigger reactions in sensitive individuals. If you’re making sunflower butter cups for someone with a peanut allergy, use entirely separate equipment, including mixing bowls and utensils, that has never contacted peanut products. Consider preparing these in a kitchen that doesn’t regularly process nuts. Label finished treats clearly with all ingredients used.
Scaling the Recipe for Different Occasions
This recipe adapts easily to different quantities and serving situations, making it practical for everything from personal snacking to large gatherings.
For a small batch that yields just six cups, simply halve all ingredients. This approach works well when you’re testing the recipe for the first time, working with limited ingredients, or don’t want the temptation of a full dozen. The process remains identical, though you’ll have less margin for error if your chocolate work is slow. Melted chocolate begins to thicken as it cools, so working quickly with small batches sometimes proves more challenging than larger ones.
Doubling or tripling the recipe for events and gift-giving requires some adjustments to technique. When working with larger chocolate quantities, maintain it at the proper temperature using a warming pad set on low or occasional brief returns to the double boiler. Large batches of chocolate can stay workable for an hour or more with proper temperature management. Prepare additional muffin tins in advance, as the limiting factor becomes mold capacity rather than ingredient volume.
Mini muffin tins create approximately 36 bite-sized cups from a standard recipe. These smaller versions work beautifully for parties, dessert buffets, and situations where guests want to sample multiple treats without committing to a full-sized cup. The assembly process remains the same, but each step moves faster. Use about a teaspoon of chocolate for the base and a teaspoon of filling for each mini cup. Total setting time decreases to 10-15 minutes per layer due to the smaller volume.
For gift-giving, presentation elevates homemade candy to something special. Small cellophane bags tied with baker’s twine show off the cups while keeping them fresh. Decorative boxes with paper inserts create a professional appearance. Consider making an assortment using different chocolates and toppings, clearly labeled, so recipients can choose their favorites. Include a note about refrigeration requirements, as recipients might not realize the cups need cool storage.
Large-scale production for bake sales or events benefits from an assembly line approach. Set up stations for liner preparation, chocolate base creation, filling, and topping. Work through each station completely before moving to the next rather than completing one cup at a time. This method dramatically increases efficiency and ensures consistent results across all cups.
The Science Behind the Sweet-Salty Magic
The irresistible appeal of peanut butter cups isn’t just clever marketing or nostalgia. There’s genuine science explaining why this combination satisfies so completely, and understanding it helps you make better candy.
Flavor layering occurs when multiple taste receptors activate simultaneously. Chocolate triggers sweetness receptors while peanut butter activates umami and fat receptors. Salt enhances both experiences by reducing bitterness perception in the chocolate and amplifying nutty notes in the peanut butter. The brain interprets this multi-receptor activation as more satisfying than either element alone. This is why a pinch of salt on top doesn’t just add saltiness, it fundamentally changes how the entire cup tastes.
Texture contrast plays an equally important role. The snap of properly tempered chocolate against the yielding creaminess of peanut butter filling creates what food scientists call dynamic mouthfeel. This textural interplay keeps each bite interesting from start to finish. When chocolate is too soft or filling too firm, the experience flattens. Maintaining clear textural distinction between layers is essential for maximum appeal.
Temperature affects flavor perception significantly. Cold chocolate releases volatile aromatic compounds more slowly, muting the flavor initially but creating a longer finish as it warms in the mouth. Room temperature chocolate tastes more immediately intense but can feel one-dimensional. Peanut butter filling firms when cold and softens when warm, changing the eating experience. Consider serving temperature based on your priorities: refrigerator-cold for longer-lasting, cleaner bites; room temperature for immediate flavor impact.
The Maillard reaction contributes to peanut butter’s depth. During roasting, peanuts undergo this browning process that creates hundreds of new flavor compounds. Darker roasted peanut butters have more pronounced Maillard characteristics, offering deeper, more complex flavor that stands up to intense chocolate. Lighter roasts taste brighter and more delicately nutty. Match your peanut butter’s roast level to your chocolate intensity for the most harmonious result.
Creative Presentation and Serving Ideas
How you present and serve peanut butter cups transforms them from simple homemade candy into memorable desserts worth lingering over.
For dinner parties, serve peanut butter cups as part of a composed dessert plate. Pair one cup with a small scoop of vanilla ice cream and a drizzle of chocolate or caramel sauce. A few fresh berries add color and brightness that cuts through the richness. The temperature contrast between cold ice cream and slightly warmer cup creates interest. Alternatively, crumble a cup over a slice of cheesecake for added texture and flavor dimension.
Homemade peanut butter cups excel in ice cream applications. Chop them and fold into softened vanilla or chocolate ice cream before refreezing for an elevated version of a classic flavor. Or blend a cup into a milkshake for intense peanut butter chocolate richness. The homemade cups soften appealingly in cold dairy without becoming waxy or hard like some commercial versions.
Baking with peanut butter cups opens additional possibilities. Press a cup into the center of a warm chocolate chip cookie immediately after baking for a molten center. Chop cups and fold into brownie batter before baking for pockets of peanut butter throughout. Use mini cups to top cupcakes, pressing them into the frosting just before serving so they don’t slide off.
For holidays and special occasions, consider themed presentations. Use colored cupcake liners for birthday parties or festive events. Drizzle melted white chocolate over finished cups and add sprinkles for celebrations. Create a platter featuring cups made with different chocolates and toppings, labeled so guests can choose their preferred style. A monochromatic presentation using only dark chocolate cups with flaky salt creates an elegant, grown-up aesthetic.
Frequently Asked Questions
Can I use almond butter or other nut butters instead of peanut butter?
Absolutely. Almond butter, cashew butter, sunflower seed butter, and other alternatives work beautifully in this recipe. Each brings its own flavor profile: almond butter is slightly sweeter and more delicate, cashew butter is creamy and mild, and sunflower seed butter offers a distinct earthy taste. The texture may vary slightly depending on how much natural oil the butter contains, so you might need to adjust the sweetener amount. Keep in mind that natural nut butters tend to separate more than peanut butter, so thorough stirring before measuring is essential.
Why did my chocolate turn white or chalky after setting?
That whitish coating is called chocolate bloom, and while it looks unappealing, the chocolate is still safe to eat. Bloom occurs when chocolate has been exposed to temperature changes that cause the cocoa butter to separate and rise to the surface. It can happen if the chocolate was overheated during melting, if the cups were stored in a refrigerator with high humidity, or if they were moved between temperature extremes quickly. To minimize bloom, melt chocolate gently and slowly, and store finished cups in an airtight container in a consistently cool part of your refrigerator.
Can I make these without a muffin tin?
Yes, though the shape will differ. You can pour the chocolate into a parchment-lined baking dish for a bar-style treat, adding the peanut butter layer once the bottom chocolate layer has set. Cut into squares or rectangles once fully chilled. Silicone chocolate molds in various shapes offer another creative option. Some people even use ice cube trays, though flexibility is limited. The key is having something that allows the chocolate to set in a contained shape that you can later remove.
How can I make these peanut butter cups lower in sugar?
Several approaches can reduce the sugar content. Start with a high-percentage dark chocolate, which contains less sugar than milk or semi-sweet varieties. For the filling, reduce or eliminate the powdered sugar. The peanut butter filling will be softer without the sugar to absorb moisture, but it will still taste delicious. You can also experiment with alternative sweeteners like stevia or monk fruit, though these may affect texture. Another option is to increase the ratio of chocolate to filling by making the peanut butter layer thinner and the chocolate layers thicker.
My peanut butter cups keep melting when I hold them. How do I fix this?
Chocolate melts at body temperature, so some softening when holding the cups is normal and even desirable, as it means you’re using quality chocolate with real cocoa butter. However, if they’re melting too quickly to enjoy, a few adjustments can help. Add a bit more coconut oil to the chocolate, which raises its melting point slightly. Store the cups in the refrigerator until right before eating. Consider using a chocolate with a higher cocoa content, as dark chocolate holds its shape better at warm temperatures. Finally, you might enjoy eating them straight from the refrigerator rather than at room temperature.
Related posts:
 Is Peanut Butter Actually a Healthy Snack?
 Is Peanut Butter Vegan? Exploring Plant-Based Nutrition
 Dark Chocolate Popcorn Bark: A Smart and Indulgent Snack
 Instant Pot Apple Butter Recipe
 Hu Kitchen’s New Milk Chocolate Adventure
 Guilt-Free Cinnamon Roll Recipe
 Healthy Peanut Butter Cups
 Peanut Butter Cookie Magic