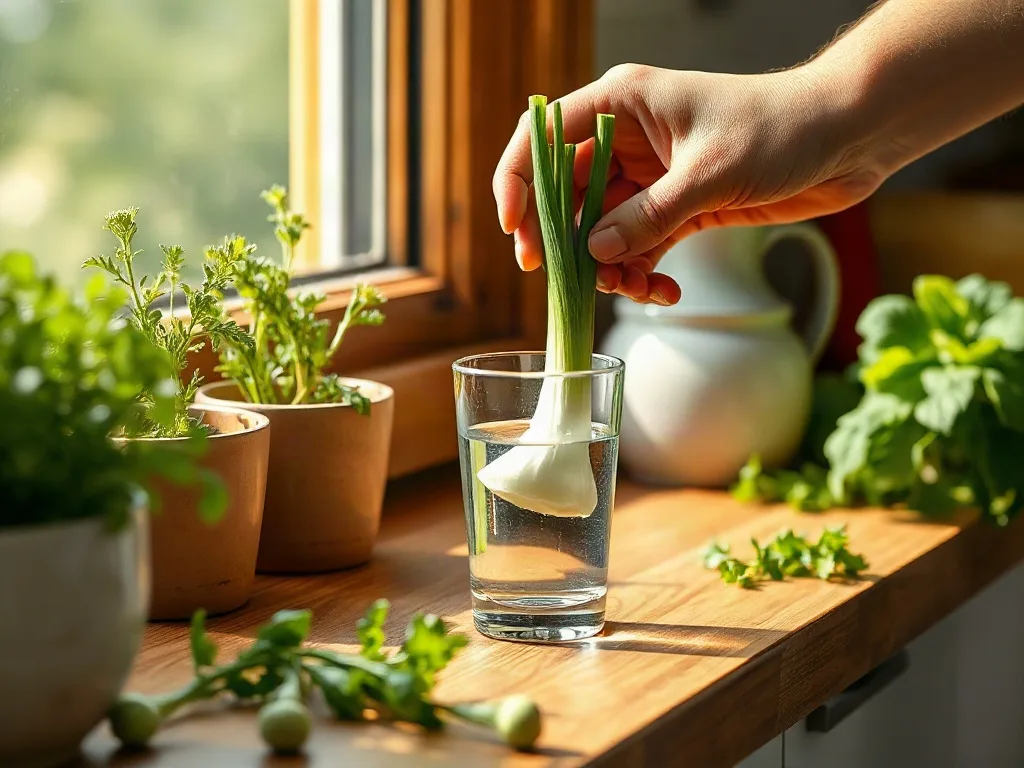
There is a profound sense of satisfaction that comes from watching a piece of “waste” transform back into a living, breathing plant. For many of us, the kitchen is the heart of the home, but it is also where a significant amount of organic material is discarded. From the woody ends of celery stalks to the translucent bases of green onions, many of the vegetables we purchase from the store possess a remarkable biological ability to regenerate. This practice, known as regrowing from scraps, is more than just a fun science experiment for children; it is a practical entry point into sustainable living, a way to reduce grocery bills, and a method for ensuring a fresh supply of greens throughout the winter months.
Key takeaways
- Place vegetable bases in shallow water to encourage root growth, changing the water daily to prevent bacterial buildup and ensure plant health.
- Transition plants from water to high-quality organic potting mix once roots reach one to two inches to provide necessary long-term nutrients.
- Use clear glass containers to monitor root development and identify potential issues like rot or algae growth early on.
- Provide at least six hours of bright, indirect sunlight or use LED grow lights to prevent weak, leggy stems and support photosynthesis.
Regrowing vegetables is an act of mindfulness. It encourages us to slow down and observe the subtle changes in nature—the first tiny white root emerging from a stem, the first sliver of neon-green growth pushing through the center of a bulb. While not every vegetable can be fully regrown to its original size, many provide endless harvests of leaves and stems. By understanding the basic needs of these plants—water, light, and eventually nutrients—anyone can turn a sunny windowsill into a miniature, productive garden.
The Science of Regeneration: How Scraps Grow
To successfully regrow vegetables, it helps to understand the biological mechanism at play. Most of the vegetables we regrow from scraps rely on a process involving meristematic tissue. Meristems are regions of the plant where growth occurs; they contain undifferentiated cells that can divide and specialize into various types of tissue, such as roots, stems, or leaves.
When we leave the base of a plant intact, we are essentially preserving the “growth engine” of the vegetable. In the case of green onions or lettuce, the basal plate contains the concentrated meristematic cells needed to push out new foliage. When placed in water, the plant is triggered to enter a survival mode, activating these cells to seek out nutrients and stability. This often results in the growth of adventitious roots—roots that grow from non-root tissue, such as a stem. Once these roots are established, the plant can begin to photosynthesize and grow new leaves using the energy stored within the scrap itself.
It is important to manage expectations: regrowing from scraps is often about harvesting the vegetative parts of the plant. For example, while you can regrow the lush tops of a carrot, you will not grow a new orange root in a glass of water. To get the full vegetable again, the plant typically needs to be transitioned from water to nutrient-rich soil, where it can develop a complex root system and access the minerals necessary for full development.
Essential Tools and Setup for Your Windowsill Garden
You do not need an expensive greenhouse or a degree in botany to start regrowing vegetables. In fact, the beauty of this practice lies in its simplicity. Most of the tools you need are likely already in your kitchen cabinets.
- Glass Containers: Clear glass jars, ramekins, or shallow bowls are ideal. Transparency allows you to monitor root growth and check for signs of rot or algae. Shallow bowls are particularly useful for vegetables with wide bases, like celery or bok choy.
- Water: Filtered water is preferable, as heavy chlorine levels in some municipal tap water can occasionally stress sensitive new roots. However, for most hardy vegetables, tap water works perfectly fine.
- Light: A south-facing window is the gold standard, providing the maximum amount of indirect sunlight. Most regrowing vegetables need at least 6 hours of bright light. If you live in a darker climate or are gardening in winter, a simple LED grow light can prevent your plants from becoming “leggy” (stretching too far for light, resulting in weak stems).
- Potting Mix: Once the plant has established a root system, it will need soil. Avoid using heavy garden soil in indoor pots, as it can compact and suffocate the roots. Instead, use a high-quality, lightweight organic potting mix that allows for aeration and drainage.
- Pots with Drainage: When transitioning to soil, ensure your pots have holes at the bottom. Stagnant water at the root level is the fastest way to kill a regrowing plant.
Regrowing Leafy Greens: Lettuce, Bok Choy, and Celery
Leafy greens are among the most rewarding vegetables to regrow because they grow quickly and provide a continuous harvest. The process for most of these is similar: focusing on the basal plate.
Lettuce and Bok Choy
When preparing a head of lettuce or bok choy, avoid cutting the plant flush to the board. Instead, leave about 1.5 to 2 inches of the base intact. Place this base in a shallow bowl of water, ensuring the bottom is submerged but the top of the stem remains dry to prevent rotting.
Change the water every day or every other day. Fresh water provides oxygen and prevents the buildup of bacteria. Within 3 to 7 days, you will notice tiny green shoots emerging from the center. Once these shoots are an inch tall and roots have formed, you can transplant the plant into a pot of soil. You can harvest the outer leaves as they grow, allowing the center to continue producing.
Celery
Celery is remarkably resilient. After harvesting the stalks, place the base (about 2 inches) in a shallow dish of water. Celery takes a bit longer to show signs of life than lettuce, but it is persistent. Like lettuce, change the water daily. Once new growth appears in the center and roots are visible, move it to a pot. Celery is a “heavy feeder,” meaning it requires more nutrients than lettuce, so consider adding a small amount of organic compost to the soil during transplanting.
The Art of Regrowing Alliums: Green Onions and Shallots
Green onions (scallions) are the absolute easiest vegetable to regrow and serve as a perfect introduction for beginners. They are incredibly fast and can be grown almost indefinitely in water, though they grow stronger in soil.
The Process: Cut the green onion about an inch above the root end. Place the root end in a small glass with just enough water to cover the roots. Do not submerge the entire white stem, as this can lead to mushiness. Within 24 to 48 hours, you will see a bright green spike emerging from the center. In many cases, a single scallion base will produce multiple shoots.
Pro Tip: While you can keep scallions in water for weeks, they eventually run out of nutrients and the leaves become pale and thin. To avoid this, transplant them into a pot of soil once they have reached a few inches in height. If you have shallots, the process is the same, though they may grow more slowly and produce a more bulbous base over time.
Transforming Root Vegetables: Carrots, Beets, and Radishes
It is a common misconception that you can grow a new carrot from a carrot top in a glass of water. While you cannot regrow the root itself without planting a seed, you can grow the greens, which are edible and highly nutritious.
Carrot Tops
Cut the top 2 inches off a carrot. Place it in a shallow dish with a small amount of water—just enough to touch the bottom. Within a week, you will see lacy, fern-like greens sprouting. These greens can be used in pestos, salads, or as a garnish. Because the plant is no longer connected to its energy source (the root), these greens will not grow indefinitely. They are best grown for a few weeks as a culinary curiosity.
Beets and Radishes
Similar to carrots, the tops of beets and radishes can be regrown. Beet greens are particularly delicious and taste similar to spinach. Place the crown of the beet in water, change it daily, and once the leaves emerge, you can move them to soil. While you won’t get a new beet bulb, the leaves provide a sustainable source of nutrient-dense greens.
Managing Herbs from Scraps: Basil, Mint, and Rosemary
Many store-bought herbs are sold as bunches. Instead of using the entire bunch and discarding the stems, you can use a technique called stem propagation to create entirely new plants.
Basil and Mint
These two herbs are masters of water propagation. Take a healthy stem cutting about 4-6 inches long. Remove the lower leaves, leaving only the top few sets of leaves. Place the stem in a glass of water. Ensure no leaves are submerged, as they will rot and foul the water. Place the glass in a bright spot, and within 10 to 14 days, you will see white roots emerging. Once the roots are about an inch long, transplant them into potting soil.
Rosemary and Woody Herbs
Rosemary, thyme, and oregano are slightly more difficult because they have woody stems. Instead of just placing them in water, it is often more effective to dip the end of a cutting in rooting hormone (or a cinnamon-water mixture) and planting it directly into a moist, sandy soil mix. Keep the soil consistently damp and the humidity high (you can cover the pot with a clear plastic bag) until new growth appears.
Common Pitfalls and How to Avoid Them
Even with the simplest plants, things can go wrong. Understanding the signs of plant stress can help you save your scrap garden.
- Root Rot and Slime: If the water becomes cloudy or the base of the plant feels slimy, you are dealing with bacterial or fungal growth. This is usually caused by changing the water too infrequently or submerging too much of the stem. Solution: Gently rinse the plant under cool water, trim away any mushy brown parts with clean scissors, and use a fresh glass with a smaller amount of water.
- Leggy Growth (Etiolation): If your plants are growing very tall and thin with large gaps between the leaves, they are “stretching” for light. This makes the plant weak and prone to falling over. Solution: Move the plant to a brighter window or supplement with a grow light.
- Yellowing Leaves: This is often a sign of nutrient deficiency. Water alone does not contain the nitrogen, phosphorus, and potassium that plants need for long-term health. Solution: This is the signal that it is time to move the plant from water into nutrient-rich potting soil.
- Algae Growth: Green film on the glass is common. While not usually harmful to the plant, it can compete for oxygen. Solution: Scrub the glass frequently and consider using an opaque container or wrapping the glass in paper to block some of the light from hitting the water directly.
Transitioning from Water to Soil: The Final Step
While some vegetables can survive in water for a long time, they will never reach their full potential without soil. The transition period is critical; if done too abruptly, the plant may suffer from transplant shock.
When to Transplant: The ideal time to move your plant is when the roots are approximately 1 to 2 inches long. If you wait too long, the roots become “water roots,” which are structurally different and more fragile than “soil roots,” making the transition harder.
The Process: Fill a small pot with organic potting mix. Make a hole in the center using your finger. Gently place the plant in the hole, being careful not to snap the delicate new roots. Press the soil firmly but gently around the base to remove air pockets. Water the soil thoroughly immediately after planting. For the first few days, keep the soil quite moist to mimic the water environment the plant is used to, then gradually transition to a standard watering schedule.
Hardening Off: If you plan to move your indoor scrap garden outside to a larger plot, you must “harden off” the plants. This means placing them outside for an hour the first day, two hours the second, and so on. This prevents the intense sun and wind from scorching the tender indoor leaves.
Expanding the Allium Family: Mastering Garlic and Leeks
While green onions are the gateway to regrowing, other members of the allium family require a slightly more nuanced approach. Garlic and leeks, for instance, do not respond as quickly to water propagation and often require a more direct relationship with the earth to succeed. Understanding these differences prevents the frustration of waiting for a sprout that may never come in a glass of water.
Regrowing Garlic Cloves
Unlike scallions, garlic cannot be regrown simply by placing a slice in water. To grow new garlic, you must use individual, unpeeled cloves. If you have a head of garlic that has begun to sprout small green shoots (often called “keiki” in other plant contexts), you have a head start. These sprouts indicate that the clove is already breaking dormancy.
The Process: Select the largest, healthiest cloves from the bulb. Do not peel them; the papery skin protects the clove from soil-borne pathogens. Plant the clove point-side up about two inches deep in a pot with well-draining soil. Unlike the water-start method, garlic is a “set and forget” vegetable. Water it moderately, ensuring the soil stays moist but not soggy. In a sunny window, you will see the green shoots emerge within a few weeks. While you can harvest these greens to use as a mild garlic garnish, remember that growing a full new bulb requires a significant amount of time and a period of cold (vernalization) that indoor environments typically lack.
The Leek Strategy
Leeks are similar to green onions but have a more robust, woody structure. To regrow leeks, you need the bottom two to three inches of the stalk, including the root plate. Place the leek base in a shallow dish of water, just as you would with celery. However, leeks are more prone to “stem rot” if the water level is too high.
Edge Case: Store-Bought Treatment. Be aware that some commercial leeks are treated with growth inhibitors to prevent them from sprouting on the shelf. If your leek doesn’t show growth after ten days, it may be chemically dormant. A helpful trick is to soak the base in a very diluted mixture of honey and water for an hour before placing it in the dish; the natural sugars and enzymes in honey can sometimes “wake up” a dormant plant.
The Magic of Rhizomes: Regrowing Ginger and Turmeric
Ginger and turmeric are not grown from seeds or basal plates, but from rhizomes—thick, underground stems that store nutrients. Regrowing these is a slower process than regrowing lettuce, but the result is a rewarding, aromatic addition to the kitchen. Because rhizomes are denser and more prone to fungal infections, the strategy shifts from water-based propagation to humidity-based soil propagation.
Identifying the “Eyes”
To regrow ginger or turmeric, look for small, pale bumps on the skin of the rhizome known as “eyes.” These are the nodes where new shoots will emerge. If your store-bought ginger is perfectly smooth, it may have been irradiated to prevent sprouting. Look for organic ginger, as it is far more likely to possess active meristematic tissue.
The Propagation Process
Instead of a glass of water, use a shallow tray filled with a mixture of potting soil and coarse sand (for maximum drainage). Place a piece of rhizome—about two inches long and containing at least one eye—on the surface of the soil and cover it with only a half-inch of dirt. The goal is to keep the rhizome warm and moist without drowning it.
Managing Humidity: Rhizomes love humidity. To simulate a tropical environment, cover the pot with a clear plastic bag or a plastic dome for the first two weeks. This creates a miniature greenhouse effect. Once the first green shoot breaks the surface and reaches about three inches in height, you can remove the cover. Be patient; ginger and turmeric can take several weeks to show signs of life, but once they start, they produce stunning, lush foliage that looks more like a decorative houseplant than a kitchen scrap.
Beyond Plain Water: Introducing Basic Hydroponic Nutrients
As noted in the transition to soil, plants eventually run out of the energy stored in their scraps. While soil provides a buffet of minerals, you can extend the life and vigor of your water-grown vegetables by introducing basic hydroponic principles. This prevents the “pale leaf” syndrome and allows you to keep plants in water longer if you don’t have potting soil on hand.
The Role of N-P-K
Plants require three primary macronutrients: Nitrogen (N) for leaf growth, Phosphorus (P) for root and flower development, and Potassium (K) for overall plant health and disease resistance. Water provides zero of these. If you wish to keep your scallions or lettuce in water for an extended period, you need a water-soluble fertilizer.
Practical Nutrient Application
Liquid Seaweed or Fish Emulsion: These are organic options that provide a broad spectrum of micronutrients. However, use them sparingly. In a glass of water, a few drops are often enough. Over-fertilizing in a small container can lead to “nutrient burn,” where the tips of the leaves turn brown and crisp.
The DIY Nutrient Hack: If you don’t have commercial fertilizer, you can create a very weak “compost tea.” Steep a handful of finished compost in a quart of water for 24 hours, strain it through a coffee filter, and use this liquid to top off your water jars. This introduces diluted nitrogen and beneficial microbes that help the roots absorb oxygen more efficiently.
Warning on Algae: Adding nutrients to water increases the risk of algae blooms. To combat this, move your plants from clear glass to opaque containers (like recycled yogurt cups or painted jars). By blocking the light from reaching the nutrient-rich water, you starve the algae while the plant continues to feed through its roots.
Indoor Pest Control and Plant Health Maintenance
A windowsill garden is a miniature ecosystem, and unfortunately, that includes pests. When you bring kitchen scraps into the home, you occasionally bring in “hitchhikers,” or you may attract indoor pests like fungus gnats. Maintaining a clean environment is essential for the health of your regrown vegetables.
Combating Fungus Gnats
Fungus gnats are the most common nuisance in indoor scrap gardens, especially after you transition plants to soil. These tiny black flies are attracted to the moisture and organic matter in potting mix. While the adults are harmless, the larvae feed on the delicate new roots of your regrown plants.
The Solution: Avoid overwatering. Let the top inch of soil dry out completely before watering again. You can also use “yellow sticky traps,” which attract and catch the adults. For a more organic approach, sprinkle a thin layer of cinnamon on the soil surface; cinnamon is a natural fungicide that kills the fungus the larvae feed upon.
Managing Aphids and Spider Mites
If you notice tiny green bugs on the stems of your basil or a fine, web-like substance on your lettuce, you have aphids or spider mites. These pests suck the sap from the plant, causing leaves to curl and yellow.
The Solution: Create a simple insecticidal soap spray. Mix one teaspoon of mild, scent-free liquid soap with a quart of water. Spray the leaves thoroughly, including the undersides, every few days until the pests are gone. For a more stubborn infestation, a diluted Neem oil solution is highly effective and safe for most edible greens.
The Sustainable Loop: Creating DIY Fertilizers from Kitchen Waste
The philosophy of regrowing from scraps is rooted in zero-waste living. To truly close the loop, you can feed your regrown plants using the very waste you would otherwise throw away. This eliminates the need for store-bought chemicals and enriches the soil with organic minerals.
Banana Peel Water for Potassium
Potassium is essential for the structural integrity of the plant stems. Banana peels are rich in this mineral. To make banana peel tea, place a banana peel in a jar of water for 48 hours. Remove the peel (which can be composted) and use the nutrient-dense water to feed your celery or leeks. This is particularly helpful during the transition from water to soil, as it strengthens the root system.
Eggshell Powder for Calcium
Calcium prevents “tip burn” and helps plants build strong cell walls. Rinse your eggshells and let them dry completely. Once dry, crush them into a fine powder using a mortar and pestle or a blender. Mix this powder directly into the potting soil when transplanting your lettuce or bok choy. Because eggshells break down slowly, they provide a steady, long-term release of calcium.
Coffee Ground Infusions for Nitrogen
Used coffee grounds are a fantastic source of nitrogen, which is the primary fuel for the lush, green leaves of scallions and herbs. However, adding raw coffee grounds directly to a pot can sometimes lead to mold or overly acidic soil. Instead, steep used grounds in water for a few hours to create a “coffee wash.” Use this liquid to water your plants once every two weeks. This provides a gentle nitrogen boost without disrupting the pH balance of the soil.
Mastering the Harvest: Sustaining Long-Term Growth
The ultimate goal of regrowing is not just a one-time harvest, but a sustainable source of food. Many beginners make the mistake of harvesting the entire plant at once, which kills the meristematic tissue and ends the growth cycle. To keep your kitchen garden producing, you must employ a “cut-and-come-again” strategy.
The Cut-and-Come-Again Method
For leafy greens like lettuce, bok choy, and spinach, never harvest the center of the plant. The center is the growth point where new leaves are generated. Instead, harvest only the outermost leaves. By leaving the core intact, the plant will continue to push out new foliage from the center. Use sharp scissors to make a clean cut; tearing the leaves with your hands can create open wounds that are susceptible to infection.
Pruning for Bushiness
When regrowing herbs like basil or mint, you may notice the plant growing as one long, thin stem. This is known as apical dominance. To encourage the plant to grow fuller and produce more leaves, you can “pinch back” the top. Using your fingernails, pinch off the very top set of leaves just above a leaf node (the point where two leaves emerge from the stem). This signals the plant to redirect its energy to the side buds, resulting in two new stems instead of one. This doubling effect can significantly increase your yield over time.
Frequently Asked Questions
Q: Can I regrow any vegetable from scraps?
A: Not every vegetable can be regrown. Vegetables that are grown from seeds and produce a single fruit or root (like pumpkins, peppers, or full-grown cucumbers) cannot be regrown from a slice. However, most leafy greens, alliums, and some root tops can be successfully regenerated. If the plant has a basal plate or a stem with nodes, there is a good chance it can regrow.
Q: How often should I actually change the water?
A: For the best results, change the water daily. This ensures the plant has a fresh supply of dissolved oxygen and prevents the buildup of bacteria that cause rot. If you are using a very large volume of water, every two days may suffice, but daily changes are the safest bet for beginners.
Q: My green onions are growing, but the leaves are very thin. Why?
A: This is usually due to a lack of nutrients. Water provides hydration but no “food.” The plant is using up the stored energy in the bulb to grow. To get thick, robust leaves, you must transplant the onions into soil where they can access nitrogen and other essential minerals.
Q: Is it safe to eat vegetables regrown from store-bought scraps?
A: Yes, it is generally safe. However, be mindful of the vegetables you choose. Some store-bought produce is treated with growth inhibitors or preservatives to extend shelf life, which can occasionally hinder regrowth. Always wash your regrown produce thoroughly before eating, just as you would with any store-bought vegetable.
Q: What is the best light source if I don’t have a sunny window?
A: A full-spectrum LED grow light is the best alternative. You don’t need an expensive professional setup; a simple clip-on LED lamp designed for plants will work. Position the light about 6-12 inches above the plant and leave it on for 12-14 hours a day to simulate a summer growing season.
Related posts:
 Urban Outfitters’ Faux Plant Collection
 Growing Peanuts at Home: A Fun and Rewarding Gardening Project
 Tiny Green Therapy: How Mini Plants Are Revolutionizing the Workspace
 The Best Potting Soil for Houseplants, According to Plant Parents
 How to Propagate Succulents
 Essential Tips for Better Garden Health
 Practical Tips for Growing Herbs on a Balcony
 The Green Goddess Guide to Buying Leafy Perfection