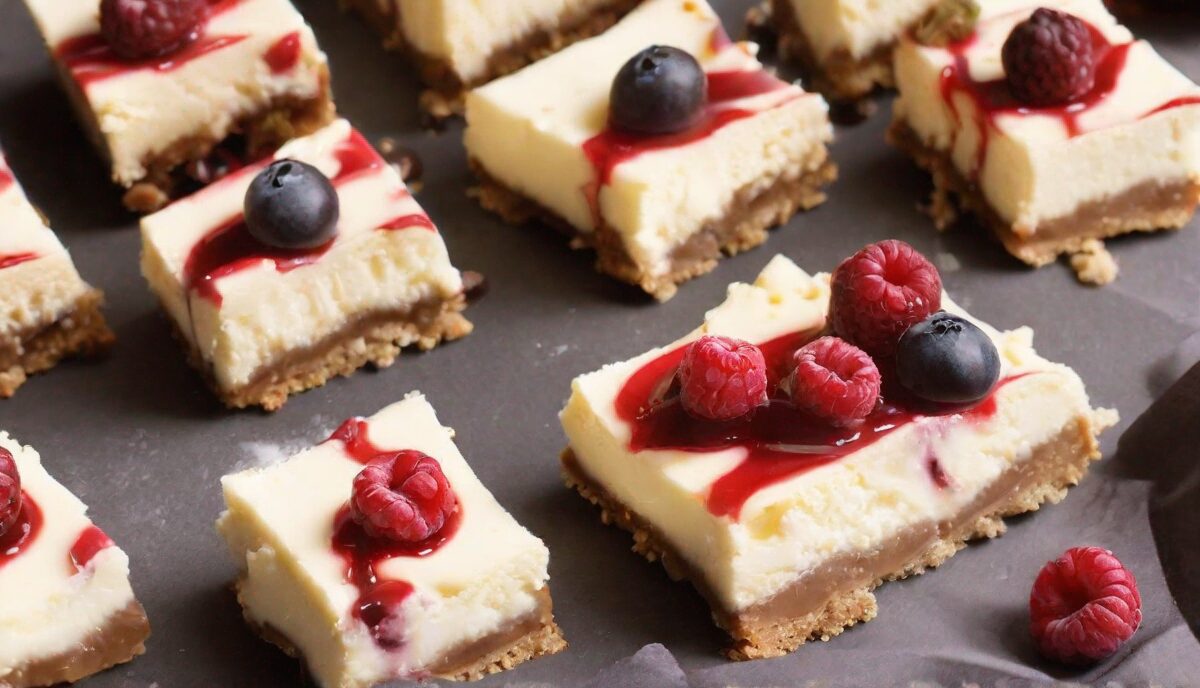
Are you a dessert lover who’s constantly on the lookout for guilt-free options? Look no further! These indulgent cheesecake bars are not only delicious but also crafted with healthier ingredients to satisfy your sweet tooth without the guilt. Perfect for snack time, dessert, or even a party treat, these cheesecake bars will impress both your taste buds and your waistline. Let’s dive into how you can make these delightful treats at home.
Why You’ll Love These Cheesecake Bars
- Simple and easy to make.
- Lower in calories than traditional cheesecake.
- Made with natural sweeteners.
- Deliciously creamy and satisfying.
- Perfect for meal prep and on-the-go snacking.
Ingredients for Your Guilt-Free Cheesecake Bars
To make these cheesecake bars, you’ll need the following ingredients:
- 2 cups of almond flour for the crust.
- 1/4 cup of coconut oil, melted.
- 3 tablespoons of honey or maple syrup.
- 1 teaspoon of vanilla extract.
- 16 oz of low-fat cream cheese, softened.
- 2 large eggs.
- 1/2 cup of Greek yogurt.
- 1/2 cup of your preferred natural sweetener.
- 1 teaspoon of lemon zest.
Step-by-Step Instructions
- Preheat your oven to 350 degrees Fahrenheit and line an 8×8 inch baking pan with parchment paper.
- In a bowl, combine almond flour, melted coconut oil, honey or maple syrup, and vanilla extract until a dough forms. Press this mixture into the bottom of your prepared pan to create the crust.
- In a separate bowl, whip the softened cream cheese until smooth. Add eggs, one at a time, mixing well after each addition.
- Blend in Greek yogurt, natural sweetener, and lemon zest until the mixture is completely smooth.
- Pour the cream cheese mixture over the crust and smooth the top with a spatula.
- Bake for 30 to 35 minutes or until the cheesecake is set and the edges are lightly golden brown.
- Allow the cheesecake to cool at room temperature, then refrigerate for at least 4 hours, or overnight, before cutting into bars.
Customizing Your Cheesecake Bars
One of the best things about this recipe is its versatility. Here are some ideas to customize your cheesecake bars:
- Add a swirl of fruit puree before baking for a fruity twist.
- Mix in chocolate chips or cocoa powder for a chocolatey version.
- Top with fresh berries or a drizzle of honey before serving.
- Experiment with different crusts, like an oat or date base.
Mastering the Crust: Texture and Structural Integrity
While the almond flour base is a reliable standard, achieving the perfect snap versus chew balance requires attention to detail. If you find your crust is too crumbly when cutting, it is often a sign of insufficient binding. Try incorporating a tablespoon of ground flaxseed meal or chia seeds into your almond flour; these ingredients act as a natural glue and add a subtle nutty depth. To ensure the crust holds its shape during the transition from pan to plate, blind-bake the base for 8-10 minutes before adding the filling. This pre-bake process ensures a crisp bottom layer that prevents the moisture from the cream cheese filling from making the base soggy over time. If you prefer a crunchier, cookie-like texture, ensure your coconut oil is fully melted and whisked thoroughly with the vanilla extract before coating the flour, as this creates a more uniform hydration of the nut meal.
The Science of Temperature and Emulsification
The secret to a perfectly smooth, crack-free cheesecake bar lies in the temperature of your ingredients. Using cold cream cheese or eggs will inevitably lead to a lumpy batter that requires over-mixing. Over-mixing introduces excessive air into the batter, which causes the bars to rise rapidly in the oven and then collapse, leading to unsightly surface cracks. To achieve a professional, silky texture, bring your cream cheese and eggs to room temperature for at least 60 minutes before you begin. When mixing, use a low speed on your electric mixer or even a sturdy whisk to incorporate the eggs one by one. This manual control prevents the emulsification from breaking and ensures the Greek yogurt integrates into a cohesive, velvety matrix that holds together perfectly once chilled.
Elevating Flavor Profiles: Beyond Vanilla
While vanilla is a classic, the neutral base of cream cheese and almond flour acts as a blank canvas for sophisticated flavor infusions. For an aromatic, herbal note, try steeping two tablespoons of dried lavender or finely chopped fresh rosemary into your melted coconut oil before mixing it into the crust. If you crave a citrus-forward experience, don’t stop at lemon zest; incorporate a teaspoon of orange blossom water or lime juice into the filling for a brighter, more complex acidity. For those who enjoy warm, cozy notes, folding in a half-teaspoon of ground cardamom or freshly grated nutmeg creates an exquisite balance against the tang of the Greek yogurt. These subtle additions transform a simple snack into a gourmet dessert suitable for elegant dinner parties.
The Art of the Clean Cut
The most common frustration with cheesecake bars is the messy, uneven edges during slicing. To achieve sharp, bakery-quality squares, precision and temperature control are your best tools. First, ensure the bars have chilled in the refrigerator for at least 6 hours—overnight is ideal. When you are ready to serve, use a long, thin, sharp chef’s knife. Before each individual cut, dip the blade into a container of hot water and wipe it clean with a dry towel. The residual heat from the blade will glide through the dense cream cheese layer without tearing or dragging the crust. For even cleaner lines, lift the entire block of cheesecake out of the pan using the parchment paper overhang before you begin the slicing process, allowing you to cut confidently on a flat cutting board.
Strategic Freezing and Thawing Techniques
These bars are exceptional candidates for long-term storage, but they require specific handling to maintain their texture upon thawing. To freeze, wrap the individual bars tightly in parchment paper followed by a layer of plastic wrap to prevent freezer burn and the absorption of other scents in your freezer. When you are ready to enjoy them, do not thaw them in the microwave, as this will liquefy the cream cheese filling. Instead, move the desired number of bars from the freezer to the refrigerator 12 hours before serving. This slow, controlled thawing process allows the moisture to redistribute evenly, ensuring that the integrity of the crust and the creaminess of the filling remain identical to the day they were baked.
Scaling for Gatherings: Pan Size Adjustments
If you are planning to serve a larger crowd, you might be tempted to double the recipe, but be wary of simply using a larger pan without adjusting your timing. A deeper pan requires a lower temperature and a longer bake time to ensure the center sets without burning the edges. If you choose to use a 9×13 inch pan, consider increasing the bake time by 10-15 minutes and covering the edges with aluminum foil halfway through the process to prevent excessive browning. Conversely, if you prefer thinner, bite-sized “mini-bars,” use a muffin tin lined with silicone cups. This reduces the baking time significantly—usually to 18-22 minutes—and creates individual, portion-controlled treats that require no cutting at all, making them perfect for potlucks and outdoor gatherings.
FAQs About Guilt-Free Cheesecake Bars
Can I use a different type of flour for the crust?
Yes, you can use other nut flours like hazelnut or coconut flour for a different flavor or texture. However, the ratio may vary, so adjust accordingly.
Is there a vegan alternative for the cream cheese and eggs?
Absolutely! There are many plant-based cream cheeses and egg substitutes available that can be used in this recipe to make it vegan-friendly.
How long can I store these cheesecake bars?
These cheesecake bars can be stored in an airtight container in the refrigerator for up to 5 days. They also freeze well for up to a month.
Are these cheesecake bars keto-friendly?
With a few tweaks, such as using a keto-friendly sweetener, these bars can be adapted to fit a ketogenic diet.
Can I add protein powder to this recipe?
Yes, you can add a scoop of your favorite protein powder to the cream cheese mixture to increase the protein content of the bars.
Nutritional Information
Each cheesecake bar (1/16th of the recipe) approximately contains:
- Calories: 200
- Fats: 16g
- Protein: 6g
- Carbohydrates: 8g
- Sugar: 5g
Indulge in these creamy, dreamy cheesecake bars and enjoy a treat that’s as nutritious as it is delicious. Whether it’s for a special occasion or just because, these guilt-free cheesecake bars are sure to satisfy.
Related posts:
 Matcha Banana Bread Recipe That’s Actually Healthy
 Guilt-Free Cinnamon Roll Recipe
 The Coconut Pudding That Tastes Like Dessert But Isn’t
 Partake’s Pizza Crust Mix: A Gluten-Free, Allergen-Friendly Option
 Zoe Kravitz’s Coconut Oil Hair Care Secret
 Simple Vegan Ice Cream Recipe
 Apple Coconut Cake Bars: A Delightful and Wholesome Treat
 Sweet Tooth Salvation: Sugar-Free Keto Dessert Bites That Actually Taste Amazing