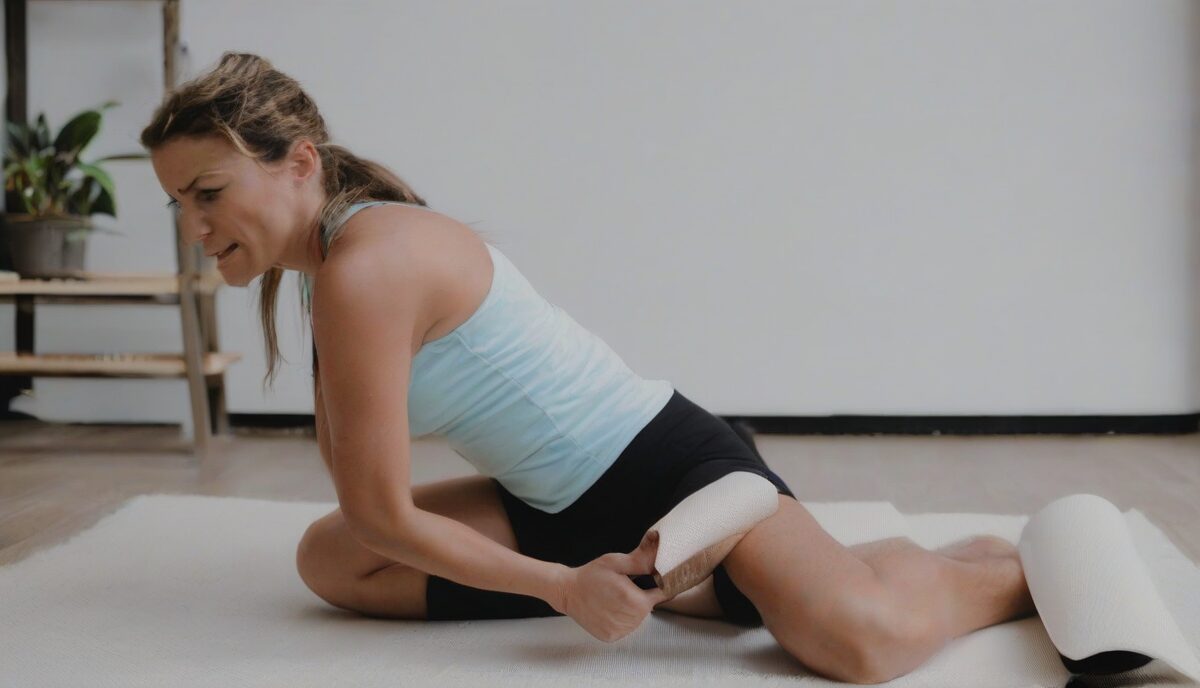
Understanding the IT Band
The iliotibial (IT) band is a thick band of tissue that runs down the outside of your thigh, from your hip to your knee. It plays a crucial role in stabilizing and moving the knee joint. However, it can become tight and cause pain, often referred to as IT band syndrome. Foam rolling the IT band can help alleviate this pain and improve flexibility.
Benefits of Foam Rolling the IT Band
Foam rolling the IT band offers several benefits:
- Reduces muscle tightness and tension
- Improves blood circulation
- Enhances flexibility and range of motion
- Decreases the risk of injury
- Promotes muscle recovery
How to Properly Foam Roll the IT Band
Follow these steps to effectively foam roll your IT band:
- Start by lying on your side with the foam roller positioned under your outer thigh, near your hip.
- Place your other leg in front of you for support.
- Using your arms and your supporting leg, slowly roll down the length of your IT band, from your hip to just above your knee.
- Pause and hold on any tender spots for 20-30 seconds.
- Repeat the process for 2-3 minutes on each side.
Common Mistakes to Avoid
When foam rolling your IT band, avoid these common mistakes:
- Rolling too quickly: Take your time to ensure you can effectively target tight areas.
- Applying too much pressure: Start with light pressure and gradually increase it as needed.
- Ignoring pain: If you experience sharp pain, stop immediately and consult a healthcare professional.
When to Foam Roll Your IT Band
Foam rolling your IT band can be done as part of your warm-up or cool-down routine. It is especially beneficial after activities that involve repetitive knee movement, like running or cycling. Incorporate foam rolling into your daily routine to maintain muscle health and prevent tightness.
Additional Tips for IT Band Health
Besides foam rolling, consider these additional tips to keep your IT band healthy:
- Incorporate regular stretching exercises focusing on the hips and thighs.
- Strengthen the muscles around your hips, glutes, and thighs to support the IT band.
- Maintain proper posture and alignment during physical activities.
- Stay hydrated and follow a balanced diet to support muscle health.
The Upstream Influence: Releasing the Tensor Fasciae Latae (TFL) and Glutes
While the existing guide covers the basic mechanics of rolling the IT band itself, it is vital to understand that the IT band is not an isolated structure. It is a thick, fibrous reinforcement of the fascia lata that serves as the insertion point for two major muscles: the Tensor Fasciae Latae (TFL) and the Gluteus Maximus. If these muscles are chronically shortened or overactive, they act like tuning pegs on a guitar string, pulling the IT band taut and creating friction at the knee. To truly resolve IT band issues, you must address these “upstream” drivers.
The TFL is a small, fleshy muscle located on the front-outer aspect of the hip, roughly where a front pants pocket sits. To target the TFL, lie face down with the foam roller tucked under the hip bone (anterior superior iliac spine). Tilt your body slightly outward at a 45-degree angle. Because the TFL is a small muscle, you only need to move the roller about two to three inches. Use a “micro-rolling” technique here, focusing on small, oscillatory movements. If you find a particularly sensitive spot, breathe deeply and allow the roller to sink into the tissue for 30 seconds before moving on.
Next, transition to the Gluteus Maximus and Gluteus Medius. The posterior fibers of the glute max insert directly into the IT band. To release this area, sit on top of the foam roller and cross your right ankle over your left knee. Lean your weight toward the right buttock. Roll from the top of the pelvic rim down toward the bottom of the glute. This position puts the gluteal muscles on a slight stretch, allowing the roller to penetrate deeper into the fascial layers that merge with the IT band. By relaxing these muscular anchors, you reduce the baseline tension on the IT band before you even begin rolling the thigh itself.
Advanced Pin-and-Stretch and Cross-Friction Techniques
Standard longitudinal rolling—moving up and down the length of the tissue—is excellent for general circulation, but it often fails to address specific fascial adhesions where the IT band becomes stuck to the underlying Vastus Lateralis (the outer quad muscle). To break these adhesions, advanced practitioners use “pin-and-stretch” and “cross-friction” methods. These techniques move beyond simple compression to create shear force, which is more effective for remodeling stubborn connective tissue.
To perform the pin-and-stretch technique, position yourself in the standard IT band rolling posture. Locate a tender spot or a point of high resistance. Instead of rolling over it, stop and “pin” the tissue down with the roller. While maintaining steady pressure, slowly bend your knee, bringing your heel toward your glutes, then straighten it back out. Repeat this 5-10 times. This forces the underlying muscle to slide beneath the pinned fascia, effectively ungluing the layers. This can be significantly more intense than standard rolling, so ensure you are not tensing your upper body or holding your breath during the movement.
Cross-friction rolling involves moving perpendicular to the direction of the tissue fibers. Once you have pinned a section of the IT band, use your supporting leg and arms to shift your body slightly forward and backward (toward the front and back of your thigh) rather than up and down. This “sawing” motion helps to broaden the fascial sheath. It is particularly useful for athletes who feel a “snapping” sensation in the hip or knee, as it addresses the lateral expansion of the tissue rather than just its length. Integration of these movements should be gradual; start with one or two spots per session to avoid over-sensitizing the nerves.
Understanding the “Compression vs. Tension” Debate in Fascial Health
A common misconception in fitness circles is that foam rolling “stretches” the IT band. Biomechanical studies have shown that the IT band is incredibly strong—comparable to soft steel—and would require thousands of pounds of force to actually elongate. Therefore, the goal of foam rolling is not to make the band longer, but to change its tone and improve the sliding surface between the IT band and the lateral quadriceps. This is an important distinction for how you approach your recovery routine.
When you apply pressure to the IT band, you are communicating with the nervous system via mechanoreceptors like Ruffini endings and Pacinian corpuscles. These receptors respond to slow, steady pressure by sending signals to the brain to decrease muscle guarding. If you roll too aggressively or with a “no pain, no gain” mentality, you may actually trigger a sympathetic nervous system response (fight or flight), causing the muscles to tighten further as a protective mechanism. This is why the “edge case” of extreme pain is counterproductive.
For individuals with chronic IT band tightness, the issue is often a lack of “glide.” The IT band should move independently of the Vastus Lateralis. When these tissues become matted together due to inflammation or repetitive strain, the IT band loses its ability to distribute force. Focus your rolling on the borders of the IT band—the “seams” where it meets the hamstrings and the quads. By rolling slightly more toward the front or back of the thigh, you target these intermuscular septa, which are the most common sites of fascial restriction. Improving this glide is far more effective for long-term mobility than attempting to compress the dense middle of the band itself.
Selecting Specialized Tools: From High-Density Rollers to Percussion Therapy
While a standard medium-density foam roller is a great starting point, different stages of IT band health require different tools. For those in the acute phase of pain, a soft, smooth roller is preferable to avoid bruising the periosteum (the bone lining) or aggravating inflamed bursa. However, as the tissue becomes more resilient, a smooth roller may reach a point of diminishing returns. This is where high-density, textured, or vibrating rollers come into play.
Textured rollers, often featuring ridges or knobs, are designed to mimic the thumbs or elbows of a massage therapist. These are specifically useful for the cross-friction techniques mentioned earlier, as the ridges can “hook” into the fascia more effectively than a flat surface. If you find that you can no longer “feel” the release with a standard roller, a firm, knobby roller can provide the necessary mechanical stimulus to reach deeper layers. However, avoid these if you have very low body fat or are rolling over bony prominences, as they can cause significant discomfort and potential tissue damage.
Percussion massage guns and vibrating foam rollers offer another layer of therapy: vibration. Research suggests that vibration can be more effective at desensitizing painful areas and increasing blood flow than static compression alone. For the IT band, using a massage gun on the TFL and glutes before foam rolling can “pre-warm” the nervous system, making the subsequent rolling session much more tolerable. When using a massage gun, never apply it directly to the lateral knee joint; keep the device on the fleshy parts of the hip and the thickest part of the thigh. For the IT band itself, use a lower frequency and a softer attachment head to avoid the jarring sensation of the device bouncing off the dense connective tissue.
Addressing the “No-Roll” Zone: Managing Acute Lateral Knee Sensitivity
One of the most critical nuances in IT band care is knowing where *not* to roll. Many people suffering from IT band syndrome (ITBS) make the mistake of rolling directly over the site of their pain, which is usually the lateral femoral epicondyle (the bony bump on the outside of the knee). This area is often home to a highly innervated layer of fat and, in some cases, an inflamed bursa. Applying heavy pressure directly to this inflamed site can exacerbate the condition, leading to increased swelling and a longer recovery time.
The “No-Roll Zone” extends roughly two inches above and below the knee joint line. If you are in an acute flare-up—meaning it hurts to walk or go down stairs—focus your rolling efforts entirely on the upper two-thirds of the thigh and the hip. This is known as a “distal release strategy.” By relieving the tension higher up the chain, you reduce the compressive force at the knee without touching the sensitive area. As the inflammation subsides, you can gradually move closer to the knee, but you should always stop just above the joint.
Another edge case involves the lateral hamstring. Frequently, what feels like IT band pain is actually tension in the Biceps Femoris (outer hamstring). If you have been rolling your IT band for weeks with no relief, try shifting your body weight so you are rolling the back-outer corner of your thigh. Releasing the lateral hamstring can often provide the “missing link” in resolving lateral knee pain, as it shares a close anatomical relationship with the IT band and influences knee rotation and stability during the gait cycle.
Correcting Biomechanical Deficits: The Role of Hip Stability and Foot Mechanics
Foam rolling is a powerful tool for symptom management, but it rarely addresses the root cause of IT band tension, which is often biomechanical. Two primary factors contribute to excessive IT band strain: “Trendelenburg gait” (hip drop) and overpronation of the foot. If your hips are not stable, the IT band has to work overtime to keep your pelvis level, leading to chronic tightness that no amount of rolling can permanently fix.
The Trendelenburg gait occurs when the gluteus medius is too weak to stabilize the pelvis during the single-leg phase of walking or running. This causes the opposite hip to drop, which in turn causes the femur to adduct (move inward) and internally rotate. This position puts a massive eccentric load on the IT band. To test this, stand in front of a mirror and perform a single-leg squat. If your knee caves inward or your pelvis tilts, your IT band is being used as a primary stabilizer instead of a secondary one. In this scenario, foam rolling should be paired with glute-strengthening exercises like side-lying leg raises or monster walks.
Foot mechanics also play a role. If you overpronate (your arches collapse inward), it forces the tibia to rotate internally, which increases the friction of the IT band against the femur. Check the wear patterns on your shoes; if the inside of the sole is significantly more worn than the outside, your foot mechanics may be the primary driver of your IT band issues. In these cases, rolling the calves and the plantar fascia can be a helpful adjunct to IT band rolling, as it helps restore a more neutral foot strike and reduces the rotational stress traveling up the leg to the knee.
Post-Rolling Integration: Transitioning from Mobility to Functional Stability
The most effective way to utilize foam rolling is to treat it as a “window of opportunity.” After you have rolled and reduced the neural tension in the IT band and surrounding muscles, you have a temporary increase in range of motion and a decrease in pain. If you simply go sit on the couch after rolling, you are missing the chance to “lock in” those gains. You must follow up your rolling session with active movements that teach your body how to use its newly found mobility.
Immediately after rolling, perform 10-15 repetitions of a dynamic stability exercise. A “lateral lunge with a pause” is an excellent choice. This exercise takes the IT band through a full range of motion while requiring the glutes and quads to stabilize the limb. Another effective integration move is the “curtsy lunge,” which provides a functional stretch to the lateral hip structures in a controlled, weight-bearing manner. This transition from passive rolling to active movement helps the brain map the new tissue length and reinforces better movement patterns.
Furthermore, consider the timing of your rolling in relation to your workouts. While the existing article mentions rolling as a warm-up, be careful not to over-roll before high-intensity explosive movements like sprinting or heavy squatting. Excessive rolling can temporarily decrease the “stiffness” of the tissue, which is actually necessary for power production. For pre-workout sessions, keep the rolling brisk and rhythmic (about 1-2 seconds per stroke) to wake up the muscles. Save the deep, slow, and painful “pin-and-stretch” work for your post-workout recovery or a dedicated mobility day when your body has time to adapt to the tissue changes.
FAQ
1. How often should I foam roll my IT band?
It is recommended to foam roll your IT band 3-4 times a week, especially if you are experiencing tightness or discomfort.
2. Can foam rolling replace stretching?
No, foam rolling should not replace stretching. Both foam rolling and stretching have unique benefits and should be included in your routine for optimal muscle health.
3. How long should I spend foam rolling each session?
Spend about 2-3 minutes on each side during your foam rolling session. Focus on rolling slowly and holding on tender spots to maximize the benefits.
4. Can foam rolling help with IT band syndrome?
Yes, foam rolling can help alleviate the symptoms of IT band syndrome by reducing tightness and improving flexibility. However, it is also important to address any underlying issues through proper training and strengthening exercises.
5. Is it normal to feel pain while foam rolling?
It is common to feel some discomfort while foam rolling, especially if your muscles are tight. However, if you experience sharp or intense pain, stop immediately and consult a healthcare professional.
Related posts:
 The *Best* Foam Roller Stretches for Lower Back Pain Relief
 This Full-Body Resistance Band Workout Will Transform Your Home Gym
 The Recovery Technique Physical Therapists Swear By for Muscle Pain
 Why Using a Rolling Pin on Your Muscles Actually Works
 5 Foam Roller Exercises That Will Make Your Muscles Feel Oh So Good
 Essential Foam Roller Exercises
 Managing Hip Pain from Sitting
 Band Together: Transform Your Core With Just One Simple Tool