
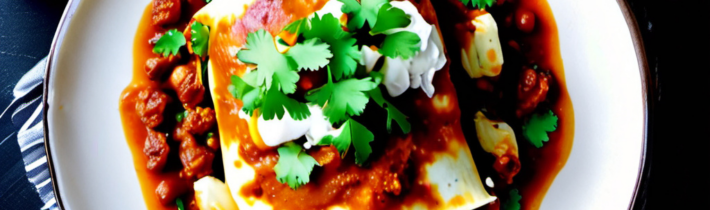
If you’ve been following a ketogenic lifestyle, you know the struggle of missing your favorite comfort foods. Mexican cuisine, with its corn tortillas, rice, and bean-heavy dishes, often feels completely off-limits. But here’s the thing: with the right ingredient swaps and a bit of culinary creativity, you can enjoy all those bold, satisfying flavors without kicking yourself out of ketosis. These cauliflower enchiladas deliver everything you crave—tender tortillas wrapped around a savory filling, smothered in rich enchilada sauce, and topped with melted cheese.
The secret lies in using cauliflower not as a bland substitute but as a flavorful vehicle for the spices and textures that make Mexican food so beloved. When properly prepared, these enchiladas don’t taste like a compromise. They taste like dinner at your favorite neighborhood cantina, minus the carb coma afterward.
Why Cauliflower Works Brilliantly in Mexican Dishes
Cauliflower has earned its reputation as the keto community’s most versatile vegetable, and for good reason. Its mild, slightly nutty flavor provides an excellent foundation for absorbing the robust seasonings typical of Mexican cooking. Unlike some low-carb alternatives that announce their presence with every bite, properly seasoned cauliflower disappears into the dish, letting the cumin, chili powder, and garlic take center stage.
The texture factor matters too. When pulsed to a rice-like consistency and briefly sautéed, cauliflower develops a tender yet substantial mouthfeel that mimics the body of traditional grain-based fillings. It holds sauce well, mixes beautifully with cheese and proteins, and bakes up without turning to mush. For enchiladas specifically, this means a filling that satisfies rather than leaves you reaching for seconds out of sheer disappointment.
Nutritionally, cauliflower brings serious benefits to your keto plate. One cup of riced cauliflower contains approximately 5 grams of carbohydrates, with 2 grams of fiber, netting out at just 3 grams of net carbs. Compare that to the 30-plus grams of carbs in a typical flour tortilla and rice filling, and the appeal becomes obvious. You’re not just cutting carbs; you’re adding a vegetable that delivers vitamin C, vitamin K, folate, and antioxidants while you’re at it.
Essential Ingredients for Authentic Flavor
Building great cauliflower enchiladas starts with assembling the right components. Each element contributes to the final experience, so quality matters. Here’s what you’ll need to stock before heading into the kitchen.
For the cauliflower filling: Start with one large head of fresh cauliflower or two 12-ounce bags of pre-riced cauliflower if you’re short on time. You’ll need olive oil or avocado oil for sautéing, a medium yellow onion (diced), and 4-5 cloves of minced garlic. The seasoning blend includes ground cumin, chili powder, smoked paprika, dried oregano, salt, and black pepper. Fresh cilantro, lime juice, and a splash of heavy cream help bind everything together and add brightness.
For assembly: Low-carb tortillas are non-negotiable here. Several brands now offer tortillas with 4-6 net carbs each, made with ingredients like almond flour, coconut flour, or fiber-rich alternatives. Check labels carefully, as some low-carb tortillas still contain wheat or questionable additives. Shredded cheese is essential—Mexican blend, sharp cheddar, or Monterey Jack all work beautifully. You’ll also need a quality red enchilada sauce, ideally one without added sugar or thickeners, or homemade if you prefer.
Optional protein additions: While these enchiladas are substantial enough to stand alone as a vegetarian main, you can add shredded chicken, ground beef, or carnitas for extra protein. Just account for the additional cooking time and seasoning adjustments.
Preparing the Cauliflower Rice Base
The foundation of these enchiladas is properly prepared cauliflower rice, and this step deserves your full attention. Rush through it, and you’ll end up with watery, bland filling. Take your time, and you’ll create something genuinely delicious.
If starting with a whole head of cauliflower, remove the outer leaves and thick core, then cut the florets into manageable pieces. Working in batches, pulse the florets in a food processor until they reach a rice-like consistency. Don’t over-process into a paste—aim for grains roughly the size of actual rice. If using pre-riced cauliflower, give it a quick chop on your cutting board to ensure uniform texture.
Here’s the technique that transforms good cauliflower rice into great: after pulsing, transfer the rice to a clean kitchen towel or several layers of cheesecloth. Squeeze firmly to remove excess moisture. This single step, which takes perhaps two minutes, makes the difference between soggy filling and perfectly textured enchiladas.
Heat your oil in a large skillet over medium-high heat. Add the diced onion and cook until translucent, about 4-5 minutes. Add the garlic and cook for another minute until fragrant, being careful not to let it brown. Add the cauliflower rice and your seasoning blend—typically 2 teaspoons cumin, 1 tablespoon chili powder, 1 teaspoon smoked paprika, and 1 teaspoon oregano for one large head of cauliflower. Stir well to coat everything evenly.
Cook the cauliflower for 8-10 minutes, stirring occasionally, until it’s tender but still retains some bite. Remove from heat and stir in fresh cilantro, a squeeze of lime juice, and if desired, 2 tablespoons of heavy cream or softened cream cheese. This addition helps bind the filling and adds a subtle richness. Let the mixture cool slightly before assembling your enchiladas.
Choosing and Preparing Low-Carb Tortillas
The tortilla question has long plagued keto cooks, but the options have improved dramatically in recent years. Several commercial brands now produce tortillas that are genuinely low-carb, pliable enough to roll, and palatable enough to enjoy. Look for products with net carb counts between 4-6 grams per tortilla, made primarily from almond flour, coconut flour, or fiber sources like oat fiber and bamboo fiber.
Popular brands include Siete (almond flour-based), Mission Carb Balance (contains wheat, so skip if you’re avoiding gluten), and various small-batch producers available online. If you’re feeling ambitious, you can make your own using almond flour, eggs, and seasonings, though the texture tends to be more crepe-like than tortilla-like.
Regardless of which tortilla you choose, warm them before assembly. Cold low-carb tortillas crack and tear; warm ones roll beautifully. Heat a dry skillet over medium heat and warm each tortilla for 15-20 seconds per side until pliable. Stack them on a plate and cover with a clean kitchen towel to retain warmth while you work.
If your tortillas still resist rolling, try microwaving them wrapped in damp paper towels for 10-15 seconds. The brief steam helps soften the fibers and makes them more cooperative.
Assembling Your Enchiladas Step by Step
Assembly is straightforward once your components are prepped. Preheat your oven to 375°F (190°C) and prepare a 9×13 baking dish by spreading about 1/2 cup of enchilada sauce across the bottom. This prevents sticking and ensures the bottom tortillas don’t dry out during baking.
Set up an assembly line: warmed tortillas, cauliflower filling, shredded cheese, and enchilada sauce. Working one at a time, place about 1/3 cup of filling in a line down the center of each tortilla. Sprinkle generously with cheese—a quarter cup per enchilada is a good starting point. Roll the tortilla around the filling, placing it seam-side down in your prepared dish.
Continue until your dish is full, typically 8-10 enchiladas depending on tortilla size. Pack them snugly but don’t force them; they need room for sauce to seep between. Once all enchiladas are in place, pour the remaining enchilada sauce over the top, ensuring each enchilada is well coated. Sprinkle additional cheese over everything—this is not the time for restraint.
Cover the dish loosely with aluminum foil (tent it slightly so the foil doesn’t touch the cheese) and bake for 20 minutes. Remove the foil and continue baking for another 10-15 minutes until the cheese is bubbly and beginning to brown in spots. Let the enchiladas rest for 5-10 minutes before serving. This brief cooling period helps them set and makes serving cleaner.
Making Homemade Enchilada Sauce
While store-bought enchilada sauce can work, homemade versions taste significantly better and give you complete control over ingredients. The process is surprisingly simple and takes about 15 minutes from start to finish.
In a medium saucepan, melt 3 tablespoons of butter or heat 3 tablespoons of avocado oil over medium heat. Whisk in 3 tablespoons of almond flour (or use arrowroot powder for a paleo option) and cook for 1-2 minutes, whisking constantly, until the mixture bubbles and begins to smell nutty. This creates a roux that will thicken your sauce.
Add 2 tablespoons of chili powder, 1 teaspoon of cumin, 1/2 teaspoon of garlic powder, 1/2 teaspoon of onion powder, and 1/4 teaspoon of oregano. Whisk to combine and cook for 30 seconds until fragrant. Slowly pour in 2 cups of chicken or vegetable broth while whisking continuously to prevent lumps. Add 1 tablespoon of tomato paste for depth and a pinch of salt.
Bring the mixture to a simmer, then reduce heat to low and cook for 5-7 minutes until the sauce thickens enough to coat the back of a spoon. Remove from heat and stir in 1 teaspoon of apple cider vinegar or lime juice for brightness. Taste and adjust seasoning as needed. If the sauce is too thick, thin with additional broth; if too thin, simmer a few minutes longer. This sauce keeps in the refrigerator for up to a week and freezes beautifully.
Serving Suggestions and Delicious Toppings
A great enchilada deserves great accompaniments, and the keto lifestyle offers plenty of options. Traditional toppings like sour cream, sliced avocado or guacamole, and additional fresh cilantro all fit naturally within low-carb parameters. A dollop of Mexican crema or a sprinkle of queso fresco adds authentic flair. Pickled jalapeños or a splash of your favorite hot sauce bring heat for those who like it spicy.
For side dishes, consider cauliflower rice seasoned with lime and cilantro as a direct substitute for Spanish rice. A simple green salad with a citrus vinaigrette provides freshness and crunch. Keto-friendly refried beans can be made using mashed cauliflower or lupini beans, though honestly, these enchiladas are substantial enough to stand alone as a complete meal.
If you’re entertaining, set up a toppings bar and let guests customize their plates. Shredded lettuce, diced tomatoes, sliced black olives, different cheeses, and various salsas allow everyone to build their perfect bite. This approach works particularly well for families with varying dietary preferences—everyone can adapt the base dish to their liking.
Leftover enchiladas store well in the refrigerator for 3-4 days. Reheat individual portions in the microwave, or warm the entire dish (covered) in a 350°F oven for about 15 minutes. The tortillas will soften upon reheating, but the flavor actually improves overnight as everything melds together.
Nutritional Information and Macros
Understanding the macro breakdown helps you incorporate these enchiladas into your daily targets. The following figures are approximate and will vary based on specific brands, tortilla choice, and cheese quantity. Per enchilada (assuming 8 servings from the recipe with cheese but no additional protein):
Calories: Approximately 220-250
Protein: 10-12 grams
Fat: 16-18 grams
Total Carbohydrates: 8-10 grams
Fiber: 3-4 grams
Net Carbs: 5-7 grams
Adding 4 ounces of shredded chicken per serving increases protein by roughly 25 grams and adds about 150 calories with minimal carb impact. Ground beef follows a similar pattern. If you’re tracking strictly, calculate your specific version using the exact products you purchase.
For those following a vegetarian approach, these enchiladas provide adequate protein when paired with a side dish containing beans or additional cheese. Consider adding nutritional yeast to the cauliflower filling for a subtle cheesy flavor and B-vitamin boost.
Mastering the Spice Blend for Depth and Complexity
The difference between enchiladas that taste like a diet hack and enchiladas that taste like they came from an abuela’s kitchen often comes down to one thing: how you handle your spices. Those little jars in your pantry have more potential than you might realize, and unlocking it requires technique beyond simply dumping them into the pan.
Start with the quality of your spices. Ground spices lose their potency surprisingly quickly—after about six months, that chili powder you bought for last year’s taco Tuesday has faded to a ghost of its former self. If you can’t remember when you purchased it, replace it. For the most vibrant flavor, buy whole spices when possible and grind them yourself. Whole cumin seeds, dried chiles, and peppercorns stay fresh for years and can be toasted and ground in minutes. A dedicated coffee grinder dedicated to spices makes this effortless.
Toast your spices before using them. This single step transforms flat, dusty flavors into something layered and complex. Place whole or ground spices in a dry skillet over medium-low heat. Keep everything moving constantly—spices go from toasted to burnt in seconds. You’ll know they’re ready when they become fragrant, usually after 30-60 seconds for ground spices and 1-2 minutes for whole seeds. Transfer them immediately to a cool dish to stop the cooking process. The oils released during toasting carry the intense aromatics that make restaurant Mexican food so memorable.
Consider building your own chili powder blend rather than relying on the generic supermarket version. Commercial chili powder typically contains ground dried chiles, cumin, oregano, garlic powder, and sometimes salt, but the proportions favor mildness over character. Mix equal parts ancho chili powder (made from dried poblano peppers, offering deep, almost raisiny sweetness), guajillo powder (moderate heat with fruity undertones), and New Mexico chili powder (earthy and moderately spicy). Add a pinch of cayenne if you want more heat. This custom blend delivers the kind of nuanced heat that builds slowly rather than hitting you all at once.
Dried oregano matters more than you’d think. Mexican oregano, despite sharing a name with its Mediterranean cousin, comes from a different plant entirely and offers a more citrusy, earthy profile. It’s worth seeking out at Latin markets or online. If you can only find Mediterranean oregano, add a tiny pinch of ground coriander to approximate the brighter notes of the Mexican variety.
Layer your seasoning throughout the cooking process rather than adding everything at once. Season your onions when they hit the pan. Add aromatics like garlic and cumin partway through sautéing. Finish with fresh herbs and lime juice after cooking. This layering creates dimension that one-note seasoning can’t achieve. Think of it like building a chord progression in music—each note supports and enhances the others.
Troubleshooting Common Cauliflower Problems
Even experienced keto cooks encounter challenges when working with cauliflower as a primary ingredient. Understanding what went wrong and why transforms failures into learning opportunities and prevents repeat disappointments.
Watery filling ranks as the most frequent complaint, and it usually traces back to inadequate moisture removal. Cauliflower is approximately 92% water, and that moisture has to go somewhere. If you skipped the towel-squeezing step or gave it only a cursory press, your filling will weep during baking, creating a pool at the bottom of your dish and turning tortillas soggy. The solution is straightforward but requires commitment: after ricing your cauliflower, whether raw or cooked, gather it in a clean kitchen towel and squeeze with significant pressure. You should see a surprising amount of liquid come out. Keep squeezing until the towel comes away merely damp rather than soaked. Yes, your hands will get tired. Consider it part of the process.
Bland flavor typically stems from under-seasoning or poor spice quality, but another culprit often goes overlooked: salt timing. If you salt your cauliflower at the beginning of cooking, the salt draws out moisture, which then evaporates, concentrating the flavor. However, if you salt at the end, the seasoning sits on the surface rather than penetrating the vegetable. For cauliflower enchiladas, salt your cauliflower rice as soon as it hits the pan, giving it time to work throughout the cooking process. Taste and adjust at the end, but start with a foundation.
Texture issues fall into two camps: undercooked cauliflower that feels crunchy and raw, or overcooked cauliflower that turns to mush. The sweet spot lies in between—tender with a slight resistance, similar to al dente rice. Raw cauliflower rice cooked for 8-10 minutes in a skillet usually achieves this perfectly. If you prefer to steam or boil your cauliflower before ricing, reduce the cooking time significantly and consider finishing it in the skillet to drive off additional moisture. The baking time in the assembled enchiladas continues the cooking process, so slightly undercook the filling during prep.
Sulfur smell puts some people off cauliflower entirely, but this issue responds well to proper technique. The compounds responsible for that characteristic cruciferous odor become more pronounced with longer cooking times and higher temperatures. To minimize them, cook cauliflower quickly at moderate heat rather than slowly at high heat. Adding acid—lime juice works beautifully here—neutralizes some of the sulfur compounds. The spices in Mexican preparations also help mask any remaining vegetal notes, which is why heavily seasoned dishes like these enchiladas work so well.
Filling that won’t hold together often disappoints cooks expecting a cohesive center. Unlike rice, which releases starch that helps bind mixtures, cauliflower has no natural binder. This is where additions like cream cheese, heavy cream, or beaten egg come into play. Two tablespoons of cream cheese or a quarter cup of heavy cream mixed into the finished filling provides enough fat to create cohesion without making the mixture greasy. One beaten egg works too, but add it off the heat and stir quickly to prevent scrambling. The egg sets during baking, creating a more structured filling.
Protein Variations Beyond the Basics
While the existing article touches on protein additions, the possibilities extend far beyond a simple mention. Each protein brings its own character, preparation requirements, and macro profile to the enchilada equation.
Shredded chicken remains the most versatile option, absorbing the enchilada flavors while adding substantial protein. For the best results, start with bone-in, skin-on chicken thighs rather than breasts. Thighs carry more flavor and stay moist through the cooking process. Season them generously with cumin, chili powder, and salt, then roast at 400°F for 35-40 minutes until cooked through and the skin is crispy. Let the meat cool slightly, then shred it, discarding bones and skin. Mix the shredded chicken into your cauliflower filling, adding some of the pan drippings if you’re not strictly counting calories. The rendered fat from chicken thighs adds richness that breast meat simply can’t provide. For a shortcut, use a rotisserie chicken from the grocery store, but be aware that these often contain added sugars in the seasoning.
Ground beef brings a hearty, satisfying quality that pairs naturally with Mexican flavors. Choose 80/20 ground beef for the best flavor—leaner options tend toward dryness, especially when combined with cauliflower. Brown the beef in a skillet, breaking it up as it cooks, until no pink remains. Drain most but not all of the rendered fat. Season generously with the same spice blend used for the cauliflower, plus an extra teaspoon of cumin. Mix with the prepared cauliflower rice after both have cooled slightly. The residual heat allows the flavors to meld. This combination creates an enchilada that eats like a substantial meal rather than a light lunch.
Carnitas elevate these enchiladas to something approaching special occasion status. Traditional carnitas require hours of slow cooking in lard, but a simplified version works beautifully here. Cut a pork shoulder into 2-inch chunks, season with salt, pepper, cumin, and oregano, and place in a slow cooker with a cup of chicken broth and the juice of two oranges. Cook on low for 8 hours until the meat shreds easily. Transfer the meat to a baking sheet and roast at 450°F for 10-15 minutes until the edges crisp. Shred and mix into your filling. The citrus notes from the cooking liquid brighten the entire dish, and the textural contrast between crispy edges and tender interior adds dimension.
Chorizo offers an entirely different flavor direction. Mexican chorizo (fresh, not cured Spanish chorizo) brings intense spice and significant fat. Remove the chorizo from its casing and cook in a skillet, breaking it up as you would ground beef. No additional seasoning is needed—the chorizo carries enough cumin, chile, and garlic to season the entire filling. Drain some but not all of the rendered fat before mixing with the cauliflower. Because chorizo is so intensely flavored, use it in a smaller proportion—about half chorizo, half cauliflower—so it doesn’t overwhelm the dish.
Seafood options require different handling but can produce spectacular results. Large shrimp, peeled and deveined, can be sautéed quickly in butter with garlic and lime, then chopped and folded into the filling. White fish like cod or tilapia should be baked or pan-seared until just cooked through, then flaked. Add seafood proteins at the last minute before assembling the enchiladas, and reduce the total baking time slightly—seafood becomes rubbery when overcooked. These variations work particularly well with green enchilada sauce rather than red, creating a lighter, more delicate dish.
Vegetarian protein boosters for those avoiding meat needn’t rely on processed substitutes. Hemp hearts add a nutty flavor and 10 grams of protein per 3-tablespoon serving. Stir them into the cauliflower filling after cooking for a subtle nutritional upgrade. Chopped, toasted walnuts contribute healthy fats and a satisfying crunch. Nutritional yeast, mentioned briefly in the original article, deserves more attention—besides its cheesy flavor, it provides complete protein and B vitamins. Start with 2 tablespoons mixed into the filling and adjust to taste.
Green Enchilada Sauce: A Vibrant Alternative
Red enchilada sauce gets most of the attention, but green sauce—made from tomatillos and green chiles—offers a brighter, more acidic counterpoint that works beautifully with cauliflower. The preparation differs significantly from red sauce, and the results are worth exploring.
Start with fresh tomatillos, those papery-husked green fruits that look like alien lanterns. Remove the husks and rinse the sticky residue from the skin. Roast tomatillos under the broiler for 5-7 minutes until the skins blister and char in spots, turning once halfway through. This roasting concentrates their natural sugars and adds subtle smokiness. Alternatively, roast them on a dry comal or skillet, turning frequently, until softened and slightly charred.
While the tomatillos roast, prepare your aromatics. Serrano peppers provide authentic heat—start with two and adjust upward if you like things spicy. Jalapeños work too, with less heat and a slightly different flavor profile. Regardless of which pepper you choose, roast them alongside the tomatillos until the skins blister. Remove the stems and seeds for milder sauce, or leave them in for more heat. Combine the roasted tomatillos and peppers in a blender with half a white onion (roughly chopped), 2-3 cloves of garlic, a handful of fresh cilantro, and 1/2 teaspoon of salt. Blend until smooth.
Transfer the puree to a saucepan and simmer over medium-low heat for 10-15 minutes until the sauce thickens slightly and the raw onion flavor cooks out. The finished sauce should coat a spoon without being paste-like. If it seems too thick, thin with a splash of chicken or vegetable broth. Taste and adjust seasoning, adding more salt or a squeeze of lime juice as needed. The sauce keeps in the refrigerator for up to a week and freezes well.
Green sauce pairs particularly well with chicken-filled enchiladas or seafood variations. The acidity cuts through rich proteins, and the herbal notes from the cilantro complement rather than compete with the cauliflower filling. For a creamier variation, blend in half an avocado or a tablespoon of Mexican crema after the sauce finishes cooking. This creates a richer, silkier sauce that bridges the gap between traditional enchilada sauce and a salsa verde-based preparation.
Nutritionally, green enchilada sauce differs from red in meaningful ways. Tomatillos provide vitamin C, vitamin K, and niacin, with slightly fewer carbohydrates than red chile-based sauces. A half-cup serving of green sauce typically contains 3-4 grams of net carbs, compared to 5-6 grams for red sauce, though these numbers vary based on preparation method and any added thickeners. The difference is marginal but can matter for those tracking macros precisely.
Make-Ahead Strategies for Busy Weeknights
Assembling enchiladas from scratch on a weeknight might feel daunting, but strategic preparation transforms this from an all-night project into something manageable. Breaking the process into components that can be prepared ahead means dinner comes together in minutes when it’s time to cook.
The cauliflower filling keeps beautifully for up to five days in the refrigerator. Prepare a double batch on Sunday, and you’re halfway to enchiladas for a midweek meal. Let the cooked filling cool completely before storing it in an airtight container. If you’ve added protein—chicken, beef, or pork—the same timeline applies. The flavors actually improve after a day in the refrigerator, as the seasonings meld and penetrate the cauliflower more thoroughly. Label your containers with the date, and don’t hesitate to freeze portions you won’t use within the week. Frozen filling thaws overnight in the refrigerator and reheats well in the microwave or a skillet.
Homemade enchilada sauce, whether red or green, stores exceptionally well. Make a large batch and portion it into 2-cup containers—roughly the amount needed for one batch of enchiladas. Freeze the portions flat in freezer bags for space-efficient storage. Thaw in the refrigerator overnight or in a bowl of warm water when you’re ready to cook. Sauce keeps for up to three months in the freezer without noticeable quality loss. Having homemade sauce ready to go eliminates one of the most time-consuming steps in the process.
Cheese can be shredded in advance, though it’s best used within 3-4 days for optimal melting. Store shredded cheese in a resealable bag with as much air removed as possible. If moisture accumulates inside the bag, the cheese may develop surface mold, so use it promptly. For longer storage, freeze shredded cheese in portion-sized bags. Frozen cheese melts differently—slightly grainier at first—but works fine for baked dishes like enchiladas.
For the ultimate weeknight shortcut, assemble the enchiladas completely on your prep day and refrigerate them unbaked. Cover the dish tightly with plastic wrap and foil. They’ll keep for 24-48 hours, though the tortillas will soften as they sit. When ready to bake, remove from the refrigerator while the oven preheats, then bake as directed, adding 5-10 minutes to account for the cold start. The texture won’t be quite as distinct as freshly assembled enchiladas, but the convenience factor may outweigh that consideration.
Freezer-to-oven enchiladas represent the make-ahead pinnacle. Assemble your enchiladas in a foil baking pan rather than your regular casserole dish. Wrap thoroughly—plastic wrap directly on the surface, then a double layer of foil around the entire pan. Label with the contents and date. These frozen meals keep for up to three months. To cook, thaw overnight in the refrigerator, then bake as directed. Alternatively, bake from frozen by adding about 20 minutes to the covered baking time. The tortillas emerge softer than fresh, but for a grab-and-go dinner option, the tradeoff is often acceptable.
Pairing Suggestions for a Complete Mexican Feast
These enchiladas satisfy on their own, but building a complete meal around them elevates the experience. Traditional Mexican accompaniments often contain rice and beans—both problematic for keto—but creative alternatives exist that honor the spirit of the cuisine without the carb load.
Cauliflower Spanish rice mimics the real thing with remarkable accuracy. Start with riced cauliflower—the same preparation as your enchilada filling, but treated differently. Sauté diced onion and garlic in oil until translucent, then add the cauliflower rice along with tomato paste, cumin, and a pinch of saffron if you have it. The saffron adds that distinctive yellow-orange color and subtle floral notes. Cook until the cauliflower is tender but not mushy. Finish with chopped cilantro and lime juice. This side dish contains roughly 4 grams of net carbs per cup compared to 40-plus grams for traditional Spanish rice, yet it delivers the same flavor profile that makes that fluffy, tomato-tinted rice so satisfying.
Refried beans pose a greater challenge, as no direct substitute replicates their creamy, earthy character. The closest keto approximation uses mashed cauliflower blended with bacon fat, cumin, and a touch of cocoa powder for depth. It sounds strange, but the cocoa contributes earthiness that mimics the mineral quality of pinto beans. Another option uses lupini beans, which contain significantly fewer carbs than black or pinto beans. Mash cooked lupini beans with lard or bacon drippings, season with cumin and garlic, and simmer until thick. A half-cup serving contains about 2-3 grams of net carbs compared to 15-20 grams for traditional refried beans.
A crisp green salad provides contrast to the warm, soft enchiladas. Skip the iceberg and choose sturdy greens like romaine or baby spinach, which hold up under dressing. Make a simple citrus vinaigrette by whisking lime juice, olive oil, a pinch of cumin, and a tiny amount of sweetener if desired. Add sliced radishes for crunch and color, cucumber for freshness, and avocado for richness. This salad cleanses the palate between bites of rich enchilada and adds valuable nutrients without significant carbs.
For those who enjoy beverages with dinner, traditional Mexican drinks offer opportunities and challenges. Margaritas made with fresh lime juice, quality tequila, and a keto-friendly sweetener like erythritol or allulose deliver the experience without the sugar crash. Skip the mixers and opt for freshly squeezed juice. A traditional margarita contains about 25 grams of carbs from the orange liqueur and agave; a keto version can come in under 3 grams. Mexican beer is generally off-limits, but light lagers exist in the 3-5 gram carb range if you’re willing to compromise. Sparkling water with lime provides a refreshing non-alcoholic option that complements the meal without competing with it.
When entertaining, consider building a spread that allows guests to customize their experience. Set out bowls of toppings—different salsas, pickled onions, crumbled queso fresco, sliced jalapeños, diced avocado. Provide both red and green enchilada sauce options for those who want to try both. This approach works beautifully for families with mixed dietary needs; the cauliflower enchiladas serve as a base, and everyone adds what works for them. A guest who isn’t keto can pair their enchilada with traditional rice and beans, while someone dairy-free can skip the cheese and load up on avocado. The communal aspect of shared meals remains intact even when dietary restrictions vary.
Frequently Asked Questions
Can I make these enchiladas dairy-free?
Yes, with a few modifications. Use dairy-free cheese shreds (though note that many don’t melt as smoothly), replace butter with avocado oil in the sauce, and skip any cream additions in the filling. Coconut cream can substitute for heavy cream, though it will add a slight coconut flavor. The cauliflower filling itself is naturally dairy-free, so you have flexibility in how far you take the adaptations.
How do I prevent soggy enchiladas?
Sogginess usually stems from excess moisture in the cauliflower or sauce that’s too thin. The critical step is squeezing your riced cauliflower in a towel before cooking—this removes surprising amounts of water. Additionally, don’t drown the enchiladas in sauce; coat them well but don’t create a pool at the bottom of the dish. Finally, let the assembled enchiladas rest after baking so the tortillas can absorb some moisture back from the filling and sauce.
Can I assemble these ahead of time?
You can prepare all components up to 24 hours in advance and store them separately in the refrigerator. Assemble the enchiladas just before baking for best results. If you must assemble ahead, know that the tortillas will soften significantly as they sit, becoming more like a casserole than distinct enchiladas. Still delicious, just different in texture.
What’s the best way to add protein?
Shredded chicken works beautifully and can be mixed directly into the cauliflower filling. Ground beef should be cooked and seasoned separately, then combined with the cauliflower. Carnitas or pulled pork add wonderful flavor but increase the fat content significantly. For a lighter option, flaked white fish or shrimp can work, though reduce the cooking time as these proteins can become rubbery when overcooked. Aim for 4-6 ounces of protein per serving depending on your macro needs.
Can I freeze cauliflower enchiladas?
Yes, though texture changes slightly upon thawing. Freeze before baking for best results. Assemble the enchiladas in a freezer-safe dish, wrap tightly with plastic wrap and foil, and freeze for up to 3 months. Thaw overnight in the refrigerator before baking as directed, adding about 10 extra minutes to the covered baking time. If you must freeze already-baked enchiladas, know that the tortillas will be quite soft upon reheating, more like a casserole consistency.
Related posts:
 The One-Ingredient Swap That Makes Any Salad Dressing Healthier
 Guilt-Free Cinnamon Roll Recipe
 Easy Trader Joe’s Dinner Ideas
 Low-Carb Cauliflower Oatmeal Recipe
 Creative Cauliflower Recipe Collection
 Exploring American Cuisine
 From Salads to Pasta: The Versatile Veggie That Tastes Like Everything
 A Sweet And Spicy Cauliflower That’ll Change How You Think About Indian Food