The Power of Contouring
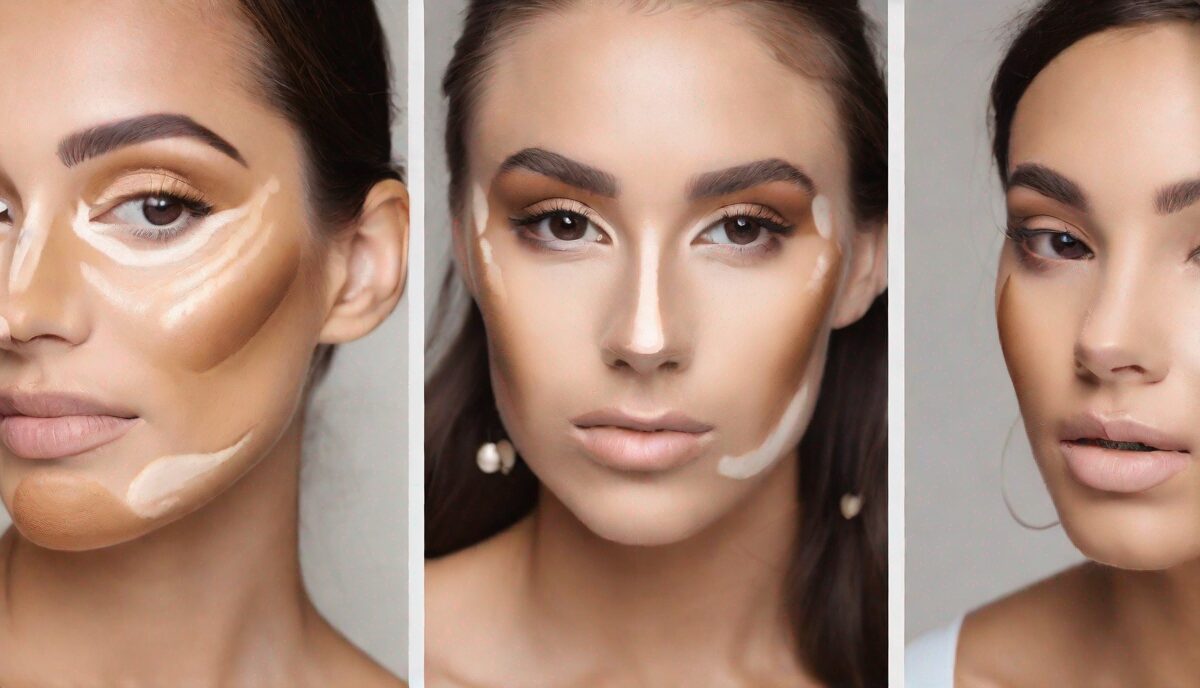
Contouring makeup techniques allow you to sculpt and define facial features for a striking look. When done well, contouring creates dimension and the appearance of higher cheekbones, a slimmer nose, and sharper jawline. It takes patience and practice, but the payoff for mastering these skills is the ability to transform your face.
Choosing Products for Contouring
The right makeup products are essential for natural-looking contours. Matte bronzers in cool, ashy tones mimic natural shadow for subtle definition. Cream or stick products blend easily for a smooth gradient. Opt for concealer a few shades lighter than your skin to highlight facial features you wish to pull forward, like the tops of cheekbones.
Find Your Face Shape
Determine your face shape before sculpting so you can accentuate your natural bone structure. Oval faces suit most contour styles, while round faces need angular lines lifted cheeks to elongate features. Contour the temples and jawline on square faces. Soften harsh lines on heart, long or diamond face shapes with soft, blended contouring.
Placement Guidelines by Feature
- Cheekbones: Apply bronzer below the cheekbone in a “3” shape from temples to the corners of the mouth.
- Jawline: Contour a slightly darker shade along the jawline under the edges of the face.
- Nose: Use light application along both sides, careful not to extend color too low.
- Hairline: Dust a light veil of bronzer along hairline for a naturally framed look.
Blending is Key
Seamless blending creates the illusion of shadow and dimension. Use a damp sponge or contour brush in sweeping motions until zero harsh lines appear. Slightly brighter concealer layered on top of cheekbones, nose bridge, and forehead highlights these focal points.
Set with Powder
Finish with a translucent setting powder to keep cream or liquid contour products from shifting. Lightly press powder over contoured and highlighted areas using a large fluffy brush. Setting your makeup ensures your sculpted dimensions hold all day.
The Science of Undertones and Color Correction in Concealer Contouring
While the basic premise of contouring involves using light and dark shades to manipulate depth, the success of the technique relies heavily on an advanced understanding of skin undertones. Many beginners make the mistake of choosing a contour concealer that is simply ‘dark,’ leading to a muddy or orange appearance that looks artificial in daylight. To achieve a professional-grade sculpt, you must identify whether your skin is cool, warm, or neutral. Cool undertones require contour shades with a hint of grey or taupe to mimic the natural shadows cast by bone structure. Conversely, warm undertones benefit from rich mocha or deep tan shades that integrate seamlessly with the skin’s natural golden hues. If you possess a neutral undertone, a balance of both—often labeled as ‘olive’ or ‘neutral brown’—prevents the contour from looking too ashy or too fiery.
Beyond the contour itself, integrating color correction into your concealer routine is a prerequisite for a clean sculpt. If you have significant redness around the nose or blue-toned dark circles under the eyes, applying a highlighting concealer directly over these areas can result in a grey, muddy finish. Use a peach or orange corrector for dark circles and a green corrector for redness before you begin the highlighting phase of your contour. This creates a neutralized canvas, allowing your highlighting concealer to pop. When selecting your highlighting shade, aim for a product with a high pigment load but a thin consistency; this prevents the ‘cakey’ look that often occurs when layering multiple products. A common edge case involves skin with hyperpigmentation; in these instances, use a concealer that exactly matches your skin tone to spot-conceal before applying your lighter highlighting shade to ensure an even, sculpted gradient.
The Underpainting Method: A Professional Approach to Seamless Sculpting
The ‘underpainting’ technique, a favorite among celebrity makeup artists, flips the traditional order of application to create a look that appears to come from within the skin rather than sitting on top of it. Instead of applying foundation first, you apply your contour and highlighting concealers directly onto primed skin. Start by mapping out your shadows using a cream contour concealer in the hollows of your cheeks, the temples, and along the jawline. Because you will be layering foundation over this, you can afford to be slightly more generous with the pigment than you would in a traditional application. Follow this by applying your brightening concealer to the center of the forehead, the bridge of the nose, and the under-eye area.
The magic of underpainting happens during the foundation step. Choose a sheer to medium-coverage liquid foundation and apply it using a damp sponge or a large, fluffy buffing brush. Rather than swiping the foundation—which would smear your carefully placed concealer—use a stippling or tapping motion. This allows the foundation to veil the contour and highlight, softening the edges and creating a diffused, airbrushed effect. This method is particularly effective for those who find traditional contouring too harsh for everyday wear. It eliminates the risk of visible ‘racing stripes’ on the cheeks and ensures that the transition between your sculpted features and your natural skin tone is completely undetectable, even under harsh fluorescent lighting.
Advanced Corrective Techniques for Asymmetry and Specific Features
Standard contouring guides often assume a perfectly symmetrical face, but most individuals deal with slight asymmetries that require a tailored approach. If one side of your jawline is softer than the other, you can use a deeper contour concealer to create a sharper shadow on the less-defined side, while using a lighter touch on the more prominent side to balance the visual weight. For those with a deviated septum or a nose that leans to one side, avoid straight vertical lines. Instead, follow the natural curve of the bridge with your contour, but use a brightening concealer to ‘straighten’ the center line, drawing the eye toward a perfectly vertical highlight regardless of the underlying bone structure.
The eye area offers another opportunity for corrective sculpting. To achieve a ‘fox eye’ or lifted effect without surgery, apply your highlighting concealer in an upward diagonal line from the outer corner of the eye toward the temple. Pair this with a subtle touch of contour concealer just above the natural crease of the eyelid, extending it slightly outward. This creates a lifting illusion that opens the gaze. For those with a more prominent forehead, avoid a solid block of dark concealer at the hairline. Instead, use a ‘flicking’ motion with a small brush to mimic the appearance of natural shadows cast by hair follicles. This adds depth without creating a heavy, mask-like boundary. If you have a ‘double chin’ or a soft submental area, apply your contour concealer in a V-shape starting from the base of the ears and meeting under the chin; this draws the focus upward and creates a more defined profile.
Managing Texture: Contouring for Mature Skin and Acne-Prone Complexions
Contouring with concealer presents unique challenges when dealing with textured skin. For mature skin, the primary goal is to avoid products that settle into fine lines or accentuate dryness. Opt for cream-based concealers enriched with hydrating ingredients like hyaluronic acid or squalane. Avoid applying heavy contour directly onto areas with deep expression lines, such as the ’11’ lines between the brows or the nasolabial folds. Instead, focus your sculpting on the outer perimeter of the face and the high points of the cheekbones. Use a damp sponge to press the product into the skin, which helps fill in minor textural irregularities rather than sitting on top of them. A light-reflecting (but not glittery) highlighting concealer can also help ‘blur’ the appearance of wrinkles by bouncing light away from the depths of the folds.
For those with acne-prone or scarred skin, the challenge lies in preventing the contour from looking ‘patchy.’ Active breakouts often have a different texture and temperature than the surrounding skin, which can cause concealer to break down prematurely. Use a silicone-based primer to create a smooth barrier before contouring. When applying contour over textured areas, avoid dragging the brush, as this can lift the concealer and reveal the blemish underneath. Use a ‘stippling’ motion with a dense, synthetic brush to deposit color. If a blemish falls exactly where a shadow should be, use a color-matched concealer first, set it with a tiny amount of translucent powder, and then very carefully layer your contour shade over it. This ‘sandwiching’ technique ensures that the blemish remains hidden while the sculpted dimension is maintained.
High-Definition Contouring: Adapting Your Look for Photography vs. Natural Light
The intensity of your contour should be dictated by your environment. What looks stunning in a dimly lit restaurant or on a high-definition camera can look like theatrical face paint in the midday sun. For photography, especially when flash is involved, you need to increase the contrast of your contour by about 20-30%. Flash photography tends to ‘wash out’ features, making the face appear flat. In this scenario, use a slightly deeper contour and a more opaque highlighting concealer. Be wary of ‘flashback,’ which occurs when powders containing high levels of silica reflect the camera flash, creating white patches under the eyes. To avoid this, use a tinted setting powder that matches your skin tone rather than a pure white translucent powder.
For natural light or everyday office settings, the ‘less is more’ rule applies. The goal is to create shadows that are only visible when the face moves. Use sheerer formulas and focus on blending until the product is almost invisible. A pro tip for checking your work is to step away from your vanity mirror and look at your reflection in a handheld mirror while standing near a window. This reveals any unblended edges or ‘muddy’ spots that the warm glow of bathroom lights might hide. If you find the contour is too heavy, don’t wash it off; instead, take the brush or sponge you used for your foundation (without adding more product) and buff over the edges of the contour to dial back the intensity. This maintains the shape while softening the pigment to a more natural level.
The Toolset Mastery: Selecting Bristle Density and Sponge Porosity
The tools you use are just as important as the concealer formulas themselves. For precise contouring, especially around the nose and eyes, a small, tapered synthetic brush is essential. Synthetic bristles are preferred for cream and liquid concealers because they don’t absorb as much product as natural hair, allowing for a more concentrated application. When sculpting the cheekbones, a slanted or angled contour brush with medium density provides the right balance of precision and blending power. If the bristles are too soft, you won’t be able to move the product effectively; if they are too stiff, you risk micro-exfoliating the skin and creating a flaky finish.
Sponges offer a different finish altogether. A high-porosity sponge (one with larger ‘holes’) will absorb more product, which is ideal for sheering out a contour that feels too heavy. A low-porosity, dense sponge is better for building coverage and achieving a high-glam, opaque finish. Always use your sponge damp; a dry sponge will soak up the water content of your concealer, leaving the pigment behind in a dry, unblendable clump. For the sharpest jawline and cheekbone lines, many artists use the ‘stamping’ method with the flat edge of a teardrop-shaped sponge. By loading the flat edge with a bit of translucent powder and pressing it directly beneath your contour line, you create a ‘cut’ that makes the shadow above it look significantly more defined—a technique often referred to as ‘baking’ the contour.
Longevity and Weatherproofing: Layering Formulas for All-Day Wear
To ensure your sculpted look survives a long day, a humid climate, or an evening of dancing, you must master the art of layering. Cream concealers are excellent for their blendability and natural finish, but they are prone to shifting as the skin produces natural oils. The solution is ‘formula doubling.’ After you have blended your cream contour and highlight to perfection, lightly ‘set’ them with a corresponding powder product. Use a matte bronzer or a cool-toned contour powder over the dark areas, and a brightening pressed powder or loose setting powder over the highlighted areas. This creates a double-bonded layer that is much more resistant to friction and sweat.
In extreme conditions, such as high humidity, consider using a setting spray between layers. Apply your cream products, mist the face lightly with a long-wear setting spray, let it dry, and then apply your powder products. This creates a ‘sandwich’ effect that locks the pigment in place. For those with oily skin, the ‘reverse setting’ method can be a game-changer: apply a very light dusting of translucent powder *before* your cream contour. This gives the cream something to grip onto and prevents it from sliding around as the day progresses. Finally, always carry a small blotting paper or a puff with a bit of residual powder for mid-day touch-ups. When touching up a contoured face, never rub the skin; always press and lift to remove excess oil without disturbing the architectural placement of your highlights and shadows.
FAQ
What is the best contour shade for fair skin?
Those with fair skin should choose cool-toned taupe or ash brown shades. Bronzers with grey, brown or purple undertones mimic natural shadow on pale skin better than warm shades.
Where should you apply highlighter when contouring?
Light-reflecting highlighter belongs on the highest points of the face – tops of cheekbones, center of forehead, tip of nose and cupid’s bow. Apply sparingly to brow and chin bones too.
What brush is best for contouring?
Look for angled contour brushes with dense bristles, or small dense brushes for precision application. Buffing brushes blend seamlessly once contour is laid down. Dampened makeup sponges also work well.
Can you contour without using makeup?
Yes, shading the hollows of cheeks and temples with a darker colored powder eyeshadow can subtly sculpt features without heavy contour products.
What face shape works best for contouring?
Oval faces suit most contouring styles since the shape lends itself well to sculpting. Very angular narrow faces should avoid strong cheek and temple contours which can overly accentuate sharp angles.
Related posts:
 Top Concealer Picks at Sephora
 The Eyeshadow Application Method That Actually Works
 Foundation’s Impact on Skin
 The Makeup Tricks That Will Change Your Entire Face
 Finally, Real Answers to Your Most Embarrassing Concealer Questions
 The Ultimate Guide to Using Highlighter Like a Pro Makeup Artist
 Budget Beauty Beat: Creating a Full Makeup Look with Drugstore Products
 NARS Concealer Review