
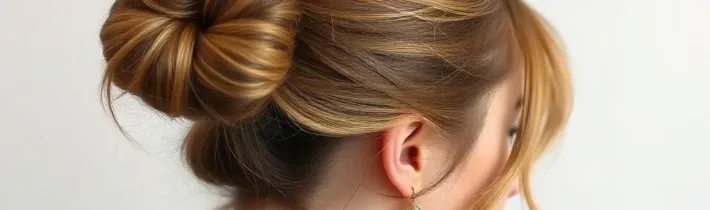
The messy bun is the ultimate chameleon of hairstyles. It is the go-to look for lazy Sunday mornings, intense gym sessions, and—when styled correctly—sophisticated evenings out. However, there is a fine line between “effortlessly chic” and “I just rolled out of bed.” Achieving that coveted, intentional dishevelment requires a bit of technique, the right products, and an understanding of your hair texture. This guide will walk you through the anatomy of the perfect messy bun, ensuring you look polished regardless of the occasion.
Understanding Your Hair Texture and Prep
The foundation of a great messy bun starts before you even reach for a hair tie. If your hair is freshly washed and silky, it will likely be too slippery to hold a bun in place. The secret is to create grip. If you have fine, straight hair, start by applying a texturizing spray or dry shampoo to your roots and mid-lengths. This adds volume and grit, allowing the hair to grab onto itself. If your hair is naturally curly or coarse, you are already halfway there. You may only need a tiny dab of light styling cream to tame flyaways. The goal is to make your hair feel lived-in, not squeaky clean.
The Essential Toolkit for the Perfect Bun
You do not need a professional stylist’s kit, but having the right tools makes the process significantly easier. First, invest in high-quality hair elastics that match your hair color to keep them discreet. Avoid plastic-coated bands that can snap hair. You will also need a handful of U-shaped hairpins, which are much more effective at securing loose pieces than traditional bobby pins. A wide-tooth comb for backcombing and a light-hold hairspray are the final elements. Keep these items in a small pouch in your bathroom so you are always ready for a quick styling session.
The High-Volume Top Knot Technique
For a look that feels elevated and modern, the high-volume top knot is the gold standard. Start by flipping your head upside down and gathering all your hair at the crown of your head. Instead of pulling the hair through the elastic for the final loop, pull it only halfway through to create a large, messy loop. Take the remaining ends of your hair and wrap them around the base of the bun to hide the elastic. Secure these ends with U-pins rather than more elastics. Use your fingers to gently pull at the bun, loosening sections to create a wider, fuller shape. The result should look airy and intentional, not tight or plastered to your scalp.
Creating a Low, Romantic Nape Bun
If you prefer a softer, more romantic aesthetic, the low nape bun is your best friend. This style works beautifully with face-framing layers. Start by gathering your hair at the nape of your neck, leaving out a few tendrils around your ears and temples. Twist the ponytail loosely and wrap it into a circular shape against your neck. Use a clear elastic or a few hairpins to anchor it. The beauty of this style lies in the imperfection; let pieces fall where they may. This style is particularly effective for formal events when paired with statement earrings or a silk scarf tied around the base.
Incorporating Braids for Added Detail
Adding a braid is the easiest way to take a messy bun from basic to professional. Before you pull your hair into your bun, create a small Dutch braid along your hairline or a simple three-strand braid starting from the back of your neck. Once you have created your bun using the techniques mentioned above, integrate the tail of the braid into the bun. This adds texture and visual interest that makes the hairstyle look like it took much longer than it actually did. It is a fantastic trick for hiding second-day hair while adding a touch of bohemian flair.
Mastering the Art of Face-Framing Tendrils
The biggest mistake people make with a messy bun is pulling all their hair back too tightly. The “effortless” look is achieved by what you leave out. Before you secure your bun, pull out small sections of hair around your face. Use a one-inch curling iron to add a slight bend to these tendrils. This softens your features and prevents the bun from looking like a severe schoolmarm style. Keep the pieces thin; if they are too thick, they will look like unintentional strands you forgot to pin back rather than a deliberate style choice.
Transitioning from Gym to Dinner
One of the best aspects of the messy bun is its versatility. If you have been wearing your hair in a high bun for a workout, you can easily transition it for an evening out. Start by shaking out the bun and re-securing it if necessary. Use a bit of dry shampoo to absorb any moisture and add volume. Swap out your gym scrunchie for a decorative hair accessory, like a velvet ribbon or a gold-tone hair cuff. Add a touch of shine spray to smooth out any unwanted frizz, and you are ready for dinner without having to wash or restyle your hair entirely.
Common Mistakes and How to Avoid Them
The most common error is over-thinking the process. If you spend twenty minutes trying to make the bun perfect, it will lose that “effortless” quality. Aim for a three-minute limit. Another mistake is using too much product. Heavy gels or waxes will make the hair look greasy and stiff. Always opt for lightweight formulas. If your bun feels like it is sagging, the problem is likely that your elastic is too loose or you are using too much hair in one section. Try using two smaller elastics instead of one large one, or focus on pinning the weight of the hair closer to the base of your skull.
The Science of Sectioning for Balanced Volume
Achieving a messy bun that doesn’t sag by noon often comes down to how you distribute weight. Instead of gathering all your hair into one giant ponytail, try a “two-tier” approach. First, gather the top half of your hair—from the temples to the crown—and secure it with a small elastic. Next, gather the remaining bottom half and secure it into a second, slightly looser ponytail just below the first. By pinning your bun sections into these two distinct anchor points, you distribute the weight of your hair evenly across the scalp. This prevents the dreaded “heavy bun” syndrome where the style pulls on your hairline or droops toward your neck. This technique is particularly vital for those with heavy, long hair who find that a single elastic simply cannot support the volume of a messy bun for more than an hour.
Accessorizing Beyond the Basic Scrunchie
The transition from a functional bun to a high-fashion accessory often lies in the hardware. While elastics hold the shape, decorative elements provide the polish. Consider incorporating a “hair fork” or a decorative claw clip. A metallic, open-circle hair fork can be pushed through the center of a bun to provide both structural integrity and a minimalist, sculptural aesthetic. Alternatively, if your bun is feeling a bit flat, a small, matte-finish claw clip can be placed at the base of the bun to push it upward, creating an instant lift that lasts all day. For those who enjoy a vintage touch, a silk scarf woven through the bun during the final twist offers a pop of color and hides any unwanted flyaways while acting as a soft, breakage-free way to secure the style.
The “Wet-Look” Messy Bun for Evening Sophistication
While the standard messy bun relies on dry texture, a “wet-look” variation is a powerhouse for evening events or transition days when you haven’t had time to wash your hair. Start by applying a small amount of lightweight styling gel or a grooming cream to your roots, combing it back with a wide-tooth comb to create deliberate, sleek lines. Pull the hair into a mid-height bun, but leave the ends slightly damp with a bit of product. Instead of tucking the ends away, let them splay out slightly at the top or side of the bun to create a “deconstructed” look. This style pairs exceptionally well with bold makeup, such as a red lip or a sharp cat-eye, as the contrast between the slicked-back scalp and the soft, textured bun creates a high-fashion editorial silhouette.
Customizing the Bun for Different Head Shapes
Not all buns should sit at the exact same height on every head. To elongate a round face, aim for a high, narrow top knot that draws the eye upward; avoid wide, side-swept buns that add horizontal volume. If you have an oval or long face, a mid-height bun or a slightly wider, lower nape bun works best to balance your features without over-extending your profile. For those with a heart-shaped face, a softer, lower bun with plenty of face-framing pieces around the jawline helps to add width where it is needed most. Experiment by standing in front of a mirror and physically holding your hair at different heights—crown, mid-back, and nape—to see which placement best complements your specific bone structure before you reach for the elastic.
Troubleshooting the “Over-Pinned” Look
A common pitfall in the quest for a secure bun is using too many bobby pins, which can make the hair look cluttered and industrial. If you find your bun is losing its shape, it is usually because the pins are being used to “clamp” the hair rather than “weave” it. To fix this, use the “anchor and lock” method: open the pin slightly, catch a small section of the hair in the bun, and then push the pin inward so it catches the hair against your scalp. Then, flip the pin and push it back into the bun itself. This creates a locking mechanism that requires half the number of pins. If you find yourself using more than six pins, you are likely relying on the pins to do the work that your initial twist should be doing; go back to step one and re-twist your base more tightly.
Adapting for Post-Workout Humidity
If you are heading straight from a high-intensity workout to a social engagement, your hair is likely suffering from sweat-induced flatness. The key here is to avoid adding more product immediately, which can lead to a sticky, heavy buildup. First, use a blow dryer on the “cool” setting at the roots to evaporate the moisture and reset the lift. Once the hair is dry, apply a dry texturizing spray—not a dry shampoo—to the bun itself. Dry shampoo is designed to absorb oil, whereas texturizing spray provides the “tack” needed to give a limp, post-gym bun that airy, voluminous look again. By separating the roots from the lengths, you can effectively refresh the style without turning your hair into a matted mess of product and sweat.
Frequently Asked Questions
Q: How can I keep my messy bun from falling out during the day? A: The secret is in the pins. Instead of relying solely on an elastic, use U-shaped hairpins to anchor the bun to the base of your ponytail. Inserting the pins at an angle—catching both the bun and the hair against your scalp—will create a much more secure hold than bobby pins.
Q: My hair is very short; can I still do a messy bun? A: Yes, but you will need to adapt. Focus on a “half-up, half-down” messy bun. Gather only the top section of your hair, create a small, loose bun, and leave the rest of your hair down. This gives you the aesthetic of the messy bun without needing enough length to pull all your hair into one spot.
Q: Does a messy bun damage my hair? A: It can, if you wear it in the exact same position every day with a tight elastic. This causes tension at the hairline and breakage where the elastic sits. To prevent this, vary the height of your bun—sometimes high, sometimes low—and use silk or satin scrunchies to minimize friction.
Q: What is the best way to add volume to a thin-haired bun? A: Use a “donut” or a hair-padding tool hidden inside the bun. Alternatively, backcomb the ponytail before you twist it into a bun. This creates a cushion of hair that makes the finished look appear twice as thick as it actually is.
Q: How do I make a messy bun look appropriate for a professional work environment? A: Focus on “controlled chaos.” Keep the bun itself somewhat structured rather than completely wild, and ensure your face-framing pieces are neat rather than stringy. Pairing the bun with professional attire, like a blazer or a crisp button-down, automatically elevates the look, making it suitable for most office settings.
Related posts:
 Perfect Curly Hair Routine
 The Best Hair Ties for Every Hair Type and Style
 Easy Summer Updos for Every Hair Type
 Silk Hair Ties: Gentle on Hair, Tough on Tangles
 Zoe Kravitz’s Coconut Oil Hair Care Secret
 Blow Drying Hair Without Damage: Expert Tips
 The Game-Changing Air-Dry Shampoo That’s Taking Over Social Media
 The Half-Ponytail Updo Celebrities Can’t Stop Wearing This Season