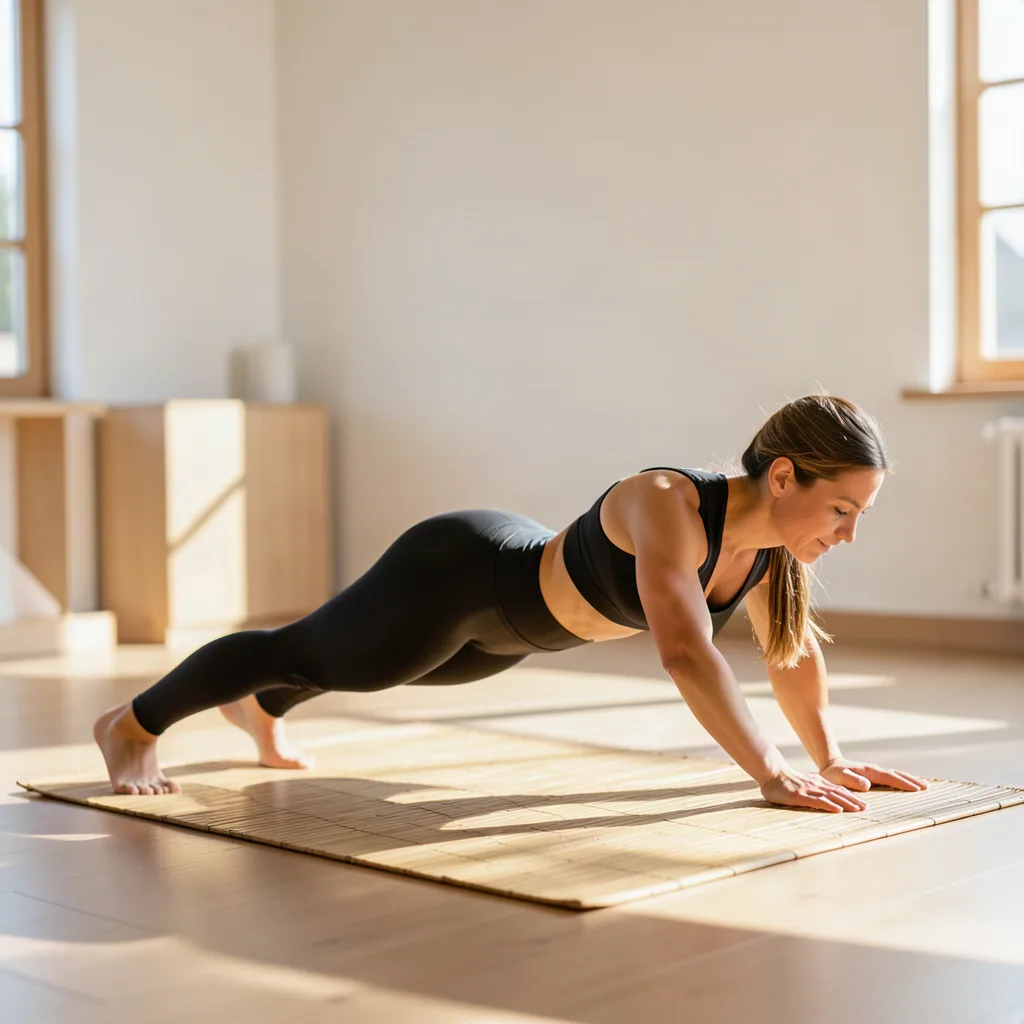
Chaturanga Dandasana, often simply called Chaturanga, is a cornerstone pose in many yoga practices. It builds the strength, stability, and body awareness needed for more advanced postures while also teaching the mind‑body connection essential to a safe, sustainable practice. This guide walks you through every element of the pose, from preparing your body to troubleshooting common errors, and ends with a complete sequence you can incorporate into your daily routine.
Key takeaways
- Warm up your wrists, shoulders, and core before practicing to prevent strain and improve stability.
- Keep elbows tucked at a 90-degree angle close to your ribcage to protect your shoulder joints.
- Engage your core by drawing the navel toward the spine to maintain a straight line and prevent sagging.
- Use props like yoga blocks or folded blankets to support your wrists and lower back while building strength.
1. Understanding Chaturanga Basics
Before you dive into the mechanics, it helps to know why Chaturanga matters. The pose mimics a low plank, engaging the core, shoulders, and legs in a coordinated effort. In traditional Hatha and Ashtanga yoga, Chaturanga serves as the bridge between upward‑facing and downward‑facing postures, creating a fluid, strength‑building transition. When performed correctly, it protects the wrists, shoulders, and lower back while cultivating the muscular endurance needed for poses like arm balances and inversions.
2. Preparing Your Body
Proper preparation reduces the risk of strain and makes the learning curve smoother. Follow these warm‑up steps before attempting Chaturanga:
- Wrist Mobilisation: Place your palms on a table or block and gently rock side‑to‑side for 30 seconds. Perform wrist circles, first clockwise then counter‑clockwise, for another 30 seconds.
- Shoulder Opener: In a tabletop position, slide each hand forward a few inches, then lower your chest toward the floor while keeping elbows close to the ribs. Hold for 5 breaths.
- Core Activation: Lie on your back, draw your belly button toward your spine, and lift your shoulders a few inches off the mat (a gentle “mini‑crunch”). Hold for 5 breaths, then release.
- Leg Warm‑Up: Perform 10 slow, controlled lunges on each side, focusing on engaging the quadriceps and glutes.
These movements prime the joints and muscles that will bear weight during Chaturanga.
3. Mastering Alignment Fundamentals
Alignment is the language of safety in yoga. The following checklist ensures you’re stacking the body correctly:
- Hand Placement: Position your hands directly under the shoulders, fingers spread wide, pressing evenly through the base of the thumb and the outer edge of the index finger.
- Elbow Angle: As you lower, aim for a 90‑degree bend at the elbows, keeping them tucked close to the ribcage. Think of forming a right angle, not a flared “V”.
- Shoulder Position: Draw the shoulder blades down the back (depression) and together (retraction). This creates a stable “shelf” for the elbows.
- Body Line: Your head, torso, hips, and heels should form a straight line, similar to a plank, without sagging in the lower back or piking the hips upward.
- Engage the Core: Pull the navel toward the spine, activating the transverse abdominis. This prevents the lumbar spine from collapsing.
Practice each element individually before combining them into a full pose.
4. Building Core Strength
The core is the central pillar that supports Chaturanga. Strengthen it with these targeted drills, performed 3‑4 times per week:
- Plank Variations: Hold a forearm plank for 30‑60 seconds, focusing on maintaining a neutral spine. Progress to a full‑arm plank once comfortable.
- Dead‑Bug: Lie on your back, arms extended toward the ceiling, knees bent at 90 degrees. Lower the opposite arm and leg toward the floor while keeping the lower back pressed into the mat. Perform 10 reps per side.
- Boat Pose (Navasana): Sit with knees bent, lift feet off the ground, and balance on the sitting bones. Extend arms forward and hold for 20‑30 seconds, gradually increasing duration.
Consistent core work will make the “hold” phase of Chaturanga feel more natural.
5. Hand and Wrist Positioning
Many beginners experience wrist discomfort because the weight distribution is off. Follow these cues:
- Spread fingers wide, creating a stable base.
- Press evenly through the thumb knuckle and the index finger’s outer edge.
- Lift the heel of the hand (the base of the palm) slightly off the mat to avoid collapsing the wrist.
- If you feel strain, place a folded towel or yoga block under the palms for a short period while you build strength.
Over time, the wrists will adapt, and the extra support can be removed.
6. Breathing and Flow Integration
In yoga, breath is the thread that ties movement together. For Chaturanga:
- Inhale: As you shift from Downward‑Facing Dog (or a high plank) into the pose, draw the breath in, expanding the chest.
- Exhale: Lower into Chaturanga while exhaling slowly, maintaining a steady, audible breath. This exhalation helps engage the core and prevents holding the breath.
- Maintain a smooth, even rhythm throughout the hold; avoid short, shallow breaths that can cause tension.
Practicing the breath‑movement connection during slow, mindful repetitions will improve both stability and concentration.
7. Common Mistakes & Corrections
Even experienced yogis slip into habits that undermine the pose. Identify the most frequent errors and apply the corrective actions below:
| Mistake | Why It Happens | Correction |
|---|---|---|
| Elbows flaring out | Weak shoulder girdle or lack of awareness | Place a yoga block between the upper arms; focus on pulling elbows toward the ribcage during the descent. |
| Sagging hips | Insufficient core engagement | Engage the belly button toward the spine before lowering; imagine a string pulling the crown of the head upward. |
| Hunched shoulders | Shoulder blades not depressed | Before lowering, draw the shoulder blades down and together, as if trying to tuck the shoulder blades into the back pockets. |
| Wrist pain | Improper hand distribution | Spread fingers wide, press evenly, and consider a short block under the palms while building strength. |
| Holding breath | Focus on balance over breath | Set a verbal cue: “Inhale up, exhale down.” Practice the movement without a full hold first. |
8. Progression to Advanced Variations
Once the foundational pose feels stable, you can explore variations that deepen strength and flexibility:
- Chaturanga with One‑Leg Lift: From the full pose, lift one leg a few inches while keeping hips level. Alternate sides for 5 breaths each.
- Low Plank to Chaturanga Flow: Transition from a low forearm plank into Chaturanga, then back to forearm plank. This challenges shoulder endurance.
- Chaturanga to Side Plank (Vasisthasana) Transition: Lower into Chaturanga, shift weight onto the right hand, rotate the body, and stack the left foot on top of the right. Hold for 3 breaths, then return.
- Weighted Chaturanga: Place a light sandbag (2‑3 lb) across the upper back to increase resistance once you can hold the pose comfortably for 30 seconds.
Introduce each variation gradually, ensuring the base pose remains solid before adding complexity.
9. Putting It All Together – A Sample Sequence
Integrate the skills you’ve learned into a cohesive flow. Perform the sequence 3‑5 times, linking breath to movement.
- Start in Child’s Pose (Balasana) for 5 breaths, grounding the spine.
- Move to Downward‑Facing Dog (Adho Mukha Svanasana). Hold 5 breaths, lengthening the spine.
- Shift forward into a High Plank. Inhale, then exhale as you lower into Chaturanga, keeping elbows at a 90‑degree angle.
- From Chaturanga, inhale and roll forward onto the tops of the feet, then exhale into Upward‑Facing Dog (Urdhva Mukha Svanasana), opening the chest.
- Exhale back into Downward‑Facing Dog. Repeat the entire cycle 4‑6 rounds.
- After the final round, transition into Low Plank (forearms on the mat) for 30 seconds, reinforcing shoulder stability.
- Finish with a gentle Supine Twist and a few minutes of Savasana to integrate the work.
This sequence balances strength, flexibility, and recovery, making Chaturanga a reliable anchor in any practice.
FAQ
Q1: How long should I hold Chaturanga when I’m a beginner?
Start with a 2‑ to 3‑second hold, focusing on perfect alignment. Gradually increase the duration by 2‑second increments each week until you can comfortably hold for 15‑20 seconds.
Q2: My wrists hurt even after using a block. What else can I do?
Incorporate wrist‑strengthening exercises such as wrist curls with a light dumbbell, reverse curls, and gentle wrist stretches. Additionally, rotate the hands slightly outward (about 10 degrees) to reduce pressure on the carpal tunnel.
Q3: Can I practice Chaturanga every day, or should I give my muscles rest?
Because Chaturanga is a strength‑building pose, it’s wise to alternate heavy‑strength days with lighter, restorative sessions. For most practitioners, 3‑4 focused sessions per week, combined with gentle yoga on off‑days, yields balanced progress.
Q4: I tend to collapse in my lower back. How can I protect my spine?
Engage the core before you lower: draw the belly button toward the spine, and think of pulling the navel up toward the ribcage. If the lower back still rounds, place a folded blanket under the sacrum for a few practice rounds to reinforce the correct spinal curve.
Q5: Is Chaturanga appropriate for people with shoulder injuries?
Yes, but modifications are essential. Begin with a forearm plank, keep the elbows close to the ribs, and avoid lowering fully until a qualified instructor evaluates shoulder stability. Always listen to pain signals and stop if discomfort intensifies.
Related posts:
 Master Chair Pose Without Falling Over: A Yoga Guide for Real People
 Desk Yoga for Back Pain Relief
 Practical Exercises for Better Wrist Mobility
 5-Minute Plank Challenge
 Here’s exactly how to start planking if you’ve never tried it before
 PHA Bodyweight Workout: Efficient Fitness Anywhere, Anytime
 Lindsay Ellingson’s Stress-Relieving Yoga Move
 Reverse Plank Power: The Backwards Move That’s Forward-Thinking Fitness