

Reverse Plank Power: The Backwards Move That’s Forward-Thinking Fitness
In the vast landscape of fitness, some exercises shine brightly, while others, equally potent, remain in the shadows, waiting to be discovered. The traditional plank, a staple for core strength, often takes center stage. But what if we told you there’s a powerful, often overlooked cousin that can revolutionize your posture, strengthen your entire posterior chain, and bring a profound sense of balance to your body? Enter the reverse plank – a truly forward-thinking fitness move that works your body in a wonderfully different way.
In a world where we spend countless hours hunched over screens, our bodies often tell a story of forward flexion. Our shoulders round, our chests tighten, and our posterior chain – the muscles running along the back of our body – can become weak and underutilized. The reverse plank isn’t just an exercise; it’s an antidote. It’s a compassionate embrace for your back, your glutes, your hamstrings, and your shoulders, inviting them to awaken, strengthen, and support you in a more upright, confident posture. Join us as we explore the incredible power of this ‘backwards’ move that’s set to propel your fitness journey forward, with grace and strength.
Unveiling the Reverse Plank: What It Is and Why It Matters
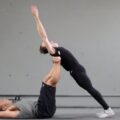
Imagine lying on your back, then flipping that concept entirely. The reverse plank involves supporting your body weight with your heels and hands (or forearms), lifting your hips off the ground to create a straight line from your shoulders to your ankles. Unlike its more famous counterpart, which primarily targets the anterior core, the reverse plank shifts its focus to the *posterior chain* – the powerhouse muscles at the back of your body. This includes your glutes, hamstrings, and the erector spinae muscles that run along your spine.
Why does this matter so much? In our modern lives, we often engage in activities that pull our bodies forward. Think about sitting at a desk, driving, or even looking down at your phone. This constant forward pull can lead to muscle imbalances, poor posture, and even discomfort in the neck and lower back. The reverse plank acts as a beautiful counter-balance. It strengthens the very muscles that help pull your shoulders back, lift your chest, and stabilize your spine, enabling you to stand taller, move with greater ease, and experience less strain from everyday activities. It’s an empowering move that helps you reclaim your natural, upright posture and feel more grounded in your body.
The Symphony of Strength: Muscles Engaged in a Reverse Plank
The reverse plank is a full-body symphony, orchestrating a harmonious engagement of multiple muscle groups. It’s a testament to how interconnected our bodies are, and how working one area can beautifully impact so many others. Let’s break down the key players:
- Gluteal Muscles (Glutes): These are the true stars of the reverse plank. Your glutes (maximus, medius, and minimus) work intensely to lift and hold your hips high, preventing them from sagging. Strong glutes are crucial for everything from walking and running to preventing lower back pain and supporting healthy hip function.
- Hamstrings: Running along the back of your thighs, your hamstrings work in conjunction with your glutes to extend your hips and keep your legs straight. They are vital for powerful leg movements and contribute significantly to knee stability.
- Erector Spinae (Lower Back Muscles): These muscles run along either side of your spine and are responsible for extending and stabilizing your back. In the reverse plank, they work to maintain that straight line from shoulders to ankles, counteracting gravity’s pull and protecting your spine.
- Core Muscles (Abdominals & Obliques): While the primary focus is posterior, your entire core engages to stabilize your torso. Your rectus abdominis, transverse abdominis, and obliques work synergistically to prevent your body from swaying or twisting, creating a strong, stable foundation.
- Shoulder Stabilizers (Deltoids & Rotator Cuff): If you’re performing the plank on your hands, your shoulders are actively engaged. Your deltoids (shoulder muscles) and the deeper rotator cuff muscles work to stabilize your shoulder joints, preventing collapse and promoting healthy shoulder mechanics.
- Triceps: When supporting yourself on your hands, your triceps (muscles at the back of your upper arm) provide crucial support, working to keep your arms extended and strong.
This comprehensive engagement means you’re not just building isolated strength; you’re fostering integrated, functional power that translates into better movement patterns and a more resilient body in all aspects of your life.
Beyond the Burn: Holistic Benefits of Embracing the Reverse Plank
The reverse plank offers a treasure trove of benefits that extend far beyond simply strengthening muscles. It’s a holistic practice that nurtures your body and mind, helping you cultivate a more confident and comfortable relationship with your physical self.
- Postural Transformation: This is arguably one of its most profound benefits. By strengthening the posterior chain, the reverse plank directly combats the rounded shoulders and forward head posture common in modern life. It encourages your body to naturally align, helping you stand taller, appear more confident, and reduce strain on your neck and upper back.
- Alleviating Back Discomfort: Many instances of lower back pain stem from weak glutes and hamstrings. By fortifying these muscles, the reverse plank provides better support for your lumbar spine, often leading to significant relief and prevention of future back issues. It empowers your body to support itself from the ground up.
- Enhanced Shoulder Health: For those who spend time at computers or have compromised shoulder mobility, the reverse plank can be a game-changer. It strengthens the muscles that stabilize the shoulder joint, improving mobility, reducing impingement risk, and promoting a more open, expansive chest.
- Unique Core Stability: While traditional planks focus on anti-extension, the reverse plank challenges your core in a different plane, demanding stability against gravity while your hips are elevated. This diverse core work leads to more robust, adaptable abdominal strength.
- Improved Athletic Performance: Whether you’re a runner, a lifter, or simply enjoy active living, a strong posterior chain is fundamental. The reverse plank builds power in your glutes and hamstrings, translating to more explosive jumps, faster sprints, and safer, more efficient lifting mechanics.
- Greater Body Awareness: Holding the reverse plank requires focused attention on alignment and muscle engagement. This practice cultivates proprioception – your body’s sense of its position in space – helping you become more attuned to your physical self and move with greater intention and grace.
- Mental Resilience: Like all challenging holds, the reverse plank invites you to sit with discomfort, breathe through it, and find strength within. This mental fortitude translates into other areas of your life, teaching you patience, perseverance, and the power of a calm, focused mind.
Embracing the reverse plank is an act of self-care, an investment in your long-term well-being that will leave you feeling stronger, more aligned, and more vibrant in your everyday life.
Mastering the Move: A Step-by-Step Guide to Your First Reverse Plank
Ready to unlock the power of the reverse plank? Approach this exercise with kindness and attention to form. Remember, it’s about quality over quantity, especially when you’re starting out. Here’s how to do it:
- Start Seated: Begin by sitting on the floor with your legs extended straight out in front of you.
- Hand Placement: Place your hands on the floor behind your hips, with your fingers pointing towards your feet. Alternatively, for a slightly easier version or if wrist discomfort is an issue, you can place your forearms on the floor, elbows directly under your shoulders.
- Prepare to Lift: Engage your core gently. Press firmly through your hands (or forearms) and your heels.
- Lift Your Hips: On an exhale, powerfully lift your hips off the floor. The goal is to create a straight line from your shoulders, through your hips, down to your ankles. Avoid letting your hips sag or hike up too high.
- Engage and Hold: Squeeze your glutes tightly and engage your hamstrings. Keep your core braced. Your gaze should be directed towards the ceiling to maintain a neutral neck alignment.
- Breathe: Don’t forget to breathe deeply and steadily throughout the hold.
- Lower with Control: After your desired hold time, gently lower your hips back to the starting position.
Form Cues for Success:
- Shoulders: Keep your shoulders down and back, away from your ears. Avoid shrugging.
- Neck: Maintain a neutral neck. Looking straight up helps align your head with your spine.
- Hips: The most crucial element – keep those hips lifted! Squeeze your glutes as if you’re trying to hold a penny between your butt cheeks.
- Legs: Keep your legs straight and active, pressing through your heels.
Modifications for Every Body:
- Beginner: Bent Knees: If keeping your legs straight is too challenging, start with your knees bent and feet flat on the floor, similar to a bridge. This reduces the lever length and makes it easier to lift your hips.
- Shorter Holds: Start with shorter holds (5-10 seconds) and gradually increase as your strength improves.
- Forearm Support: As mentioned, using your forearms can be more comfortable for wrists and can help you focus on core and glute engagement.
Progressions for the Advanced:
- Longer Holds: Gradually increase your hold time to 30, 45, or even 60 seconds.
- Single-Leg Reverse Plank: Once comfortable, lift one leg a few inches off the floor, maintaining hip stability. Alternate legs.
- Adding Movement: From the reverse plank, you can add small hip dips or leg raises for an extra challenge.
Always listen to your body. If you feel any sharp pain, especially in your wrists or lower back, gently come out of the pose and re-evaluate your form. This is your journey, and every step, no matter how small, is a victory.
Common Pitfalls and How to Navigate Them with Grace (and Strength!)
As with any new exercise, you might encounter a few common hurdles when learning the reverse plank. It’s completely normal, and with a little awareness and adjustment, you can navigate these challenges with grace and build formidable strength.
-
Sagging Hips: This is perhaps the most common pitfall. If your hips drop towards the floor, you lose the straight-line integrity of the plank, and your glutes aren’t working effectively.
- Solution: Focus intensely on squeezing your glutes as hard as you can. Imagine pushing your hips towards the ceiling. If it’s still too challenging, try the bent-knee modification until your glute and hamstring strength improves. Remember, it’s better to hold a perfect bent-knee plank than a sloppy straight-leg one.
-
Neck Strain: Sometimes, people let their head drop back too far or tuck their chin too much, leading to neck discomfort.
- Solution: Keep your neck in a neutral alignment with your spine. A good cue is to imagine you’re holding an apple between your chin and chest, or simply gaze gently upwards towards the ceiling without craning your neck.
-
Wrist Discomfort: Supporting your body weight on your hands can be challenging for wrists, especially if they’re not accustomed to it.
- Solution: Ensure your fingers are spread wide and pressing firmly into the floor, distributing the weight evenly. If discomfort persists, switch to the forearm reverse plank variation. You can also try placing small towels or yoga mat wedges under the heels of your hands to reduce the angle of extension.
-
Shoulder Shrugging/Rounding: Letting your shoulders creep up towards your ears or hunching them forward can put strain on your neck and upper back.
- Solution: Actively press your shoulders down and back, engaging the muscles around your shoulder blades. Imagine trying to pull your shoulder blades together slightly, opening your chest.
-
Holding Your Breath: In challenging exercises, it’s easy to hold your breath, which can increase tension and make the hold harder.
- Solution: Practice slow, controlled breathing. Inhale as you prepare, and exhale as you lift. Then, maintain a steady, deep breath throughout the hold. This helps oxygenate your muscles and calms your nervous system.
Remember, every challenge is an opportunity to learn and grow. Be patient with yourself, celebrate your efforts, and know that consistent, mindful practice will lead to incredible progress.
Your Reverse Plank Journey: FAQs for a Confident Practice
As you embark on your reverse plank journey, you might have some questions. Here are answers to common inquiries to help you feel confident and supported in your practice:
-
Q: How long should I hold a reverse plank?
A: For beginners, start with holds of 10-15 seconds for 2-3 sets. As you get stronger, gradually increase your hold time to 30-60 seconds or even longer. The key is to maintain proper form throughout the entire hold. If your form starts to break, it’s time to gently lower down.
-
Q: Can the reverse plank help with lower back pain?
A: Absolutely! By strengthening the glutes, hamstrings, and erector spinae – the muscles of your posterior chain – the reverse plank provides better support for your lumbar spine. This can significantly reduce and prevent lower back pain, especially if the pain is due to weak posterior muscles or postural imbalances. Always consult a healthcare professional if you have chronic or severe pain.
-
Q: Is it okay if my hips aren’t perfectly straight?
A: When you’re first starting, it’s common for your hips to dip slightly. The goal is to work towards that straight line from shoulders to ankles. Focus on actively squeezing your glutes and engaging your core. If the dip is significant, consider using the bent-knee modification to build foundational strength before progressing to straight legs. Consistency is key.
-
Q: What’s the difference between a reverse plank and a bridge?
A: While both exercises target the posterior chain, especially the glutes and hamstrings, they differ in their leverage and muscle emphasis. A bridge is typically performed with bent knees and feet flat on the floor, allowing for a higher hip lift and often focusing more on glute contraction. A reverse plank, with straight legs (or bent knees for modification), creates a longer lever, demanding more from the hamstrings and requiring greater shoulder and core stabilization to maintain the straight-line body position. The reverse plank is generally more challenging due to this longer lever.
-
Q: How often should I do reverse planks?
A: Incorporating reverse planks 2-3 times a week is a great starting point. Allow your muscles time to recover between sessions. As you become more proficient, you might choose to include them more frequently, or integrate them into a broader strength training routine. Listen to your body and adjust as needed.
Embrace the Backwards Move for Forward Momentum
The reverse plank is more than just an exercise; it’s an invitation to rediscover and strengthen the often-neglected parts of your body. It’s a compassionate way to counteract the demands of modern life, to stand taller, move with greater ease, and feel more robust in your own skin. By embracing this ‘backwards’ move, you are truly engaging in forward-thinking fitness – investing in your posture, your spinal health, and your overall well-being for years to come.
So, take a moment, find a comfortable space, and give the reverse plank a try. Be patient with yourself, celebrate every small improvement, and allow yourself to feel the empowering strength that emanates from your newly awakened posterior chain. Your body will thank you, not just for the physical benefits, but for the mindful attention and care you’ve shown it. Step forward into a stronger, more balanced you.
Related posts:
 Mastering the Reverse Crunch for Core Strength
 Transform Your Living Room Into a Booty-Building Powerhouse
 Mastering the Reverse Bear Crawl
 Mastering the Reverse Plank
 How to Do a Walking Plank: Engaging Your Core Differently
 Side Plank for Neck Tension Relief
 Mastering the Reverse Crunch for Core Strength
 Perfect Plank Pike Form