Introduction
Having a strong core provides many health benefits. Core exercises improve posture, balance, and stability. They also help prevent back pain. Using an exercise band can be an effective way to strengthen your core muscles.
Benefits of a Strong Core
- Better posture and spinal alignment
- Increased balance and stability
- Reduced risk of injury
- Less back pain
- Improved athletic performance
Core Muscles Worked
An exercise band core workout targets all the muscles that stabilize your torso. These include:
- Rectus abdominis
- Obliques
- Erector spinae
- Glutes
- Hip flexors
Exercise Band Core Exercises
Banded Crunches
Lie on your back with legs bent, feet flat, and exercise band wrapped around the arches of your feet. Contract abs, curling up just your shoulders as you breathe out. Lower back down, keep abs engaged. Aim for 3 sets of 12-15 reps.
Banded Planks
Start in a high plank position with hands under shoulders, back flat, core tight and toes on the exercise band. Pull band apart with your toes, engaging your abs, glutes and legs. Hold for 30-60 seconds, 3-5 rounds.
Banded Side Planks
Lie on one side with elbow under shoulder, legs straight and stacked. Lift hips off floor into a side plank. Place top foot onto the middle of the band and pull apart, engaging obliques. Hold for 30-60 seconds each side.
Tips for Safe and Effective Training
- Start slow and focus on proper form
- Progressively increase duration or intensity
- Breathe normally and don’t hold your breath
- Listen to your body and don’t push through pain
- Mix up your core exercises for balanced strength
Optimizing Tension: The Science of Linear Variable Resistance
To maximize the effectiveness of an exercise band core workout, it is essential to understand the unique physics of resistance bands, specifically Linear Variable Resistance (LVR). Unlike free weights or cable machines, where the resistance remains constant throughout the range of motion, a resistance band increases its pull as it is stretched. This means the peak tension occurs at the end of the movement, which often coincides with the point of maximum muscle contraction. For core training, this is particularly beneficial because it forces the stabilizing muscles to work harder as the lever arm lengthens or the movement reaches its apex.
Manipulating the Tension Curve
One of the most practical ways to increase the intensity of your core workout without switching to a heavier band is to manipulate the “pre-stretch.” By stepping further away from the anchor point or shortening the loop of the band, you increase the baseline tension. This ensures that the core is under significant load even at the start of the repetition. For example, in a standing rotation, if the band is slack at the start, you lose the first 20-30% of the muscle-building potential. Always ensure there is a slight “tug” on the band before you begin the first rep.
The Role of Eccentric Control
Because bands want to snap back to their original length, the eccentric (lowering or returning) phase of a core exercise is where many people fail. To truly strengthen the deep abdominal wall and the multifidus muscles along the spine, you must resist the band’s snap-back. A three-second return phase on every repetition will double the time under tension compared to letting the band pull you back quickly. This controlled resistance is what builds the functional stability required for daily activities like carrying heavy groceries or maintaining posture during long periods of sitting.
Anti-Rotational Mastery: The Pallof Press and Its Variations
While the existing article covers basic crunches and planks, the most effective use of a band for core health is often “anti-rotation.” This involves using the core to prevent the torso from being moved by an external force. The gold standard for this is the Pallof Press. To perform it, anchor your band at chest height. Stand sideways to the anchor, holding the band with both hands at the center of your chest. Step out until there is tension. Press the band straight out in front of you, hold for two seconds, and bring it back to your chest.
Half-Kneeling Pallof Press
Taking the exercise to the floor by kneeling on one knee (the knee closest to the anchor point) removes the ability of the ankles and knees to compensate for core weakness. This variation isolates the obliques and the transverse abdominis. It is an excellent edge case for those who find themselves leaning their hips to one side during standing exercises. In the half-kneeling position, your hips must remain perfectly square, forcing the deep core stabilizers to work in a more restricted, and therefore more challenging, environment.
The Pallof Circle and Overhead Reach
Once you have mastered the basic press, you can introduce dynamic stability. Instead of a straight press, move the band in small, controlled circles about the size of a dinner plate while your arms are fully extended. The varying angles of tension will challenge your core to react in 360 degrees. Alternatively, perform an overhead reach: press the band out, then lift your arms toward the ceiling without allowing your lower back to arch. This specific movement targets the serratus anterior and the upper abdominals, improving shoulder stability alongside core strength.
Strengthening the Posterior Chain: Banded Extensions and Bracing
A common mistake in core training is focusing exclusively on the “six-pack” muscles at the front. A truly strong core requires a resilient posterior chain, including the erector spinae and the deep muscles of the lower back. Resistance bands provide a safer alternative to heavy weights for strengthening these sensitive areas, especially for those recovering from minor strains or looking to improve spinal longevity.
Banded Good Mornings
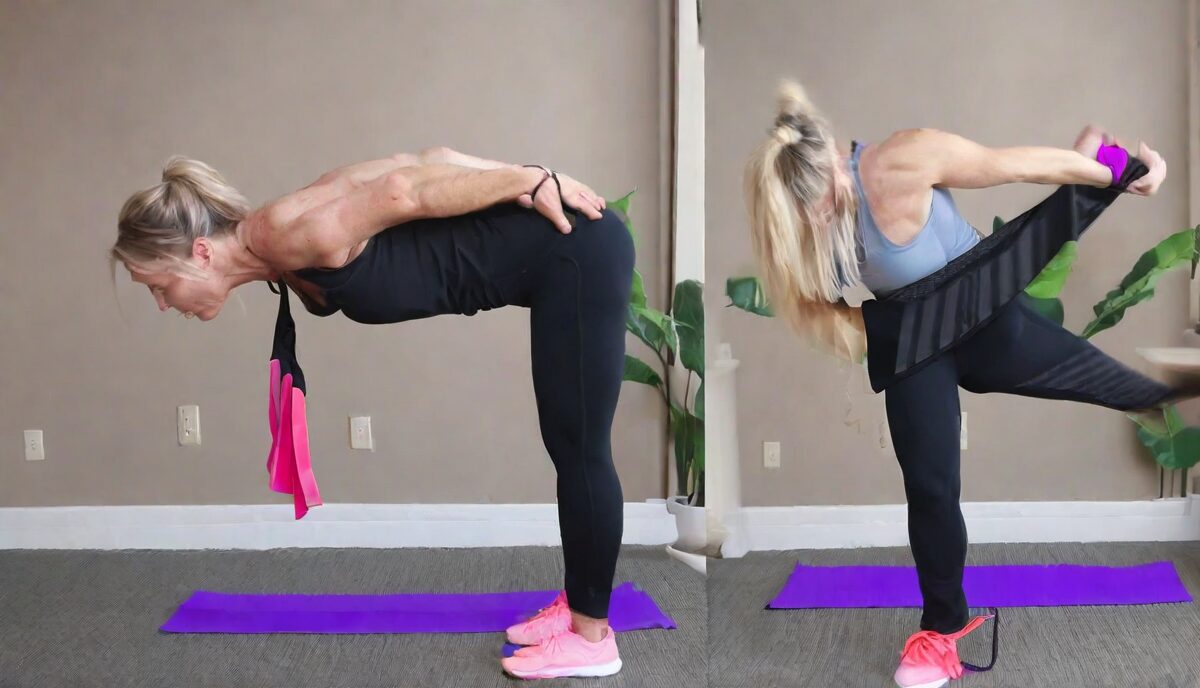
To target the lower back and hamstrings, stand on the middle of a large loop band and drape the other end over the back of your neck (resting on the traps, not the vertebrae). With a slight bend in the knees, hinge at the hips, pushing your glutes back while keeping your spine perfectly neutral. As you descend, the band tension decreases; as you stand back up, the tension increases, providing maximum resistance at the point where your back is most upright and stable. This teaches the core to “brace” during hip-hinging movements, which is the primary way to prevent back injuries during heavy lifting or manual labor.
Banded Bird-Dog for Cross-Body Stability
The bird-dog is a physical therapy staple, but adding a band introduces a significant neurological challenge. Loop a mini-band around your hands and another around the arches of your feet (or use one long band held in the hand and looped over the opposite foot). As you extend the opposite arm and leg, the band pulls against your diagonal stabilizers. This mimics the natural gait cycle and improves the communication between the left and right hemispheres of the core, which is vital for athletes and those with balance concerns.
Dynamic Rotational Power: Woodchoppers and Diagonal Pulls
Rotation is a fundamental human movement, yet it is often the movement that causes the most injuries when the core is weak. Banded woodchoppers allow you to train rotational power safely by providing a smooth, consistent resistance that can be performed at various speeds. This targets the internal and external obliques, which are responsible for twisting the torso and protecting the spine during sudden movements.
High-to-Low vs. Low-to-High Woodchoppers
The angle of the pull changes the muscle recruitment significantly. A high-to-low woodchopper (anchoring the band above head height) emphasizes the rectus abdominis and the downward-pulling fibers of the obliques, simulating a chopping motion. Conversely, a low-to-high woodchopper (anchoring near the floor) places more demand on the glutes and the upward-rotating muscles of the back. For a balanced core, integrate both variations into your routine. Focus on pivoting the back foot slightly to protect the knee, but ensure the majority of the torque is generated from the midsection rather than the arms.
The Horizontal Power Rip
For those looking for athletic development, the horizontal rip is a high-velocity version of the woodchopper. Instead of a slow, controlled movement, you perform the rotation explosively, then return slowly. This trains the “fast-twitch” fibers of the core. This is an edge case exercise: it should only be performed once a solid foundation of stability is established. It is particularly useful for golfers, tennis players, and anyone needing to generate power from a stationary stance.
High-Level Stability: Banded Dead Bugs and Bird-Dogs
The “Dead Bug” is perhaps the most effective exercise for teaching pelvic floor engagement and ribcage positioning. Adding a resistance band takes this from a basic floor exercise to an advanced core-strengthening tool. Anchor a band behind you at floor level. Lie on your back, grabbing the band with both hands and pulling it so your arms are vertical over your chest. This engagement of the lats and serratus helps to “knit” the ribcage down, preventing the common mistake of arching the back.
Maintaining the Hollow Body Position
While holding the band tension, perform the standard dead bug by lowering one leg at a time toward the floor. The band’s pull will constantly try to arch your lower back off the ground. Your goal is to use your deep core to keep your spine glued to the floor. This teaches “anterior pelvic tilt prevention,” which is crucial for anyone who suffers from lower back pain due to excessive sitting or standing. If you can maintain this position for 15 reps per side, you have achieved a level of core control far beyond the average gym-goer.
Resistance Band Resisted Leg Lowers
For a more intense challenge, loop the band around your ankles while performing leg lowers. As you lower your legs together, the band adds a lateral tension that forces the hip abductors and the lower abs to work in unison. This is particularly effective for closing the “gap” in the lower abdominal wall and strengthening the hip flexors in a lengthened position, which can help alleviate tightness in the psoas muscle.
Identifying and Correcting Common Compensation Patterns
When the core begins to fatigue during a band workout, the body will naturally look for the path of least resistance. Recognizing these compensation patterns is the difference between a productive workout and one that leads to strain. The most common fault is “lumbar extension,” where the lower back arches as the band tension increases. If you feel a pinch or pressure in your low back during a Pallof press or a plank, it is a sign that your transverse abdominis has disengaged.
The “Rib Flare” and Neck Tension
Another common mistake is the “rib flare,” where the chest puffs out and the ribs expand forward. This disconnects the upper and lower halves of the core. To fix this, imagine a string connecting your bottom rib to your hip bone; keep that string tight throughout the movement. Additionally, watch for neck tension. Many people compensate for a weak core by straining their neck muscles, especially during banded crunches. Ensure your tongue is on the roof of your mouth and your gaze is neutral to help relax the superficial neck flexors and keep the focus on the abdominals.
The “Hips-First” Error in Rotations
In rotational movements, a common error is leading with the hips rather than the torso. While some hip movement is necessary to protect the joints, the hips and shoulders should ideally move in a synchronized fashion, or the torso should rotate against a stable pelvis. If your hips turn before the band starts to move, you are using momentum and leg strength rather than core strength. Slow down the movement and focus on the sensation of the obliques “pulling” the ribcage around the center axis of the spine.
Strategic Programming: Transitioning from Stability to Power
To see continuous results, you must vary your core programming. A common mistake is doing the same three sets of ten reps every workout. Instead, think of your core training in three distinct phases: Stability, Strength, and Power. During the Stability phase (Weeks 1-2), focus on isometric holds, such as the banded plank or the Pallof hold, where the goal is to remain perfectly still against the band’s pull for 45-60 seconds.
Building Strength and Hypertrophy
In the Strength phase (Weeks 3-5), increase the resistance of the band and move into a rep range of 8-12. This is where you perform woodchoppers, banded good mornings, and dead bugs. The focus here is on the quality of the contraction and the slow eccentric return. You should reach a point where the last two reps of every set are difficult to maintain with perfect form. This phase builds the actual muscle thickness and density required for a defined and functional midsection.
Integrating Power and Reaction
Finally, the Power phase (Weeks 6-8) introduces speed. Use a lighter band and perform movements explosively. This is also the time to introduce “perturbation” training. Have a partner gently tap the band while you are holding a Pallof press or a banded plank. These small, unpredictable vibrations force your core to react instinctively, which is the highest form of functional core strength. This phase ensures that your core is not just strong in the gym, but ready to protect your spine during a trip, a fall, or a sudden athletic maneuver in the real world.
Conclusion
Exercising your core with a resistance band is an affordable, convenient way to improve overall strength and stability. Be sure to focus on good form and gradually challenge yourself for the best results. Consistency is key!
FAQ
How often should I do this exercise band core workout?
Aim for 2-3 sessions per week, with at least 1 day of rest in between to allow your muscles to recover.
What if I can’t do the exercises for the recommended duration?
That’s completely fine. Do what feels comfortable, even if it’s just 10-15 seconds at first. Slowly increase your hold times as you get stronger.
What type of exercise band should I use?
Beginners can start with light resistance bands and progressively move up to heavier resistance bands as exercises become easier.
Can I do this workout every day?
It’s best to avoid doing the same core workout every day. Your muscles need recovery time in order to get stronger. Mix up your core exercises over different days.
I have back issues. Is this workout safe for me?
Talk to your doctor first, especially if you have spinal injuries or herniated discs. When cleared for exercise, listen to your body and start gently.
Related posts:
 Resistance Band Glute Workouts
 This Full-Body Resistance Band Workout Will Transform Your Home Gym
 Perfect Your Glute Bridge
 5-Minute Core Blast Workout
 Understanding Gym Equipment
 Band Together: Transform Your Core With Just One Simple Tool
 Pelvic Floor Expert’s Advice
 Effective Workouts You Can Do While Lying Down