Introduction
If you suffer from lower back pain, using a foam roller to stretch and massage the muscles can provide relief. Foam rollers apply pressure to soft tissue to help improve mobility and flexibility. When used properly, foam rolling can reduce muscle tightness and release tension in your lower back.
Benefits of Foam Rolling for Lower Back Pain
Foam rolling offers several benefits for lower back pain sufferers:
- Breaks up muscle knots and scar tissue
- Increases blood flow to aid healing
- Improves range of motion
- Reduces inflammation and soreness
- Provides gentle massage to tight muscles
Best Foam Roller Stretches for Lower Back
1. Lower Back Roll
This stretch targets the muscles along either side of your spine. Lie face up with knees bent and feet flat. Position the foam roller under your lower back, then raise your hips off the floor slightly. Slowly roll up and down along your lower back using your feet to control the motion. Roll for 30-60 seconds.
2. Glute Roll
The glutes connect to the lower back, so keeping them loose is important. Sit on the foam roller with it positioned under one cheek. Cross the opposite leg over to increase pressure. Roll back and forth slowly over the glute for 30-60 seconds before switching sides.
3. Hamstring Roll
Tight hamstrings contribute to lower back tightness. Lie face down with foam roller under both hamstrings. Roll slowly up and down from the knees to the glutes for 30-60 seconds. Repeat with the foam roller under one leg at a time.
4. Hip Roll
Rolling the hips helps open up the entire core area. Lie face down with the foam roller positioned horizontally under your hip bones. Raise your chest slightly off the floor and use your forearms for support. Slowly roll one hip forward and backward for 30 seconds before switching sides.
5. Iliotibial Roll
The IT bands run down the outside of your hips and thighs. Lie on your side with the foam roller under your hip. Cross top leg over bottom and roll slowly from your hip to just above knee for 30 seconds. Switch sides.
Tips for Safe, Effective Foam Rolling
Keep these tips in mind:
- Always roll slowly and smoothly.
- Apply enough pressure to feel tension, but not intense pain.
- Breathe deeply throughout each movement.
- Roll daily for best results.
Thoracic Spine Mobilization to Unload the Lumbar Region
While the focus is often on the lower back, the root cause of lumbar discomfort frequently resides in the thoracic spine (the middle and upper back). Anatomically, the thoracic spine is designed for rotation and extension. When this area becomes stiff due to prolonged sitting or poor posture, the body compensates by forcing the lumbar spine to provide the mobility it wasn’t designed for. This excessive movement in the lower back leads to wear and tear, inflammation, and chronic pain. By mobilizing the thoracic segments, you create a stable foundation that allows the lower back to remain in a neutral, protected position.
To perform a thoracic extension, place the foam roller horizontally across your mid-back, just below the shoulder blades. Support your head with your hands, keeping your elbows narrow to move the shoulder blades out of the way. Slowly lean back over the roller, imagining you are wrapping your spine around it. Crucially, keep your ribcage tucked and your lower back flat; do not allow your lower back to arch excessively, as this defeats the purpose of isolating the upper segments. Hold the extension for three deep breaths, then move the roller up one or two inches and repeat. Avoid rolling onto the neck or the floating ribs at the very bottom of the ribcage.
Another effective variation is the ‘Thoracic Windmill.’ Lie on your side with your top knee bent at a 90-degree angle, resting on the foam roller. This position ‘locks’ the lumbar spine in place, preventing it from rotating. Extend both arms straight out in front of you. Slowly lift your top arm and rotate it in a wide arc over your body toward the floor behind you, following your hand with your eyes. The foam roller ensures that the rotation occurs in the upper back rather than the lower back, providing a safe and targeted stretch that relieves the compensatory strain on the lumbar discs.
Targeting the Latissimus Dorsi and Thoracolumbar Fascia
The latissimus dorsi, or ‘lats,’ are the largest muscles of the upper body, but their influence extends all the way to the pelvis. The lats attach to a thick layer of connective tissue called the thoracolumbar fascia, which acts like a natural weightlifting belt for your lower back. When the lats become chronically tight—often from overhead movements or repetitive pulling—they pull upward on this fascia, creating a constant ‘tug-of-war’ that increases tension in the lumbar region. Releasing the lats is a critical, yet often overlooked, step in long-term back pain management.
To roll the lats, lie on your side with the foam roller tucked into your armpit. Extend your bottom arm straight out along the floor. Gently lean back slightly so the roller makes contact with the meaty part of the muscle behind the armpit rather than the bone of the scapula. Slowly roll down toward the mid-ribcage and back up. Because this area contains many sensitive nerves and lymph nodes, use a slower tempo and lighter pressure than you would for the glutes or quads. If you find a particularly tender spot, hold the position and slowly rotate your torso forward and backward to ‘cross-friction’ the muscle fibers.
Beyond the lats, the thoracolumbar fascia itself can become ‘glued’ to the underlying muscles. To address this, place the roller vertically along your spine (ensure the roller is long enough to support your head and tailbone). Gently rock side to side, allowing the roller to massage the paraspinal muscles and the fascia. This lateral movement helps hydrate the connective tissue and improves the sliding mechanism between muscle layers, which is essential for pain-free bending and twisting. This approach is much safer for the lumbar spine than traditional vertical rolling, as it provides support for the entire spinal column.
Addressing Anterior Pelvic Tilt via Hip Flexor and Quad Release
Many cases of lower back pain are symptomatic of a mechanical misalignment known as anterior pelvic tilt. This occurs when the pelvis is pulled forward and downward, creating an exaggerated arch in the lower back. The primary culprits are tight hip flexors (the psoas and iliacus) and the rectus femoris (one of the four quad muscles). Because these muscles attach to the lumbar spine and the pelvis, their tightness acts like a winch, constantly pulling the spine into a state of compression. Foam rolling these anterior muscles is essential for ‘resetting’ the pelvis to a neutral position.
To target the hip flexors, lie face down and place the end of the foam roller under the crease of your hip, just below the pelvic bone. Shift your weight onto the roller and use your elbows to crawl forward and backward over a very small area—no more than two or three inches. To increase the effectiveness, perform an active stretch by slowly bending the knee of the leg being rolled, bringing your heel toward your glute. This ‘pin and stretch’ technique forces the muscle to lengthen while under compression, breaking up deep adhesions that a standard roll might miss.
Continue the movement down into the quadriceps. The quads are large, powerful muscles that can handle significant pressure. Roll from the hip down to just above the knee, avoiding the kneecap itself. If you encounter a trigger point, stop and breathe. A common mistake is tensing the muscle being rolled; instead, try to ‘melt’ the muscle over the roller. By lengthening the quads and hip flexors, you reduce the forward pull on the pelvis, which immediately slackens the tension on the lower back muscles and provides a sense of ‘opening’ in the hips.
Strategic Adductor Rolling for Pelvic Stability and Balance
The adductors (inner thigh muscles) play a surprisingly large role in lower back health. These muscles stabilize the pelvis from the inside. When the adductors are tight, they can pull the pelvis into an asymmetrical position or cause the knees to cave inward (valgus), which creates a kinetic chain reaction that ends in lumbar strain. Many people focus on the outside of the hip (the IT band), but the inside of the hip is often where the real imbalance lies. Releasing the adductors allows the pelvis to level out, taking the pressure off the sacroiliac (SI) joints.
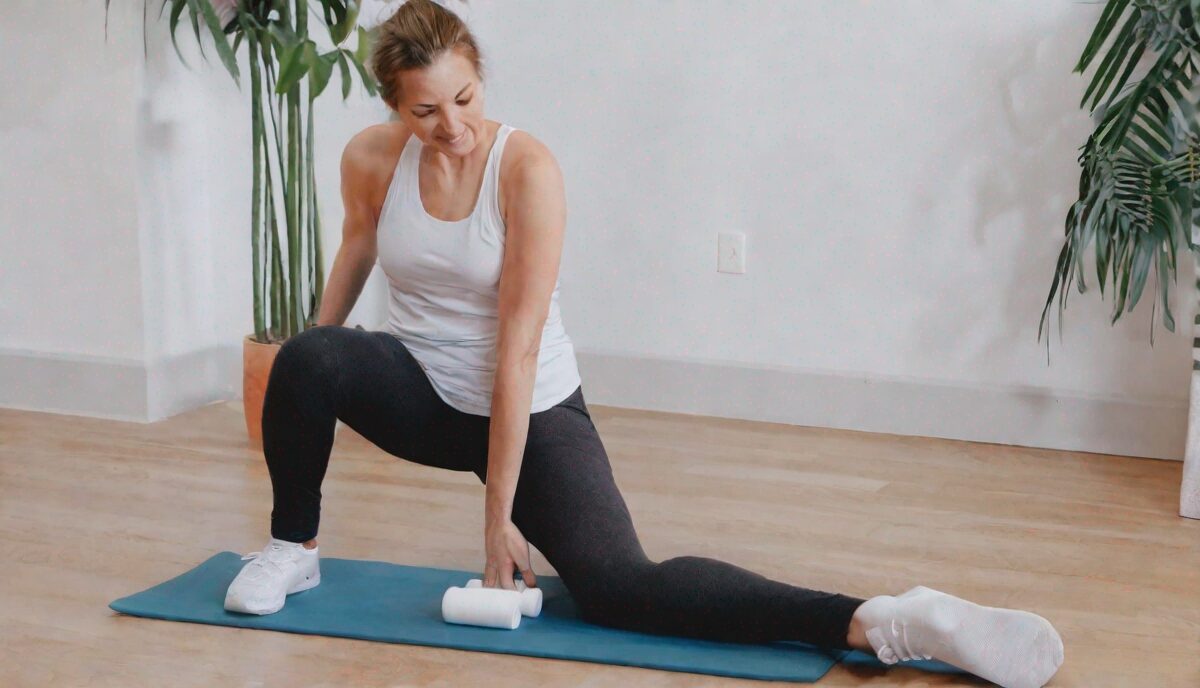
To roll the adductors, lie face down on the floor and bring one leg out to the side, bending the knee at a 90-degree angle (similar to a ‘half-frog’ pose). Place the foam roller parallel to your body, tucked under the inner thigh of the bent leg. Use your forearms to shift your body weight side to side, rolling the foam roller from the inner groin down toward the inside of the knee. Be cautious near the groin area, as there are sensitive blood vessels and nerves; keep the pressure firm but manageable.
Edge cases for adductor rolling include individuals with groin strains or symphysis pubis dysfunction. In these cases, use a softer foam roller or a rolled-up yoga mat to provide gentler feedback. For those with chronic lower back stiffness, pay special attention to the area just above the knee on the inner thigh. This is a common site for ‘referred’ tension. By spending 60 seconds on each side, you promote better hip abduction and internal rotation, which are movements that, when restricted, force the lower back to twist excessively during walking and running.
The Pin and Stretch Technique for Chronic Muscle Adhesions
Standard foam rolling involves moving the roller over the muscle, but for chronic lower back pain, the ‘Pin and Stretch’ (or active release) technique is often more effective. This method involves using the roller to ‘pin’ a specific trigger point or knot in place and then moving the nearest joint to stretch that muscle against the pressure. This creates a shearing force that is much more effective at breaking up scar tissue and ‘stuck’ fascia than simple rolling. It is particularly useful for the gluteus medius and the piriformis, which are frequently implicated in pseudo-sciatica.
To apply this to the glutes, sit on the roller and find a tender spot. Once you have ‘pinned’ the spot with your body weight, slowly move the leg of that side through its range of motion. You can do this by straightening and bending the knee, or by dropping the knee out to the side and bringing it back to the center. This movement forces the glute fibers to slide underneath the pressure of the roller, manually separating fibers that have become matted together. This technique is more intense than standard rolling, so it should be done with focused, rhythmic breathing.
This technique can also be applied to the hamstrings. Place the roller under the hamstring of one leg while sitting on the floor. Find a tight area, then slowly flex and extend your ankle (pointing and flexing the toes). This small movement creates a pull through the entire posterior chain, including the sciatic nerve and the fascia that connects to the lower back. By ‘pinning’ the hamstring and ‘stretching’ the distal end of the chain, you improve the neural gliding of the sciatic nerve, which can significantly reduce the ‘zinging’ or radiating pain often associated with lumbar issues.
Diaphragmatic Breathing and Core Integration During Rolling
Foam rolling is not just a mechanical process; it is a neurological one. The goal is to signal the nervous system to ‘down-regulate’ or relax the muscle spindles. If you are rolling while holding your breath or tensing your core in pain, your brain perceives the roller as a threat and keeps the muscles guarded, making the session counterproductive. Integrating diaphragmatic breathing—often called ‘belly breathing’—is the key to unlocking the full benefits of the stretches. This type of breathing stimulates the vagus nerve, which shifts the body from a ‘fight or flight’ state into a ‘rest and digest’ state, allowing for deeper tissue release.
When you are positioned on the roller, focus on inhaling through your nose, allowing your belly to expand 360 degrees. As you exhale through your mouth, imagine the muscle you are rolling is softening and sinking deeper into the foam. This is especially important when rolling the psoas or the lower back area. If the pain is so intense that you cannot maintain a steady breath, the pressure is too high. You should aim for a ‘productive discomfort’—a sensation that feels like a good stretch rather than a sharp or stabbing pain.
Furthermore, core integration is vital when rolling the lower back itself. Rather than letting your spine go limp over the roller, maintain a ‘hollow body’ position by slightly tucking your chin and engaging your transverse abdominis (the deep core muscles). This creates an internal ‘air cushion’ that protects the vertebrae and ensures that the pressure of the roller is distributed across the muscle bellies rather than pressing directly into the spinal processes or the discs. This active engagement turns foam rolling into a functional stability exercise, teaching your body how to maintain a neutral spine while under external pressure.
Refining Technique: Avoiding Common Errors and Protecting the Lumbar Arch
One of the most common mistakes when foam rolling for lower back pain is rolling directly on the lumbar spine with a high-density roller while the back is in an arched position. The lumbar vertebrae are not protected by a ribcage like the thoracic spine, and the kidneys are located just beneath the surface in the mid-to-lower back area. Applying direct, heavy pressure to this ‘void’ can cause muscle guarding or, in rare cases, bruising of internal organs. To roll the lower back safely, you must modify your body’s geometry to provide support.
Instead of rolling the center of the spine, tilt your body slightly to one side so the roller stays on the ‘erector spinae’—the thick columns of muscle that run parallel to the spine. This avoids putting pressure on the bony spinous processes. Additionally, always keep your hips on the floor or just barely hovering. If you lift your hips too high, you create a massive amount of leverage and downward force on the lower back that can be too aggressive. By keeping the hips low, you can control the exact amount of weight being transferred to the roller.
FAQ
1. How long should you foam roll for lower back pain?
Aim for around 5 minutes per muscle group. For lower back, spend 30-60 seconds rolling each spot before moving on.
2. How often should you foam roll your lower back?
Ideally foam roll your lower back daily, especially after exercise. If that isn’t possible, aim for every other day at minimum.
3. Is foam rolling good for sciatica?
Gentle foam rolling may help relieve sciatic nerve pain from muscle tightness. Focus on piriformis, hamstrings, IT band, and glutes. Avoid directly rolling painful spots.
4. Can foam rolling make back pain worse?
If done improperly with too much pressure, foam rolling could irritate tissues. Roll slowly on soft setting, only applying enough pressure to feel tension.
5. What size foam roller is best for lower back?
A medium-density roller around 12-18 inches long is usually best. Choose softer foam if you’re new to rolling, or firmer if you want deep pressure.
Related posts:
 The Recovery Technique Physical Therapists Swear By for Muscle Pain
 Managing Hip Pain from Sitting
 5 Foam Roller Exercises That Will Make Your Muscles Feel Oh So Good
 Essential Foam Roller Exercises
 Desk Yoga for Back Pain Relief
 Best Sex Positions for Those with Back Pain
 Mastering the Pilates Roll-Up: Technique and Benefits
 PHA Bodyweight Workout: Efficient Fitness Anywhere, Anytime