
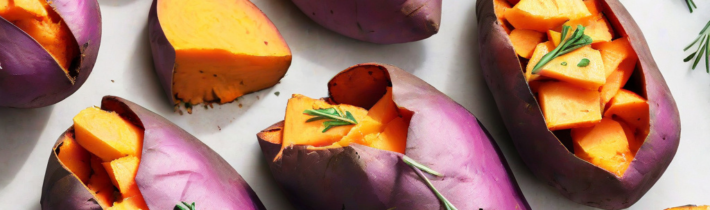
When the air turns crisp and the leaves begin to turn, a warm, caramelized sweet potato straight from the oven feels like a hug on a plate. This guide walks you through every step needed to produce fall baked sweet potatoes that are tender inside, lightly crisp on the outside, and infused with the cozy spices of the season. Whether you are feeding a crowd at a holiday gathering or simply want a reliable side for weeknight dinners, the techniques below will give you consistent results every time.
Selecting the Right Sweet Potatoes
Not all sweet potatoes behave the same way in the oven. For the classic fall experience look for varieties labeled ‘Beauregard’, ‘Jewel’, or ‘Garnet’. These have deep orange flesh, high natural sugar content, and a moist texture that caramelizes beautifully. Avoid the pale, dry ‘white’ or ‘Japanese’ types if you want that rich, sweet flavor; they are better suited for mashing or frying.
Size matters for even cooking. Choose medium tubers roughly 5 to 7 ounces each. If you have a mix of large and small pieces, cut the larger ones in half lengthwise so every piece finishes at the same time. Inspect the skin for bruises, soft spots, or sprouting eyes; any damage can lead to uneven baking and off flavors.
When possible, buy from a local farmers market in late September through November. Freshly harvested roots retain more moisture and sugar, which translates to a more intense caramelization. Store them in a cool, dark, well‑ventilated place (around 55°F) and use within two weeks for peak quality.
Prepping for the Oven
Start by giving each tuber a thorough scrub under running water. A vegetable brush removes soil without damaging the skin, which helps hold moisture during baking. Pat dry with a clean kitchen towel; excess surface water creates steam and prevents the skin from crisping.
Pierce the skin 4 to 6 times with a fork or a thin skewer. This allows steam to escape and prevents the potato from bursting. For an extra layer of flavor, lightly rub the skin with a thin coat of olive oil or melted coconut oil. The oil promotes browning and helps any dry seasoning adhere.
If you prefer a softer skin, wrap each potato individually in foil. For a crispier exterior, place them directly on a parchment‑lined baking sheet or a wire rack set over a sheet pan. The rack encourages air circulation on all sides, yielding a more even crust.
Seasoning Strategies for Fall Flavors
The natural sweetness of the tuber pairs beautifully with warm spices. A simple baseline is kosher salt, freshly ground black pepper, and a drizzle of maple syrup or honey added during the last ten minutes of baking. For a deeper autumn profile, combine the following dry blend in a small bowl:
- 1 teaspoon ground cinnamon
- ½ teaspoon ground nutmeg
- ¼ teaspoon ground allspice
- ¼ teaspoon ground ginger
- ½ teaspoon smoked paprika (optional for a subtle smoky note)
- 1 tablespoon brown sugar
Mix the spices with 2 tablespoons of melted butter or a neutral oil, then brush the mixture over the oiled skins before the potatoes enter the oven. The butter carries the spices into the surface, creating a fragrant crust.
For a savory twist, swap the sweet blend for a mixture of rosemary, thyme, garlic powder, and a pinch of sea salt. Finish with a squeeze of fresh lemon juice after baking to brighten the flavor. Both approaches work well; choose based on the rest of your menu.
If you are serving a crowd, prepare the seasoning blends in advance and store them in airtight jars. Label each jar with the date; the spices stay potent for up to six months.
Baking Techniques for Perfect Texture
Preheat the oven to 400°F (200°C) with a rack in the middle position. A fully heated oven ensures the skin starts crisping immediately. Place the prepared potatoes on the chosen surface—sheet pan, rack, or foil packets—and slide them in.
Bake for 45 to 60 minutes, turning once halfway through if they are on a flat pan. Turning promotes even browning on all sides. The potatoes are done when a thin knife slides into the center with no resistance and the internal temperature reaches about 205°F (96°C).
For an extra caramelized finish, increase the temperature to 425°F during the final 10 minutes. Watch closely; the sugars can go from golden to burnt quickly. If you used foil, open the packets for the last 5 minutes to let the skin dry out.
Another technique is the “low‑and‑slow” method: bake at 350°F for 75 to 90 minutes. This yields an exceptionally creamy interior because the starches have more time to gelatinize. The skin will be softer, so finish under the broiler for 2 to 3 minutes if you crave crunch.
Timing and Temperature Tweaks
Oven calibration varies, so use a reliable oven thermometer to verify the actual temperature. If your oven runs hot, reduce the set temperature by 15°F and check doneness a few minutes early. Conversely, a cool oven may need an extra 5 to 10 minutes.
Altitude affects baking time. At elevations above 3,000 feet, increase the bake time by roughly 10 percent and consider a slightly higher temperature (425°F) to compensate for lower atmospheric pressure.
When baking multiple trays, rotate the pans front to back and top to bottom halfway through. This prevents hot spots from over‑cooking one batch while another remains underdone.
For meal prep, you can par‑bake the potatoes at 375°F for 30 minutes, cool, then refrigerate. Finish them at 425°F for 15 minutes before serving. This two‑stage approach saves time on busy days and still delivers a fresh‑baked texture.
Serving Ideas and Pairings
Split each baked potato lengthwise, fluff the flesh with a fork, and add a pat of butter, a sprinkle of flaky sea salt, and a drizzle of maple syrup for the classic presentation. For a heartier meal, top with black beans, corn, avocado, and a dollop of Greek yogurt.
Sweet potatoes shine alongside roasted Brussels sprouts, caramelized onions, and a simple arugula salad dressed with apple cider vinaigrette. The peppery greens balance the sweetness, while the sprouts add texture.
For a breakfast twist, mash the baked flesh with a splash of milk, a pinch of cinnamon, and a spoonful of almond butter. Spread on whole‑grain toast and top with sliced banana and a sprinkle of chia seeds.
Leftover baked sweet potatoes can be turned into a creamy soup: blend the flesh with vegetable broth, a touch of coconut milk, and a pinch of curry powder. Heat gently and finish with a swirl of yogurt and fresh cilantro.
Storing and Reheating Leftovers
Cool the baked potatoes to room temperature within two hours, then transfer to an airtight container. They keep in the refrigerator for up to four days. For longer storage, place the whole potatoes (skin on) in a freezer‑safe bag and freeze for up to three months.
To reheat, the oven remains the best tool for preserving texture. Preheat to 375°F, place the potatoes on a rack, and heat for 15 to 20 minutes until warmed through. If you are short on time, a microwave on high for 2 to 3 minutes works, but the skin will lose its crispness.
For frozen potatoes, thaw overnight in the fridge before reheating. Alternatively, bake from frozen at 400°F for 30 to 40 minutes, turning once. The interior will be hot and the skin will regain a pleasant bite.
Troubleshooting Common Issues
Problem: Skin stays pale and soggy. Solution: Ensure the oven is fully preheated, pat the potatoes dry, and use a wire rack for airflow. A light coating of oil is essential for browning.
Problem: Flesh is dry or stringy. Solution: Choose moister varieties, avoid over‑baking, and consider the low‑and‑slow method. Adding a tablespoon of water to the foil packet creates steam that keeps the interior tender.
Problem: Burnt edges before the center is done. Solution: Lower the temperature by 25°F and extend the bake time. Turning the potatoes halfway also distributes heat more evenly.
Problem: Uneven seasoning. Solution: Mix spices with oil or butter first, then brush the mixture over the entire surface. For foil packets, sprinkle the blend inside before sealing.
Problem: Potatoes burst open. Solution: Pierce the skin adequately before baking. If a potato still splits, it is still edible; simply scoop the flesh and use it in a mash or soup.
Advanced Cooking Methods: Air Fryer, Convection Oven, and Outdoor Grill
An air fryer delivers a crisp skin in a fraction of the time required by a conventional oven. Preheat the basket to 390°F (200°C) for three minutes, then arrange the pierced potatoes in a single layer with a light mist of high‑smoke‑point oil. Cook for 30 to 38 minutes, shaking the basket halfway through to promote even browning. For larger tubers, cut them in half lengthwise before air frying; the exposed flesh will caramelize while the skin stays intact. A convection oven mimics the air fryer’s airflow on a larger scale. Reduce the standard 400°F setting by 25°F and expect a 10‑minute reduction in bake time. Place a wire rack on the middle shelf and rotate the pans front‑to‑back at the halfway mark to counteract hot spots. When cooking on an outdoor grill, set up a two‑zone fire: a hot direct zone for searing and a cooler indirect zone for finishing. Wrap each potato in foil with a pat of butter and a sprinkle of sea salt, then place on the indirect side for 45 minutes. Unwrap for the last five minutes over direct heat to develop grill marks and a smoky aroma. Adding a handful of soaked wood chips to the coals introduces a subtle wood‑smoke note that pairs well with fall spices. A toaster oven can handle a small batch using the same temperature curve as a full‑size oven; just monitor the internal temperature with a probe because the smaller cavity heats faster. For a hands‑off approach, a pressure cooker set to high pressure for 12 minutes followed by a quick release yields tender flesh that can be finished under a broiler for two minutes to crisp the skin. Each method has trade‑offs: air fryers excel at speed and crispness but limited capacity; convection ovens scale well for holiday crowds; grills add a unique smoky dimension but require weather cooperation. Choose the technique that matches your equipment, timeline, and flavor goals.
Curing and Aging Sweet Potatoes for Maximum Sweetness
Curing is the post‑harvest process that converts starches into sugars and heals minor skin injuries. Commercial growers hold roots at 80‑85°F with 85‑90 % relative humidity for seven to ten days. At home you can replicate this by placing clean, dry tubers in a cardboard box lined with a damp (not wet) towel, then setting the box in the warmest part of the house—often atop a refrigerator or near a heating vent. Check daily for condensation; excess moisture encourages mold. After curing, transfer the potatoes to a cool, dark storage area around 55‑60°F. This aging phase allows the newly formed sugars to concentrate further, resulting in a noticeably sweeter, more caramelized bake. The texture also improves: the flesh becomes creamier because the cell walls have softened during the warm, humid period. Edge cases include over‑curing, which can trigger premature sprouting or surface mold if humidity spikes. If you notice white filaments emerging from the eyes, move the tubers to a cooler spot immediately. Conversely, under‑cured potatoes retain a starchy, less sweet profile and may bake up drier. For gardeners who harvest early, a short two‑day cure at 75°F still provides a measurable sugar boost without the full ten‑day commitment. Keep a simple log noting harvest date, cure start, and cure end; this data helps you predict flavor development for future batches.
Creative Sweet Potato Puree Applications: Baking, Sauces, and Gluten‑Free Flour
Turning baked sweet potatoes into a smooth puree unlocks a pantry of possibilities beyond the dinner plate. After baking, let the tubers cool slightly, then scoop the flesh into a food processor. Add a tablespoon of warm water or unsweetened plant milk per pound of potato and blend until silky; the liquid adjusts consistency without diluting flavor. For baking, substitute one cup of puree for one cup of oil or butter in muffin, quick‑bread, or brownie recipes—the natural moisture reduces fat while adding subtle sweetness and a tender crumb. In pancake batter, replace half the flour with puree and add an extra teaspoon of baking powder to maintain lift. The puree also works as an egg replacer: three tablespoons of puree plus a pinch of baking soda mimic the binding and leavening of one large egg. For savory sauces, whisk puree with coconut milk, red curry paste, and lime juice to create a velvety curry base that clings to vegetables and proteins. A gluten‑free flour can be made by spreading puree thinly on a silicone mat, dehydrating at 135°F for eight to ten hours until brittle, then grinding in a high‑speed blender. The resulting flour adds a golden hue and mild sweetness to cookies, flatbreads, and thickening agents for soups. When using puree in yeast doughs, reduce added sugar by 25 % because the potato contributes its own. Store puree in airtight containers in the refrigerator for up to five days or freeze in portion‑sized bags for three months; thaw overnight in the fridge before use. Experiment with ratios—start with a 1:1 substitution for fats, then adjust based on texture preferences.
Scaling for Crowds: Batch Baking, Holding, and Service Logistics
Feeding a large gathering requires a plan that maximizes oven real estate and minimizes last‑minute work. Begin by calculating the number of potatoes: assume one medium tuber per guest plus a 10 % buffer. Use half‑sheet pans fitted with wire racks; each pan holds roughly twelve medium potatoes in a single layer. If your oven has three racks, you can bake thirty‑six at once. Stagger the loads: while the first batch finishes its final ten minutes at 425°F, slide the second batch into the oven at 400°F. Rotate pans front‑to‑back and top‑to‑bottom at the halfway point to even out hot spots. For holding, keep baked potatoes in a low oven set to 200°F, covered loosely with foil to retain moisture without steaming the skin. An insulated cooler pre‑warmed with hot water bottles can maintain temperature for up to two hours during transport. On site, set up a toppings station: bowls of seasoned butter, maple‑chipotle drizzle, toasted pepitas, crumbled feta, and fresh herbs. Pre‑split each potato lengthwise with a paring knife just before service; this speeds plating and lets guests customize. If oven space is limited, par‑bake the day before at 375°F for thirty minutes, cool, refrigerate, then finish at 425°F for fifteen minutes on the event day. This two‑stage method preserves a fresh‑baked texture while freeing the oven for other dishes. Edge cases include power outages—have a portable butane burner and a cast‑iron skillet as a backup for finishing a few potatoes at a time. Also, label each pan with the bake start time to avoid accidental over‑cooking when multiple batches rotate.
Global Flavor Profiles: Mediterranean, Asian, Latin, and Middle Eastern Twists
Sweet potatoes act as a neutral canvas that absorbs and amplifies international spice palettes. For a Mediterranean profile, brush the oiled skins with a mixture of extra‑virgin olive oil, za’atar, minced garlic, and lemon zest before baking. Finish with a drizzle of tahini‑lemon sauce (tahini, lemon juice, water, salt) and a sprinkle of chopped parsley. An Asian‑inspired glaze combines white miso, mirin, soy sauce, grated ginger, and a touch of honey; brush during the last ten minutes and garnish with toasted sesame seeds and sliced scallions. Latin flavors shine with a chipotle‑lime compound butter: blend softened butter, minced chipotle in adobo, lime zest, and cilantro, then melt over the hot split potato. Top with crumbled cotija cheese and a dollop of crema. For a Middle Eastern twist, whisk harissa paste, pomegranate molasses, olive oil, and a pinch of cinnamon; coat the potatoes before the final high‑heat burst. Garnish with pistachio dust, pomegranate arils, and a dollop of labneh. Each blend can be prepared in bulk and stored in jars for up to a month. When applying wet glazes, reserve the last five minutes of baking to prevent burning the sugars. For dry rubs, mix spices with a tablespoon of oil per pound of potatoes to ensure even coverage. Pair these global variations with complementary sides: couscous tabbouleh for Mediterranean, steamed bok choy for Asian, black bean salad for Latin, and spiced lentils for Middle Eastern. The result is a versatile centerpiece that travels across cuisines without leaving the fall comfort zone.
Frequently Asked Questions
Can I bake sweet potatoes without oil?
Yes, you can bake them dry, but the skin will be less crisp and the spices may not adhere as well. A light mist of cooking spray is a low‑fat alternative that still promotes browning.
What is the best way to tell when a sweet potato is fully cooked?
Insert a thin knife or skewer into the thickest part; it should slide in with no resistance. An instant‑read thermometer reading 205°F confirms doneness.
Can I prepare the seasoning blend ahead of time?
Absolutely. Store dry blends in airtight containers for up to six months. Wet blends with butter or oil should be used within a week and kept refrigerated.
How do I keep the skin crisp when reheating in the microwave?
Microwave reheating inevitably softens the skin. For a quick crisp, finish the microwaved potato under a hot broiler for 1 to 2 minutes.
Are there any nutritional differences between orange and purple sweet potatoes?
Both types are rich in beta‑carotene (orange) or anthocyanins (purple). They provide similar calories and fiber; the color indicates different antioxidant profiles, so mixing them adds variety to your diet.
Related posts:
 Sweet Potato Baking Guide
 Fluffy Sweet Potatoes: A Foolproof Recipe for the Perfect Side Dish
 Creative Sweet Potato Recipe Ideas: Beyond the Traditional Casserole
 Potato Milk: The New Plant-Based Milk Trend Taking Over
 Yams vs Sweet Potatoes: Key Differences
 Sweet Potatoes: All-Day Recipes
 Guilt-Free Cinnamon Roll Recipe
 When Do Potatoes Go Bad? Signs of Spoilage and Storage Tips